One of Matt Mullenweg’s announcements at the 2022 State of the Word was the addition of new taxonomies for the theme and plugin directories that will help users more quickly ascertain the purpose of the extensions they are considering.
With nearly 60,000 free plugins available and more than 10,000 free themes, it’s not always immediately evident which extensions are officially supported by the community and which have commercial upgrades and support available.
The new “Community” and “Commercial” designations were created to demystify the selection process and empower users to find plugins and themes that suit their needs. They were live on WordPress.org last week and plugin and theme authors were invited to opt into the categorization. The categories are visible in the sidebar of the listings.
In the example below, Akismet, Automattic’s commercial spam plugin that is bundled with WordPress, has the new Commercial category applied, indicating it is free but offers additional paid commercial upgrades or support.
The categories do not yet seem to be as widely applied to themes, but one example is all the default themes fall under the “Community Theme” designation, indicating that they are developed and supported by a community as opposed to being a part of a commercial endeavor.
There are currently just two categories, but meta contributor Samuel (Otto) Wood said this effort is “the start of a broader categorization of plugins and themes.” He outlined how plugin and theme authors can opt into the new categorization feature:
To opt in a plugin or theme, email plugins@wordpress.org, or themes@wordpress.org, and simply ask to opt into it. This is a manual process for now. In the future, we will be adding a method for plugins and themes to do it themselves.
Once your plugin or theme is added, you will get a new feature (on the advanced tab for plugins, or at the bottom of the listing page for themes). For both cases, it’s a simple URL entry.
For Commercial extensions the URL is a support link. Community extension URLs will be labeled as a contribute link.
Several participants in the comments of the announcement suggested that commercial-tagged plugins and themes should also have the option to include a “contribute” link since they are open source software. Wood’s response seems to indicate the URL is more about where to direct support.
“This is a matter of categorization,” he said. “Community plugins are those that are mainly supported by a community of users. Commercial plugins are those primarily supported by a commercial profit-seeking entity.”
Once these categorizations are more widely adopted, it will be interesting to see if the theme and plugin directories will add the ability to filter search results using these tags. This would allow users to narrow down the results to be in line with their expectations for support.
Block Protocol, a project that launched earlier this year that aims to build a universal block system, has announced a new WordPress plugin coming in early 2023. It will allow users to embed interactive blocks that are compatible with Gutenberg. Given WordPress’ footprint on the web (43% by W3Tech’s estimate), this plugin is a major milestone on the project’s roadmap for supporting a more interoperable and open web with blocks that can be shared through a standardized protocol.Â
The Block Protocol plugin will give users access to the global registry of interoperable blocks. These include interactive blocks for drawing, a GitHub pull request overview, a timer, calculation, and more. Once installed, users will see these blocks available in the inserter. The newest versions of the blocks are always available to users without having to update the plugin. Creators of the Block Protocol are also releasing a few new blocks alongside the plugin, including an OpenAI DALL-E-powered image generation block and a GPT-powered block for generating text.
This announcement comes just days after Matt Mullenweg’s 2022 State of the Word address, where he was asked about Gutenberg potentially collaborating with the Block Protocol project.
“Sometimes developers don’t like to work together on the same thing,” Mullenweg said in response to the question. “And so it’s part of why there’s like 200 CMS’s and stuff like that. Sometimes there might be a stylistic or a technical change that when you look at it, you say, ‘I can’t use this thing that exists. I’m going to start something that’s different.’ And I think that’s a little bit what’s happening with Gutenberg and the Block Protocol.”
Mullenweg confirmed that the projects have been communicating but were not able to get onto the same page.
“They feel like there’s some things, either choices in Gutenberg or ways we develop things, that just are incompatible with how they see it happening,” he said. “We’ll see where that goes in the future. We’ve tried to make it CMS-agnostic so it can be embedded in anything and re-skinned, like you saw with the Tumblr example, it can be totally different. Everything we’re doing is open, so I would hope that wherever they end up, Gutenberg blocks could maybe be embedded, if there’s a translation layer or something like that.”
Mullenweg sounded optimistic about the possibility of interoperability between Gutenberg and Block Protocol’s specification where users could copy and paste blocks across applications.
“Maybe they create something really cool, that’s open source,” he said. “And then we’re like, ‘oh, let’s bring that over to Gutenberg,’ so the innovation can flow both ways, and sometimes that’s only possible if you’re starting something from scratch.”
Since the Block Protocol project is open source and designed to be an open protocol, Mullenweg said he considers it “like a cousin project,” and hopes that WordPress can integrate more in the future.
“If not, that’s okay too,” he said. “Maybe this will just be an alternative ecosystem that can experiment with new ideas or maybe things we would say no to, they can try. And then we see how it’s adopted by users.”Â
The initial draft of the Block Protocol spec is being incubated by the team at HASH, an open source data, modeling, and simulation platform. HASH is using the protocol in beta. The current version of the spec will be deprecated as of v0.3, which is anticipated to arrive in February 2023 alongside the WordPress plugin.
“I obviously can’t speak to what Automattic are officially thinking about the Block Protocol, but we’ve been energized by the community’s continued interest,” HASH CEO David Wilkinson said.
“Thanks to WordPress’ open architecture we can prove out the Block Protocol first as a plugin, giving users today the ability to access Block Protocol blocks within WordPress, and build blocks themselves that work not only in WordPress, but in HASH and other Block Protocol embedders, as well. In time we think that the value in having a standard way to write blocks which work across apps will become self-evident.”
Wilkinson said WordPress was the most requested CMS from Block Protocol users, as it is the most widely used, but he also has a personal connection with the software.
“WordPress is near and dear to my heart,” he said. “I built my first websites with it, have worked with it for more than half my life (!), and have a huge amount of respect for the organization and operation behind it. It’s the obvious platform to start with.”
The Block Protocol team has received requests for support from users of more than 50 block-based applications, and the project is currently running a poll to help identify the next one on the roadmap.
Even though the Block Protocol and Gutenberg projects did not find an acceptable way to combine efforts, WordPress users will get the best of both worlds with the new upcoming plugin. At the moment, access to Block Protocol’s Hub of blocks doesn’t offer any functionality that is superior to what is found in core WordPress and other native block plugins. The addition of the OpenAI-powered blocks will help make it more compelling, and the protocol’s ability to work across apps may bring an influx of more interesting blocks in the future.
The Block Protocol is currently onboarding beta testers for the new WordPress plugin. Those who are interested can sign up for early access.
Fine tuning your website through manual optimization can be tricky, but our new Safe Mode feature in Hummingbird puts that problem in the rearview.
Now, you can now test optimization in a temporary area that allows for non-permanent changes, so you can work out any kinks, then push them to your live site. For free!
Introducing Safe Mode for Manual Asset Optimization – allowing you to optimize in a private space while your users still enjoy a fully functioning site.
In this article, we’re going to look at how Safe Mode in Hummingbird works, while touching on a few related features and settings in the plugin. Plus, we’ll take a look at an additional (surprise!) feature also included in this release.
Continue reading, or jump ahead using these links:
Hummingbird makes your website faster by optimizing site performance with fine-tuned controls. Setting enhancements make things easy and efficient, giving you new ways to boost PageSpeed Insights.
First, it identifies files that can be optimized (HTML, Javascript, and CSS), then offers a variety of means (compress, combine, or move) to make that happen.
The result gives you marked improvement in your website’s performance.
There are two different modes for asset optimization in Hummingbird:
Automatic – use our preset options to optimize your assets and improve page load times.
Manual – configure each file yourself to achieve the setup best suited to your specific site needs.
Drilling down even further, there are two options within Automatic Optimization mode:
Speedy – compresses & auto-combines smaller files together, and optimizes your fonts for faster delivery.
Basic – compresses all your files to deliver a faster version of each.
Automatic mode allows for a quick setup, providing positive gains without the time commitment that manual adjustment requires.
Both of the Automatic options can be configured for Files (CSS, JavaScript), and/or Fonts.
Hummingbird lets you optimize CSS, JS, and font files.
Manual mode allows you to tinker with any and every file individually, so you can optimize your site on a very granular level.
It’s a good idea to test files one at a time to measure results; that way if something doesn’t work it’s easy to identify what caused it and revert back without issue.
We’ve mapped out specific steps for what to do in each mode, so that you can easily follow along in Hummingbird and produce optimal results.
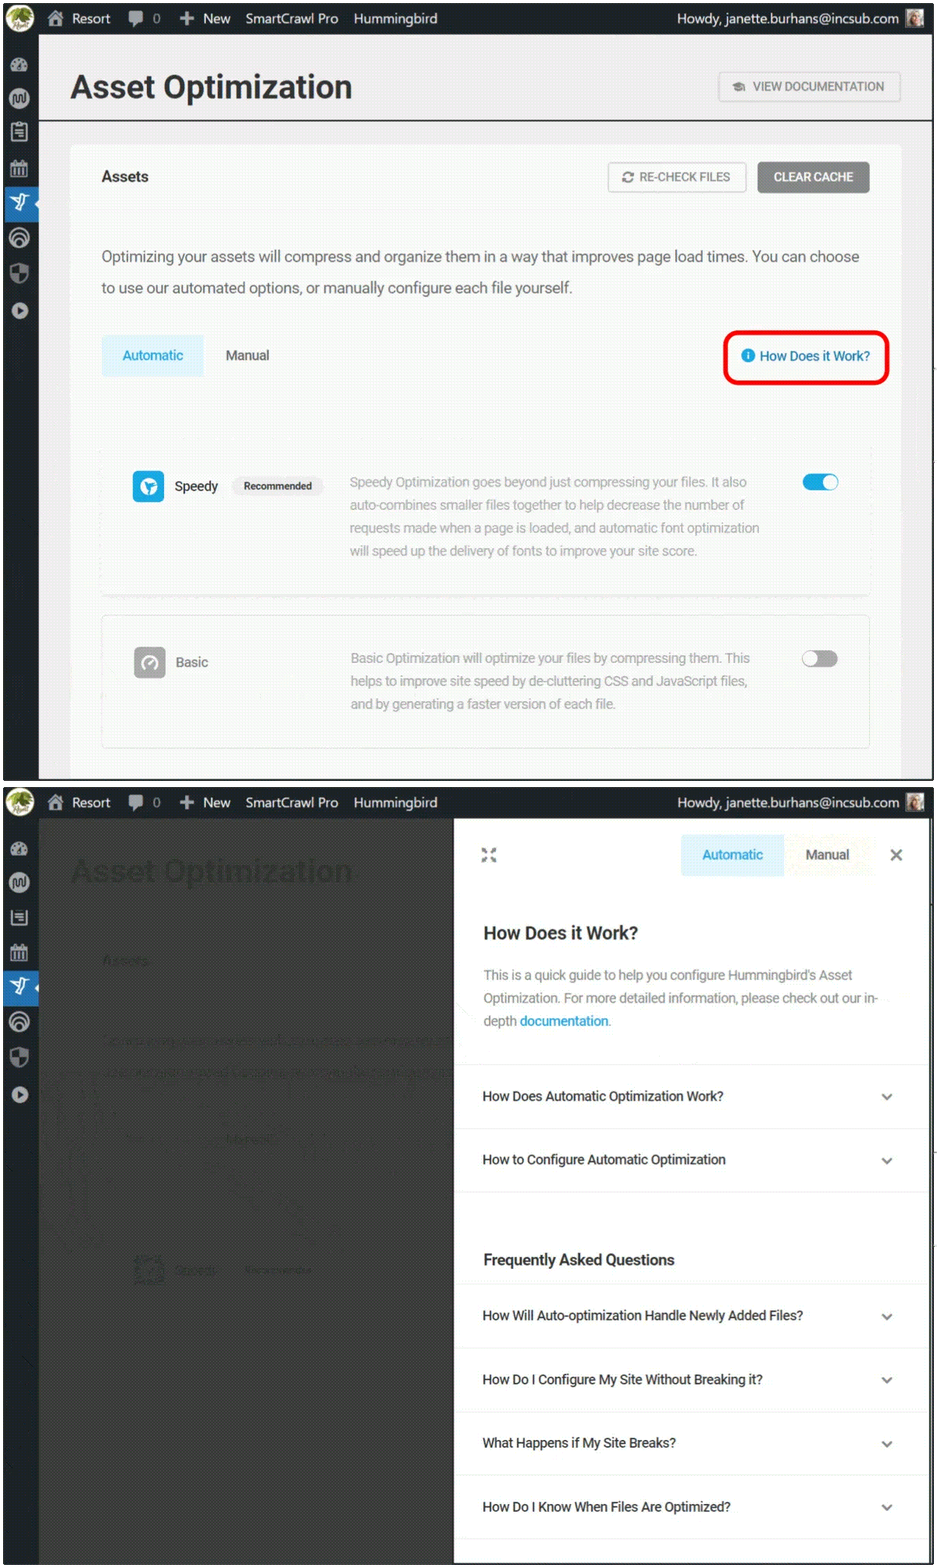
You can see these anytime by navigating to Hummingbird > Asset Optimization > Assets, then click on the How Does it Work? text at right.
There is a page for Automatic and one for Manual; just click on the corresponding header button that you’d like to read about.
Get one-click access to summarized details on both modes of asset optimization.
If you’re just starting out with Hummingbird, we recommend selecting Automatic optimization in Speedy mode to start. As you use and test your site and the plugin further, you can switch to auto basic or manual mode to check for possible improvements.
And of course, you can always view our detailed documentation, or reach out to our customer support gurus, available 24/7/365.
Testing Changes in Safe Mode
We’re going to zero in today on optimization done in Manual, as that’s where the new Safe Mode lives.
Hummingbird’s Safe Mode allows you to test different asset optimization settings in a safe environment, without affecting your website visitors’ experience.
You’ll be able to preview your site from the frontend and check for any errors in your browser’s console, then publish your changes to go live once you’ve got everything just right.
To enable this feature, go to Asset Optimization > Manual Asset Optimization, and click on the toggle button next to Safe Mode.
From here, you can also click on the filter icon, which will open a panel for finding files faster. You can free type or select from the dropdown menu.
You can filter to search for files while in Safe Mode.
When you’re in Safe Mode, clicking on any icon box will change its state.
You will see a solid outline around it, indicating it’s been selected, and a circular info icon will also appear on the far left of the row.
These visuals are to remind you’re in preview mode, and will remain until you click Publish, committing the changes you’ve made.
Visual cues will alert you to unsaved changes.
With Safe Mode enabled, you can start tweaking your files for peak optimization.
Each asset will have a status icon indicating its current state, and these vary based on the asset they’re attached to.
As an example, the Compress option can have the following states:
Gray icon – files that are already compressed
White icon – indicates which files can be compressed
Blue icon – New assets selected for compression
Can’t be compressed – marks files that can’t be compressed
Hover your mouse over any icon for a popup description of what action this change would make.
Need info on a particular icon? Just hover over it for a status popup.
To see the effect any change makes, click the Preview button.
The Preview button shows up once you turn Safe Mode on, taking the place of the Publish Changes button.
Hitting Preview will load the frontend of your site, where you can check on the asset optimization you configured, making sure it doesn’t generate errors or break anything on your site.
What our Preview page looks like in Hummingbird’s Safe Mode.
As you can see, the preview page has three clickable buttons at the top: Go Back, Copy Test Link, and Publish.
Click on Copy Test Link if you want to gauge asset optimization you’ve made using a third-party performance test. Just paste the copied text into your preferred tool.
Click on the Publish button if you’re content with the change(s) you made, and are ready to save.
Click on the Go Back button if you’ve gotten an error message, a site break, or had no observable performance improvements, so you can continue to tweak your assets further.
Once you’ve completed this exercise, turn Safe Mode OFF, as leaving it on can cause page load delays on your live site.
And there you go! Maximum optimization achieved, which is completely changeable at any time.
What’s The Other New Feature in Hummingbird 3.4?
There’s another new feature in the latest release that I wanted to mention, as it’s sure to make your search experience in Hummingbird better.
In the past, if you were working with a particular encrypted file from your performance test reports, locating it on the Manual Asset optimization tab by filename was a bit messy.
That was because Hummingbird generates special filenames for optimized files, and there was no direct way to find them there. Until now!
Copy filenames, then use Ctrl/Cmd+F to quickly find them in the browser search.
With this release, you can copy filenames from the performance reports, then look them up directly in the browser search in the Manual Asset Optimization tab.
This makes finding optimized files easier and faster.
Get Your Site Humming with Optimal Performance
Hummingbird is the ultimate performance suite for all users – whether you’re looking for simple, one-click solutions, or want to fine-tune your site performance down to the last CSS file.
You’ll get faster loading pages and higher search rankings and PageSpeed scores with Hummingbird’s speed optimization.
Now with Safe Mode for asset optimization, you can manually configure and test any files without worrying about a site break or interrupting the visitor experience on your site.
Hummingbird is only one of our highly rated and multi-functional Pro plugins. You can try them all – along with WPMU DEVs membership or hosting – for free! Everything comes with our money-back guarantee, fully supported by our always on-call, 5-star support.
We’ll help you keep your sites humming and your clients happy.
Fine tuning your website through manual optimization can be tricky, but our new Safe Mode feature in Hummingbird puts that problem in the rearview.
Now, you can now test optimization in a temporary area that allows for non-permanent changes, so you can work out any kinks, then push them to your live site. For free!
Introducing Safe Mode for Manual Asset Optimization – allowing you to optimize in a private space while your users still enjoy a fully functioning site.
In this article, we’re going to look at how Safe Mode in Hummingbird works, while touching on a few related features and settings in the plugin. Plus, we’ll take a look at an additional (surprise!) feature also included in this release.
Continue reading, or jump ahead using these links:
Hummingbird makes your website faster by optimizing site performance with fine-tuned controls. Setting enhancements make things easy and efficient, giving you new ways to boost PageSpeed Insights.
First, it identifies files that can be optimized (HTML, Javascript, and CSS), then offers a variety of means (compress, combine, or move) to make that happen.
The result gives you marked improvement in your website’s performance.
There are two different modes for asset optimization in Hummingbird:
Automatic – use our preset options to optimize your assets and improve page load times.
Manual – configure each file yourself to achieve the setup best suited to your specific site needs.
Drilling down even further, there are two options within Automatic Optimization mode:
Speedy – compresses & auto-combines smaller files together, and optimizes your fonts for faster delivery.
Basic – compresses all your files to deliver a faster version of each.
Automatic mode allows for a quick setup, providing positive gains without the time commitment that manual adjustment requires.
Both of the Automatic options can be configured for Files (CSS, JavaScript), and/or Fonts.
Hummingbird lets you optimize CSS, JS, and font files.
Manual mode allows you to tinker with any and every file individually, so you can optimize your site on a very granular level.
It’s a good idea to test files one at a time to measure results; that way if something doesn’t work it’s easy to identify what caused it and revert back without issue.
We’ve mapped out specific steps for what to do in each mode, so that you can easily follow along in Hummingbird and produce optimal results.
You can see these anytime by navigating to Hummingbird > Asset Optimization > Assets, then click on the How Does it Work? text at right.
There is a page for Automatic and one for Manual; just click on the corresponding header button that you’d like to read about.
Get one-click access to summarized details on both modes of asset optimization.
If you’re just starting out with Hummingbird, we recommend selecting Automatic optimization in Speedy mode to start. As you use and test your site and the plugin further, you can switch to auto basic or manual mode to check for possible improvements.
And of course, you can always view our detailed documentation, or reach out to our customer support gurus, available 24/7/365.
Testing Changes in Safe Mode
We’re going to zero in today on optimization done in Manual, as that’s where the new Safe Mode lives.
Hummingbird’s Safe Mode allows you to test different asset optimization settings in a safe environment, without affecting your website visitors’ experience.
You’ll be able to preview your site from the frontend and check for any errors in your browser’s console, then publish your changes to go live once you’ve got everything just right.
To enable this feature, go to Asset Optimization > Manual Asset Optimization, and click on the toggle button next to Safe Mode.
From here, you can also click on the filter icon, which will open a panel for finding files faster. You can free type or select from the dropdown menu.
You can filter to search for files while in Safe Mode.
When you’re in Safe Mode, clicking on any icon box will change its state.
You will see a solid outline around it, indicating it’s been selected, and a circular info icon will also appear on the far left of the row.
These visuals are to remind you’re in preview mode, and will remain until you click Publish, committing the changes you’ve made.
Visual cues will alert you to unsaved changes.
With Safe Mode enabled, you can start tweaking your files for peak optimization.
Each asset will have a status icon indicating its current state, and these vary based on the asset they’re attached to.
As an example, the Compress option can have the following states:
Gray icon – files that are already compressed
White icon – indicates which files can be compressed
Blue icon – New assets selected for compression
Can’t be compressed – marks files that can’t be compressed
Hover your mouse over any icon for a popup description of what action this change would make.
Need info on a particular icon? Just hover over it for a status popup.
To see the effect any change makes, click the Preview button.
The Preview button shows up once you turn Safe Mode on, taking the place of the Publish Changes button.
Hitting Preview will load the frontend of your site, where you can check on the asset optimization you configured, making sure it doesn’t generate errors or break anything on your site.
What our Preview page looks like in Hummingbird’s Safe Mode.
As you can see, the preview page has three clickable buttons at the top: Go Back, Copy Test Link, and Publish.
Click on Copy Test Link if you want to gauge asset optimization you’ve made using a third-party performance test. Just paste the copied text into your preferred tool.
Click on the Publish button if you’re content with the change(s) you made, and are ready to save.
Click on the Go Back button if you’ve gotten an error message, a site break, or had no observable performance improvements, so you can continue to tweak your assets further.
Once you’ve completed this exercise, turn Safe Mode OFF, as leaving it on can cause page load delays on your live site.
And there you go! Maximum optimization achieved, which is completely changeable at any time.
What’s The Other New Feature in Hummingbird 3.4?
There’s another new feature in the latest release that I wanted to mention, as it’s sure to make your search experience in Hummingbird better.
In the past, if you were working with a particular encrypted file from your performance test reports, locating it on the Manual Asset optimization tab by filename was a bit messy.
That was because Hummingbird generates special filenames for optimized files, and there was no direct way to find them there. Until now!
Copy filenames, then use Ctrl/Cmd+F to quickly find them in the browser search.
With this release, you can copy filenames from the performance reports, then look them up directly in the browser search in the Manual Asset Optimization tab.
This makes finding optimized files easier and faster.
Get Your Site Humming with Optimal Performance
Hummingbird is the ultimate performance suite for all users – whether you’re looking for simple, one-click solutions, or want to fine-tune your site performance down to the last CSS file.
You’ll get faster loading pages and higher search rankings and PageSpeed scores with Hummingbird’s speed optimization.
Now with Safe Mode for asset optimization, you can manually configure and test any files without worrying about a site break or interrupting the visitor experience on your site.
Hummingbird is only one of our highly rated and multi-functional Pro plugins. You can try them all – along with WPMU DEVs membership or hosting – for free! Everything comes with our money-back guarantee, fully supported by our always on-call, 5-star support.
We’ll help you keep your sites humming and your clients happy.
Spam on WordPress websites is an enduring part of the internet. It makes up nearly half of all email communications alone and, at one point, comprised around 70 percent of all emails. However, email isn’t the only area where you’ll need to deal with spam
Danny van Kooten, creator of the Mailchimp for WordPress plugin, has indicated that he is interested in selling his plugin for somewhere in the ballpark of €1.6M. It is the most popular Mailchimp solution for WordPress, although it is “unofficial” in that it is not developed by or affiliated with Mailchimp in any way. It has more than 2 million active installs and has been downloaded more than 42 million times.
It’s definitely not my passion but in 2013 I built a WordPress plugin around the API of a popular newsletter service and it’s been paying my bills ever since.
Still going strong at €36K per month excluding VAT.
There was (and still is) a huge market where non-technical people are looking for a GUI around something a programmer would find very simple (and usually too boring to work on). More so if the tech surrounding it is not particularly sexy, as is the case for WordPress and PHP.
Ps. In case anyone is reading this, I am open to selling. I spent about 4 hours a week on it and the rest is handled by 2 freelance people costing about €1K / month each. Contact me for details if interested and willing to pay in the ballpark of €1.6M.
van Kooten developed Mailchimp for WordPress when he was hospitalized in Vietnam due to acute appendicitis with extra time on his hands during his recovery. He identifies himself as an “accidental entrepreneur” in his Hacker News bio. In 2021, he was featured in Wired for his efforts in reducing his carbon output as a plugin developer. He refactored the plugin to send 20kb less data, and, due to its large user base, he estimates these changes reduced the world’s monthly CO2Â output by 59,000 kilograms, which Wired estimated is “roughly the equivalent to flying from New York to Amsterdam and back 85 times.”
Mailchimp for WordPress has commercial upgrades ranging from $59 – $149 per year, and 1% of the plugin’s revenue goes towards environmental projects.
Although Mailchimp recommends WordPress.com’s “Mailchimp block” as the official WordPress integration (also available in Jetpack 7.1+), van Kooten’s plugin is far more flexible. Mailchimp for WordPress integrates with other popular plugins like WooCommerce, Contact Form 7, Gravity Forms, Ninja Forms 3, BuddyPress, MemberPress, and Events Manager, allowing visitors to subscribe via the checkout or comments form.
Several commenters on van Kooten’s Hacker News response indicated interest in his offer for sale. His comment offers a a rare, transparent look into a popular plugin’s revenue and potential sale price, as most companies that acquire WordPress plugins are almost never willing to reveal how much they paid for them. As Substack moves to add compatibility for Ghost themes and other third-parties, and newsletters become even more critical with people leaving Twitter, it will be interesting to see more movement in the newsletter support space. van Kooten may be setting out at just the right time to find a buyer for Mailchimp for WordPress.
Jetpack has introduced a major update to its Form block in the latest version 11.6 release. Users can now interact with the various form templates as patterns.
A new quick start placeholder appears anytime users invoke a new form block. It displays a selection of the most commonly used form types as icons. Clicking on any one of the form templates will instantly add it to the block. From there, users can further customize the form fields and labels. It also displays a link to documentation on customizing forms and a link to view and export form responses.
Version 11.6 also introduces a patterns explorer, similar to the one found in the block inserter. Here users can see all available patterns fully expanded to better inform their decisions during the form creation process.
After testing, I found the pattern explorer to be a somewhat clunky way to view available form templates. In the default view they appear one at a time and expand to fit the explorer’s viewport. They are also difficult to scroll. Clicking on the grid style view, the patterns are easier to see but the design could be improved to better differentiate each pattern, as they all seem to run right into the next with faint borders around each.
Although I’m eager to see Jetpack iterate on the execution of these new ways to build forms, the placeholder and pattern explorer undoubtedly help users get started faster than trying to build a form from scratch in the block editor.
Other notable updates in this release include SEO improvements that allow users to have more granular control over how their content is presented (or not presented) to search engines. In the Jetpack SEO panel, users can now exclude that specific post or page from being indexed, while allowing the content to remain publicly accessible. Users can also now set a custom SEO title for posts and pages that will show in the search snippet and browser tab.
One of the biggest problems that store owners face is cart abandonment. Even if the right customers are viewing your products, they could add items to their carts and leave your site without making a purchase.
Fortunately, you can use abandoned cart recovery plugins to remind customers that they left products in their carts. These tools can help you boost sales and prevent users from turning to your competitors.
In this post, we’ll explain the benefits of using an abandoned cart recovery plugin. Then, we’ll recommend some of the best options on the market. Let’s get started!
Why You Should Consider Using an Abandoned Cart Recovery Plugin
Even if visitors place your products in their shopping carts, there’s no guarantee that they’ll purchase them. In fact, eCommerce stores have an abandoned cart rate of about 70 percent.
There are several reasons why customers abandon their carts. These include surprise costs like expensive shipping options or extra fees. Unexpected charges can cause customers to leave your store and do their shopping elsewhere.
Another possible cause of a high cart abandonment rate is an inefficient checkout page. If you don’t make it easy for customers to purchase a product, they likely won’t complete their orders. Therefore, you’ll want to provide a smooth checkout experience.
However, even after taking the necessary measures, you may notice that your online store still has a lot of abandoned carts. In this case, you can use an abandoned cart recovery plugin to encourage second visits.
If customers were initially window-shopping, a reminder email can prompt them to purchase the items they wanted. The right tool can help you track your customers’ carts and send messages about abandoned items. By following up with customers, you can help decrease your abandoned cart rate.
3 Best Abandoned Cart Recovery Plugins for WooCommerce
Once you decide to start targeting customers who have incomplete purchases, you’ll need to find the right tool for the job. Fortunately, many WordPress plugins are designed specifically for abandoned cart recovery. Let’s look at some of the best options on the market.
1. Metorik
If you’re having trouble tracking your customers and their abandoned carts, Metorik can be a useful tool. This plugin provides extensive reports for your revenue, orders, customer retention, and much more. Plus, you’ll be able to view your most-abandoned products and which customers were interested in them.
Once a visitor places an item in a cart, Metorik starts tracking it. If the cart is abandoned, you can send automatic email reminders with discounts to increase completed purchases. Then, the Metorik dashboard will display your new recovery rates and conversion stats.
Integration with Google Analytics, Zendesk, WooCommerce, and more
Pricing: Metorik is a free WordPress plugin. However, you’ll need to connect it with a Metorik account. Registration starts at $50 per month, but you can also sign up for a 30-day trial.
2. Retainful
During the abandoned cart recovery process, you’ll send emails to customers to encourage them to revisit your store. Retainful enables you to automate these email campaigns.
This plugin offers an easy way to contact customers, thanks to its pre-designed email templates and a drag-and-drop editor. It also enables you to show pop-up windows to visitors who are about to abandon the checkout page. By including one-time coupon codes, you can grab a customer’s attention and incentivize them to complete their purchase.
Key features:
Reports on when live carts are abandoned and recovered
Pricing: Retainful has a free plan that supports abandoned cart recovery, 500 emails per month, and up to 300 contacts. If you need to extend these features, the premium version starts at $19 monthly.
3. Abandoned Cart for WooCommerce
Abandoned Cart for WooCommerce is another plugin that sends messages to customers after incomplete purchases. After a user clicks on the add-to-cart button, they can enter their email, phone number, or Facebook account details. If they abandon their items, they’ll automatically receive reminder messages.
To quickly create a workflow, you can choose one of the pre-designed abandoned cart email templates. Alternatively, the rich text editor enables you to create new templates by copying and pasting HTML. Then, you can use merge tags to personalize the emails with details about the customer and product.
Automated reminder emails, texts, and Facebook messages
12 WooCommerce abandoned cart email templates
Option to apply discounts and coupon codes
Integration with Mailchimp, Drip, Sendinblue, and more
Pricing: Abandoned Cart Lite for WooCommerce is free to download. The premium version starts at $149 per year and includes abandoned cart email templates, coupon codes, and pre-built workflows.
Bonus: Live Cart by WP Engine
It won’t matter if you bring customers back to their carts if your site is bogged down with cart fragments. Though necessary for performance, cart fragments can slow down your site, especially during high-traffic events such as the holidays.
Because they constantly have to be running to power parts of your cart, namely “add to cart” or live inventory numbers, the rest of your pages like “About Us” or “Contact” can become slower.
In favor of site speed, many developers opt to disable them altogether, but WP Engine customers have access to a better solution, Live Cart.
Live Cart makes sure those fragments are only running when needed. Simultaneously optimizing your cart and site speed. It comes built into all WP Engine eCommerce plans.
Conclusion
Even with the right advertising methods, customers could still leave your products in their carts. With the right tools, you can target these visitors and contact them with discounted offers. By simply reminding customers about their abandoned carts, you can increase your number of completed orders.
To review, here are some of the best abandoned cart recovery plugins for WooCommerce stores:
Metorik: A cart-tracking tool that identifies commonly abandoned products, recovery rates, and conversion stats.
Retainful: An email marketing plugin with a drag-and-drop editor, pre-designed abandoned cart email templates, and exit pop-ups.
Abandoned Cart for WooCommerce: A useful plugin for sending emails, texts, and Facebook reminders to customers who abandon their carts.
Do you have any questions about the abandoned cart recovery plugins featured in this post? Let us know in the comments section below!
ChatGPT passed 1 million users today and Twitter is brimming with a steady stream of creative questions and applications for the AI-powered chatbot. The language model, created by OpenAI, is powered by GPT-3.5, a series of models trained on text and code from before Q4 2021. The model features a dialogue format that gives ChatGPT the ability to “answer followup questions, admit its mistakes, challenge incorrect premises, and reject inappropriate requests.”
While some are busy predicting the end of search engines and sounding the death knell for human-generated writing, others are fascinated by the potential of AI systems to fundamentally reshape the process of creation. WordPress developer Johnathon Williams brought this close to home when he asked ChatGPT to spin up a WordPress plugin.
Ordinarily, plugin creation is a task that requires a certain level of technical proficiency. Williams demonstrated that, with a little bit of expert guidance, ChatGPT can drastically reduce the amount of time it takes to extend WordPress.
ChatGPT wrote a working WordPress plugin for me today on the first try.
Custom menu item, custom admin screen, saving a custom options value, validating the field before saving …
Williams installed the plugin and found that it worked on the first try. Although he didn’t save the prompt for this first try, he published a gist on GitHub of the generated code.
On a second attempt of creating a different plugin, he used the following prompt:
Create a custom WordPress plugin called “Big Daddy Media” that deletes images older than one year from the media library. OOP. Custom admin screen. one button delete. log the full URL of all deleted media files.
He published a screen recording of ChatGPT at work creating the plugin:
Open AI's ChatGPT can generate an entire WordPress plugin based on a simple description.
Williams said that although he’s had mixed results with his prompts, he has gotten the best results from asking ChatGPI to generate entire functions versus specific filters or actions.
Theoretically, with additional training on plugin best practices and common architecture, ChatGPT could be used by people of all skill levels to extend WordPress in creative ways.
“Very soon, describing the WordPress plugin you need to ChatGPT will generate a new one faster than searching for an existing one in the plugin directory,” Williams said. “This won’t be true for all types of plugins, of course. But for relatively simple plugins performing established tricks … well *very soon* should probably read ‘right now.’”
WordPress Core Committer Jb Audras, CTO of the France-based Whodunit agency, has released two new accessibility plugins in cooperation with Guillaume Turpin, another developer on the Whodunit team. These are small “micro” plugins developed to fill gaps in the block editor’s accessible content creation experience.
The first plugin is called Lang Attribute for the Block Editor and is important for content that is written in multiple languages. It allows content creators to indicate language changes using the lang attribute so that those using assistive technologies will get the correct presentation and pronunciation rules for the specified language. This plugin helps WordPress sites meet the requirements of the WCAG Success Criterion 3.1.2 “Language of Parts.”
video source: Jb Audras
With the plugin installed, content creators can highlight text and then find the language attribute in the block toolbar to edit it.
“It’s worth noting that indicating language changes in content is mandatory for WCAG compliance, and there is currently no way to do that in the Block Editor (except by editing the code manually),” Audras said when introducing the plugin on Twitter. “I think this feature should be implemented natively into Gutenberg.”
The WCAG identify a few types of visitors who may be helped by the Abbreviations, including those who have difficulty decoding words, those who rely on screen magnifiers, have a limited memory, and those who have difficulty using context to aid understanding.
video source: Jb Audras
The abbreviation tag can also be found in the block toolbar, so users can highlight any text for which they want to provide the expanded form of the abbreviation.
Both the Abbreviation Button and the Language Attribute plugins are available for free in the WordPress plugins directory. The plugins’ creators hope that some of this functionality can eventually be added to the block editor, but in the meantime users can install the plugins to create more accessible content that meets accessibility guidelines.