With AI rapidly advancing its design capabilities, and new AI design tools emerging every week, now is the time for web developers to get educated on, and take advantage of, the once-futuristic opportunities that are arising in the industry. To help get you started, we’ve collated 10 of the best AI design tools for WordPress.
We recently talked about how AI will affect the WordPress industry, and when it comes to design, it’s becoming a real game-changer: Artificial Intelligence help is at hand for all aspects of creation – from images and animations, to web design and more.
So, without further ado, here is our list of hand-picked (and seriously top-notch) options that are available now:
Please note that none of these are affiliated with us (WPMU DEV). We just found them to be excellent choices based on our research.
Also, we realize and acknowledge the controversy with AI at the moment. Any art or work used without compensation for or permission from the original artist is one area where AI can be deemed unethical. So, it’s essential to understand how to use AI art as ethically as possible.
It’s up to you to decide how to handle the ethical question and who to go with. Obviously, AI ethics, copywriting, and legalities are still being sorted out with this new technology.
(Worth mentioning here that if you’ve got design work to be done and you’d rather stick with humans at the helm, check out our Agency Partners directory. You’ll find a whole host of amazing options at the ready!)
With that being said, AI thinks it’s time to begin…
Best AI Design Tools
Designs.AI
For a lot of design aspects, Designs.ai has you covered!
With its logo maker, Designs.AI uses 10,000+ icons from its library to create a logo suitable to your needs. It analyzes your brand information and, from there, will generate a logo. Opt for a complete brand identity package, including your logo, brand narration, business card mockups, and more.
One prominent feature is that it includes a logo editor, so it’s simple to customize your logo accordingly.
Regarding its video editing capabilities, Designs.AI can convert text to videos. It updates a library of fully licensed assets based on what you want. From there, you can edit however you’d like.
Finally, for design, its design maker is based on imputed text and a selected template. There are thousands of variations, custom fonts, and layout suggestions. Plus, you can resize your text and content in just a few clicks.
Bertha.AI
Bertha AI is a popular up-and-coming AI WordPress plugin.
Bertha AI does a number of things, but when it comes to design, it can create images based on image descriptions with its Bertha Art feature.
You choose what styles you want to use for painting and images. Likewise, you can resize and adjust images however you want.
It’s a plugin that works well with the major page builders (e.g. Divi, Elementor) and is a tool used for cross-functionality of writing and art for your WordPress designs.
The designs are created for banners, images in your web content, and blog articles. Additionally, you can use Bertha.AI for your brand imaging.
10Web
10Web can assist with design layouts with the help of AI.
With 10Web, you can easily convert any website (e.g. Wix, SquareSpace) with the help of AI. It works by adding the URL of the site layout, and AI copies the layout, design elements, and content.
This saves hours of time and effort by simply having AI replicate a site, and then you can edit from there. The editing works with the 10Web platform, which is based on Elementor (you can read more about the process here).
It’s a headstart for website creation, starting with a few questions about your business. Then, AI generates content and images based on your answers.
And hey, it’s bound to save you time because this AI-powered WordPress platform can automate website building, hosting, and more in just a few minutes.
CodeWP
For coding that helps with design, CodeWP might be precisely what you need.
CodeWP works by asking its AI generator for help with anything, and it will create something for you. That includes WP_Queries, complex workflows, WooCommerce PHP – practically any snippet you need, which can overall help design function for your WordPress site.
The CodeWP system allows you to save, export, and share snippets publicly or with specific users. Once snippets are created, you can also easily manage and browse them.
It’s a great software option to eliminate Google searches and wasted time on trial and error. If you’re not a developer, it works as a helpful mentor. Or, if you are a developer, you can maximize your efficiency.
CodeWP AI is trained specifically for WordPress and WooCommerce, making it a perfect solution for backend building for your design functionality. Additionally, it’s rapidly growing, with new features every week.
Adobe Sensei
Adobe is no stranger to the WordPress community.
Adobe Sensei works to deliver the perfect customer experience by using AI. It helps developers and designers create easier, make informed decisions, and use target marketing technology.
Sensei optimizes and scales experiences with real-time intelligence regarding informed decision-making. Plus, it can predict customer behavior based on attributes, differences, and conversion factors.
When designing, you can create essential edits quickly and accurately, find the right content with intuitive search, and achieve photorealistic effects.
Sensei helps take the guesswork out of your advertising when creating a website promoting products or services.
GPT AI Power
GPT AI Power is an AI plugin that can enhance your designs.
GPT AI Power is an AI plugin that generates customizable images, content, and forms.
One unique aspect of GPT AI Power is that it features integration in posts and includes a playground for testing. You can train your chatbot with your content and products.
The image generator uses content from OpenAI’s DALL-E and Stable Diffusion. You can create hundreds of configurations and customize the images according to your needs.
Additionally, there are a ton of content generators for blogs, languages, tone, product writing – and more.
AutoDraw
Simplistic — but effective.
AutoDraw is a straightforward tool that can create images based on what you’re trying to draw. Plus, it uses in-house artists – which is great ethically.
Though simplistic, you can easily design images that might fit well with whatever design you’re trying to create for WordPress. It pairs machine learning with drawings that can be done on a tablet, smartphone, or laptop – any device that allows you to make images.
It has a suggestion tool that uses the same technology as QuickDraw – to analyze and guess what you’re trying to create. Plus, you can contribute your drawings to them if you allow them permission.
Deep Art Effects
For some significant image enhancement, Deep Art Effects can do wonders.
Need to create unique images for your website? Deep Art Effects can turn photos into art with just a few clicks. It enables you to edit the background or foreground using a variety of parameters.
Brush size and styles can be altered however you want, based on your favorite artists. They have 120 pre-installed art styles so you can use their application offline.
It will even color grayscale images automatically. For example, if you have an old black-and-white photo or video, you can bring it to life with its AI colorization technology.
Let’s Enhance.io
An excellent way to enhance images is Let’s Enhance. Let’s Enhance is an image enhancer and upscale that uses AI to increase image resolution without losing quality. Its intelligent algorithm will expand images to customized dimensions, all while optimizing the texture, tone, color, and clarity.
It works by choosing a desired output size. This is perfect for a WordPress eCommerce website so users can zoom in and out with high-quality images.
With Let’s Enhance, you can save time with its automated preset feature. This is perfect for real estate, eCommerce, or any website with multiple images that need to be similar.
Also, its Smart Enhance feature allows you to clean up your images by making them clearer while maintaining their size.
Claid.AI
Claid.AI was created by Let’s Enhance.
For businesses and creating content that converts, Claid.AI is a great tool to use. You can automate image creation and boost your business with the help of these AI products.
For your brand, you can create multiple product images that are suitable. It will take boring, simple pictures and make them stand out by boosting their quality. Also, you can be consistent with uniform backgrounds and frames.
With Claid.AI, you can change a few variables to control and enhance your images, saving you time and money.
Design with AI
As this post is published, new and emerging AI technology for design and WordPress is in the works. It seems that almost daily, some innovative AI feature appears. So, we’re bound to expand on our 10 recommendations. However, hopefully this article has helped spark some initial ideas that you can use with AI’s help.
Be sure to regularly check our blog for the latest updates regarding AI – for, as new AI technology keeps emerging in the WordPress spectrum, so too will new AI-related articles keep being published on our platform!
Are you looking for ChatGPT prompts ideas to improve blog and marketing strategy?
ChatGPT prompts are the instructions that you type in ChatGPT AI to speed up your workflow. You can use ChatGPT to draft social media posts, come up with blog post ideas, and so much more. The key to getting best results with AI is to make your ChatGPT prompts better and more specific.
In this article, we’ll share the best ChatGPT prompt ideas for bloggers, marketers, and social media, so you can improve your marketing results.
This article will cover a lot of topics, so you can click on any of the links below to jump to a particular section that best suits your needs.
A ChatGPT prompt is the starting point of a conversation in the form of a question or instruction given to an AI language model like ChatGPT.
ChatGPT is an AI-based software that uses machine-learning technology called Natural Language Processing.
To see it in action, you need to sign up for ChatGPT by visiting the OpenAI website.
After that, you’ll see a simple chatroom. At the bottom, you can input your prompt in plain language.
For instance, ‘How old is the Universe?’ and hit the send button.
ChatGPT AI will then respond to your question in plain language.
The answer length and style may vary based on the prompt you entered.
Writing better prompts allows AI to narrow down its approach and provide you with more specific details.
If you want to start a blog, then ChatGPT can help you find article ideas, the article outline, rough drafts, SEO optimization, proofreading, research, and more.
Many bloggers and marketers are exploring opportunities to generate content ideas using AI.
By learning some quick prompt ideas, you can speed up the process and unlock maximum benefits from ChatGPT AI to improve your workflow.
Note: ChatGPT and other AI apps are usually not able to create content that can be simply copied and pasted without any human edits. When you use an AI tool, be sure to go through the results thoroughly to be sure that all information is correct and that the messages are appropriate for your audience.
How to Write Better ChatGPT Prompts?
ChatGPT uses natural language processing which means you can write your prompts in a plain conversational style.
For instance, instead of typing a smaller sentence, you can instruct GPT on how to respond, which style to use, length limitations, ask for examples, and more.
Instead of asking ‘What is Marketing?’ a better prompt would be:
‘Write an essay on marketing for beginners, in a 1 3 1 format, emphasize the role of social media and search engine marketing, and persuade users to have a positive image of search engine marketing.’
While writing your prompts in natural language might seem really simple, many beginners may still be unsure about where to start. It can take a lot of practice to find a style of prompt that works best for your projects.
That being said, let’s take a look at some easy and quick ChatGPT prompt ideas bloggers and marketers and marketers can use to succeed.
Using AIPRM Extension to Generate ChatGPT Prompts
The easiest way to generate ChatGPT prompts is by using AIPRM for ChatGPT.
It is a Google Chrome browser extension with a curated list of ChatGPT prompts for SEO, blogging, content creation, and marketing.
Go to the AIPRM for ChatGPT extension page on the Chrome web store and then click the Add to Chrome button.
Once the extension is added to your browser, it will automatically take you to the ChatGPT website.
If it doesn’t, you can click on the extensions button in your browser menu and click on the AIPRM for ChatGPT to launch it in a new tab.
You’ll need to sign in to your OpenAI account. After that, you will see a curated list of ChatGPT prompts.
At the time of writing this article, AIPRM had 1600+ ChatGPT prompts.
You can browse the prompts by Topic and Activity, sort them, or search for specific prompts from the top toolbar.
To use a prompt, simply click on it and it will appear in the prompt toolbar below.
If the prompt you are using requires user input, then you can provide it in the chatbox.
For instance, here it wants us to enter a keyword that we would like to target to make a content calendar.
You can also choose language, style, and tone for your response.
Hit the enter button after entering your input and ChatGPT will respond to the prompt.
You can regenerate a response or ask ChatGPT to modify or extend it by adding your instructions into chat.
You won’t be able to see the prompt that AIRPM uses at first. However, refreshing the page or switching back and forth between chats will reveal the actual prompt at the beginning of the chat.
AIPRM makes it extremely easy to find detailed, tested, and well-written prompts that you can use on your WordPress website.
Best ChatGPT Prompt Ideas for Bloggers and Marketers
With so many prompt ideas available with AIPRM extension, it could still be a bit overwhelming for users to find or use a prompt.
Here is our top pick of the most useful ChatGPT prompt ideas for blogs, SEO, and marketing.
Blogging ChatGPT Prompts
1. Generate a month-long content calendar targeting specific keywords.
“Make me a month-long calendar for the following keywords [Enter Keywords here]. Add [number of articles] articles each week, and use persuasive SEO-friendly titles for each article.”
2. Generate Blog Post Ideas
“Create a list of at least 10 blog post ideas on the following topics: [Enter topics separated by commas]. Suggest SEO-Friendly title for each post, and use an emotional and persuasive tone in post titles.”
3. Generate SEO title and meta description for a blog post
“Suggest at least 5 SEO-friendly titles and meta descriptions for the following blog post [Enter your blog post text here]. Use a persuasive and intriguing tone.”
4. Suggest tags for a blog post
“Suggest at least 5 tags for the following blog post [Enter your blog post text here].”
5. Generate related long-tail keywords for a blog post
“I want you to generate a list of long-tail keywords that are related to the following blog post [Enter blog post text here].”
6. Create an article outline
“Write an article outline for the following topic [Enter topic or blog post title here].”
7. Write an article on a specific topic
“Write an article on the following topic [Enter topic here]. The article should be at least [number of words] words in length. Use a persuasive tone and pretend to be an expert on the topic.”
8. Outrank a competitor for a specific keyword
“Write an article based on the topics covered in the following article [Enter competitor URL here]. Make the article more comprehensive than the URL provided by adding details that the source URL has missed or didn’t cover. Answer the most commonly asked questions about the topic at the end of the article.”
9. Write a motivational blog post
“I want you to write a motivational blog post about overcoming [fear/failure/challenge goes here].”
10. Generate call-to-action ideas
“I want you to come up with 5 effective call-to-action button ideas based on the contents of the following URL [Your website or landing page URL goes here].”
11. Generate a pros and cons outline for a topic
“Write down an essay on the pros and cons of [Your topic goes here].”
12. Write questions for an interview blog post
“Write interview questions for a blog post with [Guest Name] who is an expert in [Guest profession or area of expertise].”
13. Proofread a text and optimize it for the focus keyword
“I want you to act as SEO editor and copywriter. I need you to proofread and analyze the following text and optimize it for the focus keyword. I also need you to correct any grammar mistakes you find in the article. Ask me to provide you with the article text and focus keyword.”
14. Reuse a blog post for social media content
“I want you to act as a topic authority and social media influencer. I will provide you with the text or URL of an article. You need to summarize it and create content for social media platforms. Ask me to provide you with the text or URL of the article.”
15. Generate a list of tools to mention in a blog post
“Create a list of the most popular tools used by the [Field of Interest] professionals with the pros and cons of each tool.”
16. Write a conclusion for a blog post
“I want you to pretend to be a topic expert, and write a persuasive conclusion for the following blog post. [Your blog post text goes here].”
17. Come up with best practices for using something
“Pretend to be a topic expert and write down an essay on the best practices to follow when using [mention the tool or topic here].”
18. Write a comparison blog post
“I want you to pretend to be a topic expert and compare [Item 1] vs [Item 2] with pros and cons. I need you to show that [item 1] is better than [item 2] and persuade the reader to have a positive feeling about [item 1].”
19. Build reader personas to learn more about a target audience
“Build a reader persona for a blog post titled “[Your blog post title goes here].”
20. Polish your content to look more creative
“Analyze and improve the following content to make it more creative. Use an [Select tone style] tone and write in a casual and conversational style. “[Your content goes here]”
Social Media ChatGPT Prompts
21. Generate captions for Instagram posts, reels, and reels.
“Write an Instagram post description or caption using a few sentences for the post about “[Enter a description of what your Instagram post is about]”. Start the caption with an intriguing sentence and don’t make the first sentence a question. Use emojis in each sentence and add a paragraph after two sentences to make it more readable. Add the most popular hashtags related to the post.”
22. Write an Instagram post about a product / service
“Write an Instagram post promoting [product/services] using a few sentences. Start the post with a captivating sentence and end with a sentence including a call to action to check the link in bio. Use emojis and add the related hashtags at the bottom.”
23. Generate Instagram carousel ideas with slide descriptions
“Write me an Instagram carousel topic idea example. Also, write slide by slide with titles. Explain each slide with the exact content example I should use, not instructions. Also, give me images for every slide that explain all the titles for [Your Instagram Carousel Topic Here]. Do not include content instructions, instead, only write me an actionable text that I can just copy and paste.
After writing the carousel slides. Write me the Instagram post description/caption in just a few sentences. Format every new sentence with new lines so the text is more readable.
Include emojis and the best Instagram hashtags for that post. The first caption sentence should be intriguing and captivating to the readers.”
24. Write Twitter Bio
“I want you to write an interesting Twitter bio for a [Your brand niche and industry / Profession ].”
25. Suggest Twitter Header Image Ideas
“Give me at least 5 ideas to create a Twitter header image for a [Profession/Industry niche].”
26. Generate Tweets for a specific profession, niche, or business
“I want you to act as a social media manager and come up with at least 20 Tweets for a [Profession/ Business niche or industry] include popular hashtags in each tweet.”
27. Generate a viral Twitter thread
“I am looking for a Twitter thread idea that will go viral and showcase [mention your service, product. or blog] to the ideal customer persona in a creative and engaging way. Include hashtags and emojis in each tweet.”
28. Generate a Twitter content strategy
“I need you to act as my social media manager promoting [Describe your business or brand and what it does]. Generate a Twitter content calendar for the next two weeks. Generate at least three tweets for each day targeting relevant customer persona. Include hashtags and emojis in each tweet.”
29. Generate YouTube Video Description
“Write a unique and intriguing description for a YouTube video titled [Enter your video title here]. Pretend you are an expert on the niche and give your personal best advice in 1st person. Explain why you thought sharing this video would be useful and what users will get out of watching this video.”
30. Generate an entire YouTube video script
“Create an attractive and captivating YouTube video script that is informative. I want you to create a persuasive headline, write a video description repeating keywords used in the headline, cite relevant keywords and tags, create the youtube video script and suggest ideas for a persuasive thumbnail to use for the video, from the following description: [Your video description].”
31. Create thumbnail Ideas for Your YouTube video
“Give me at least 3 ideas for creating an interesting and persuasive thumbnail for a YouTube video using the following description: [Enter your video description].”
32. Generate a YouTube content strategy with video ideas
“I want you to act as my social media manager promoting [mention your brand and what services or products it offers] and come up with a content calendar for our YouTube channel. Give me a monthly calendar of posts with at least one video each week. Suggest video ideas with detailed descriptions of what that particular video will be about. Include keywords and hashtags for each video.”
33. Generate a LinkedIn content calendar with post ideas
“I want you to act as my social media manager for my [Explain your business, brand, profession, and what you typically write about]. I need you to create a month-long content calendar with at least one post each day. Write the post for me including the relevant hashtags and use emojis. Write posts specifically for LinkedIn. My target audience is [companies/professionals interested in my brand product or services].”
34. Write a LinkedIn About section
“I want you to act as my social media manager for my [Explain your business, brand, or profession and what you usually post about]. Give me at least 5 examples of an interesting About section for my LinkedIn profile.”
35. Write a caption for Facebook Photo
“I want you to act as my social media manager and write at least 5 captions for a Facebook photo about [explain what the photo is about]. Use hashtags and emojis in the caption.”
36. Write a Facebook Ad Copy
“I want you to act as a professional copyrighter with experience in writing high-converting Facebook ads. I want you to write a Facebook ad copy for the following products/services [Describe your brand name, products and services you offer]. Produce ad copy that is between 100-150 words, with an attention-grabbing headline and a strong call to action that persuades users to take action. I want you to research the potential target audience and optimize the ad copy so that it appeals to that particular target audience.”
37. Plan a Facebook content strategy
“I want you to act as my social media manager promoting [explain your business brand and what you offer]. I need you to provide me with a two-week content calendar for Facebook posts that are highly engaging and generate emotional responses from the readers. Add one post for each day, using hashtags and emojis.”
E-Commerce ChatGPT Prompts
38. Write an eCommerce product description
“I want you to pretend that you are an eCommerce SEO expert who writes compelling product descriptions. I will provide you with one product title and I want you to come up with three distinct content sections for product description, each section should have its own headline.”
39. Write an eCommerce product short description
“I want you to pretend that you are an eCommerce SEO expert who writes compelling product descriptions. I will provide you with one product title and I want you to come up with a short product description of between 250-300 characters.”
40. Generate product ideas for your eCommerce store
“I want you to pretend as a product specialist for an eCommerce store with a specialty in finding and sourcing products to sell online. My store sells [define your store industry and product types] and I need you to come up with a list of [number of product ideas] product ideas that I can sell on my online store.”
41. Write an SEO Optimized landing page copy for a product
“I want you to pretend as a copywriter specializing in writing landing page copy for better SEO rankings and higher conversions. I need you to write the landing page copy for [Your product name]. I want you to start with an intriguing headline to captivate the target audience followed by a call to action button. Below that I want you to add three content sections with different headings each targeting a specific keyword for the product. I need you to end the landing page copy with a FAQ section answering at least 5 customer questions about the product.”
42. Create and sort products into product categories
“I need you to sort the products into product categories. Ask me to provide you with a list of products. Use hierarchal categories and create child categories as needed. Products can be placed into multiple categories. Show which products are placed under a category. Write a catchy short description for each category. Use this product list [enter your product list].
43. Create an ad strategy for an eCommerce product
“I want you to act as an advertiser. You will create a campaign to promote a product or service. You will choose a target audience, develop key messages and slogans, select the media channels for promotion, and decide on any additional activities needed to reach your goals. The product you will be promoting is: [Enter your product title and description here].”
ChatGPT Prompts for Businesses
44. Polish an email text to be more effective and professional
“Fix this email to write it in a human voice in perfect English, as someone with a charismatic personality, that is extremely professional and concise with their language. Also, give at least three samples to use as the email subject. [Enter your email text here].”
45. Write a job posting ad for hiring
“I want you to act as a recruitment manager specializing in finding talented professionals for a job. I need you to write a job posting for [job title] we are offering the following benefits [mention benefits here] and we are looking for [job requirements such as experience and skills].”
46. Generate a business model canvas
“I need you to help me create a business model canvas for a [explain what your business is about] company. Organize your answers in a table that reproduces the original format used in consulting. I want you to write detailed answers that are focused on adding value and act as an expert consultant in digital marketing.”
47. Generate logo design ideas
“I want you to act as a graphic designer specializing in brand identity development. I want you to come up with detailed ideas for unique and interesting logos for a business. Come up with at least 3 ideas and mention what is unique about each idea and how it is different from the other two ideas. The business name is [Enter your company name] and it offers [mention products/services]. I need you to present your ideas in a format that can be given to a professional graphic designer as initial instructions.”
48. Instantly generate domain name ideas
“I need you to help me find domain name ideas for a business. My company name is [enter business name] and it offers [products/services/industry]. Only give .com domain name ideas. domain name should not be more than 8 characters long.”
49. Write an email to terminate an employee
“Write an email to an employee informing them that they are being fired for the following reason [mention the reason for firing]. Make the email text sound professional and polite. Use a sympathetic and kind tone and thank the employee for their work.”
50. Write a job offer email
“I want you to write a job offer email using the following parameters: 1. Candidate name 2. Job position 3. Company name 4. Salary offered Ask me to input these parameters one by one before writing the email.”
Miscellaneous ChatGPT Prompts
51. Generate a cover letter for a job application
“I need you to write me a professional cover letter to send with a job application using the following parameters: 1. Job Title 2. Years of Experience 3. Skills to mention Ask me to input each parameter one by one before writing the cover letter.”
52. Plan your day
“I need you to help me plan my day. Starting at 9 am and ending at 5 pm. Ask me to input the task I will be performing and then ask me for the start time and end time for that particular task. Repeat until the end time of a task is 5 pm. Create a table and add one row for each task with start time, end time, and task detail as columns.”
53. TL:DR Summarize a text or article
“I want you to act as a very proficient researcher. I want you to pretend that you can extract all relevant information from a text or a URL I give you. Your task is to extract all facts and summarize the text in all relevant aspects, presented in bullet points and a 1-liner summary, pick a good matching emoji for each bullet point, and then add it after the 1-liner summary. Ask me to input text or provide you a URL.”
54. Generate a list of popular websites on any topic
“I want you to act as a topic expert. I will provide you with a topic and you will provide me with a list of at least 10 most influential websites on that particular topic. Present the websites in a table with serial number, website name, website URL, 1-liner website summary as columns. Ask me to provide you with a topic.”
Bonus WordPress AI Plugins & Tools Using ChatGPT
AI usage is becoming increasingly popular among marketers and bloggers. As the most popular blogging platform, WordPress has tons of add-ons and plugins that you can use to speed things up.
As the best WordPress SEO plugin on the market, All in One SEO comes with built-in ChatGPT integration to generate SEO-friendly headlines and meta descriptions.
Finding royalty-free images for blog posts is always a challenge for bloggers. Similar to Dall-E, Imajinn AI uses text prompts to generate images using machine learning AI.
All the images generated by the plugin are copyright-free and you can use them in your blog posts.
We hope this article helped you find some useful ChatGPT prompt ideas for your blog and marketing campaigns. You may also want to see our pick of some more useful AI-powered WordPress plugins or take a look at our guide on how to grow your business online.
If you liked this article, then please subscribe to our YouTube Channel for WordPress video tutorials. You can also find us on Twitter and Facebook.
Are you looking for the best practices to maximize the SEO benefits of internal links?
Internal links play an important role in search engine optimization (SEO). They help search engines discover your content and rank them higher in search results.
In this article, we’ll list the best practices to use for internal linking for SEO.
How Does Internal Linking Improve SEO in WordPress?
Internal links are links between posts on your own website. Having internal links is important for your WordPress SEO. They help search engines like Google crawl your website and discover new content to index and rank.
Generally, the more links a page has pointing to it, the more likely it is to rank higher in search results. That means that you can use internal links to point to important pages on your site as a way to increase their traffic.
That being said, let’s take a look at the best practices for improving SEO by adding internal links in WordPress. Since this is a comprehensive guide, we have included a table of contents for easier navigation.
We recommend that you make a habit of linking to your older articles from your new articles.
It’s a great way to develop a contextual relationship between your new and old posts. It also allows you to pass relevant link juice to your older articles.
Because internal links play such an important role in SEO, we have even made it part of our pre-publish blog post checklist for WPBeginner writers.
You can also edit your older articles to add links to your newer content whenever you publish. Many successful bloggers dedicate time to adding internal links that point to new articles on a weekly or monthly basis.
This will help you boost your pageviews, increase the time users spend on your site, and ultimately will improve the SEO score of your individual blog posts and pages.
WordPress makes it easy to search for your old posts right inside the post editor. Simply select the text you want to link and click on the link button in the toolbar that appears.
A text pop-up will appear below your highlighted words. Then, you can start typing to search for the older articles you want to link to.
2. Monitor Your Internal Link Performance in WordPress
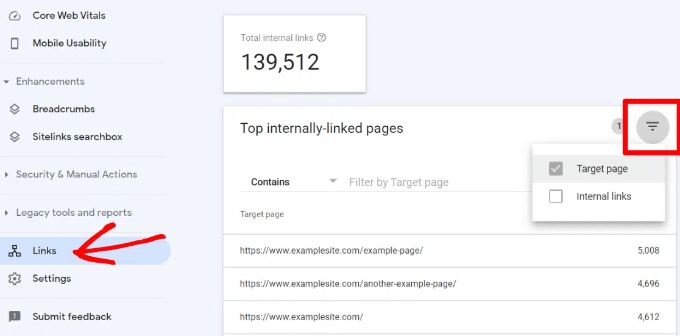
It’s helpful to see your website’s SEO performance in terms of links by using a tool such as the Links Report in Google Search Console. This is a helpful starting point for working out how to improve internal linking on your site.
The Links Report will show you how many pages are linking to this page. You can compare it with other pages and see whether pages with more internal links are ranking higher than posts with many internal links.
Just make sure you are only linking to the article when it makes sense. Adding links where they don’t make sense creates a bad user experience.
Another way to monitor the impact of internal linking is to see which keywords are gaining or losing position. All in One SEO makes this extremely easy with the Search Statistics feature.
Once you connect the plugin with Google Search Console, All in One SEO will fetch your Google Search Console data and present it under All in One SEO » Search Statistics.
The keyword positions chart shows a graph of your site’s keyword positions.
Below this, you’ll see the Keyword Rankings overview box. This shows your top 10 keywords, and if you use them for internal links they are very likely to be clicked.
3. Improve Your WordPress Site’s Internal Linking With a Plugin
If you’re not sure which posts you want to link to, then you will often find it faster to add internal links in WordPress using an internal linking plugin.
We recommend using All in One SEO. It includes a unique Link Assistant feature that lets you add links to your old and new content without having to open up the post. Plus, it provides link recommendations, detailed link reports, and much more.
Link Assistant will crawl every link on your website and then show a comprehensive list report.
The report will show you an overview of the links with total counts for internal, external, and affiliate links. It will also show you the number of orphaned posts that have not yet been linked to from another post or page.
You can switch to the Links Report tab for detailed information on all your links. Here you’ll see a list of all your posts and pages with columns for internal, external, and affiliate links.
It will also show a number of suggestions where you can add links.
For more details, you can click on the right arrow button next to a post or page. This will show all links organized in different tabs. From the suggestions tab, you can quickly view link suggestions and add links without directly editing a post or page.
Link Assistant also helps you discover more internal linking opportunities.
You can switch to the ‘Linking Opportunities’ tab to see suggestions about how to improve the internal linking on your website, and also see the list of orphaned posts so you can add links to them.
Another plugin useful for internal linking is Semrush SEO Writing Assistant because it can help you keep track of links inside your article.
For example, it lets you know when your article has too many or too few internal links and also suggests ways you can improve your links.
This tool also comes in handy if you have other authors working on articles. Editors can quickly see if the article includes internal links to other posts on your website.
4. Display a List of Your Most Popular Posts in WordPress
You can use a WordPress popular posts plugin to point users toward the articles that other users have already found helpful. These plugins automatically create a list of internal links to your most popular content.
Popular posts are usually your most successful content, which means they are more likely to increase user engagement, conversions, and sales. They are also a good opportunity for internal linking to your other less popular articles.
For example, MonsterInsights has a feature that allows you to show your popular articles anywhere on your WordPress site. You can use also use inline popular posts to show articles inside your content.
If you want to show articles in the sidebar or at the end of your content, then you can select the Popular Post Widget. MonsterInsights even lets you display your top-performing products anywhere on your eCommerce store.
5. Create List Posts That Roundup Other Articles in WordPress
Another way to increase the number of internal links on your WordPress blog is to create roundups of your existing content. You do this by creating a new post that mentions your best articles on a certain subject to give a detailed overview of the topic.
In fact, you’re reading a post like that now.
Luckily, there are some plugins that make this job easy. For example, WP Tasty Roundups allows you to quickly repurpose your existing content into beautiful roundup posts that rank in search results.
All you need to do is type one or two keywords into the built-in search functionality, and the plugin will automatically pull images, titles, descriptions, and links from relevant posts into your roundup list.
6. Get Google Sitelinks for Your WordPress Site
Sitelinks are a feature on Google search engine results pages (SERPs) where additional sub-pages appear under a website in the search results.
These are often internal links to the most popular pages of that website.
The top 3 spots on Google get the most clicks. When sitelinks are shown for a website, it takes up the same amount of space as three regular search listings.
Having this much screen space dedicated to your site significantly increases your overall click-through rate. Simply put, more visitors will visit your website from the keyword.
While there is no guaranteed way to get Google to show sitelinks for your website, it certainly helps to create lots of internal links to your most important posts and pages.
7. Preload Links in WordPress for Faster Loading Speeds
Link preloading is a browser technology that will load links in the background before a site visitor clicks them. This makes your website seem faster, which can improve SEO.
Because loading speed is one of the top indicators for search engine rankings and user engagement, when your internal pages are preloaded, your visitors are more likely to stay on your website longer.
They are more likely to view more pages because they’re loading instantly.
The easiest way to preload links is by using the Flying Pages plugin. It simply adds intelligent preloading to make sure preloading won’t crash your site or even slow it down.
Broken links are bad for your website’s SEO. Search engine crawlers find new content on your website by following internal links, so a broken link can stop them from indexing a new post.
They also negatively impact user experience because broken links will return a 404 error. If a visitor clicks on a link and is unable to find a page they’re looking for, then they may leave.
AIOSEO offers a powerful redirection manager that helps track 404 errors on your website and lets you set up permanent 301 redirects to fix broken links.
9. Update Internal Link URLs When Moving a Site to a New Domain
If you ever move your WordPress site to a new domain name, then it is important to update all internal link URLs. Otherwise, you will have lots of broken links.
You should start by changing the WordPress address and site URL by visiting the Settings » General page from your WordPress dashboard.
But you will also need to change the URLs of every internal link added to your posts and pages.
10. Use MediaWiki Syntax to Quickly Add Internal Links to WordPress
If you want to make internal linking a habit, then it helps to use the most efficient method. Since WordPress 6.0, WordPress has supported standard MediaWiki syntax to quickly add internal links when creating or editing a post.
You can now quickly add links by adding two square brackets followed by the post title. The animated gif below shows you how easy this feature is to use inside WordPress.
The link will automatically add the correct URL to the post, and use the post title as an anchor link.
If you know the title of a post (or even just part of it), then using the double square bracket method is the fastest way of creating an internal link.
11. Track Which Internal Links Are Clicked in WordPress
One of the best ways to uncover how users interact with your website is to track which internal links your visitors are clicking. Tools such as MonsterInsights can help you see which internal links your visitors are the most interested in.
You can then use these insights to improve the way you add internal links to your posts and pages.
You can also use All in One SEO to enable breadcrumbs for your WooCommerce products. For details, see the fifth tip in our guide on WooCommerce SEO made easy.
If you liked this article, then please subscribe to our YouTube Channel for WordPress video tutorials. You can also find us on Twitter and Facebook.
What constitutes the ultimate toolkit for web developers? To find out, we surveyed our members about what tools they use for their WordPress development business – and the results are in!
To be clear, we’ve written previously about Must Have tools, but this list is based on what the members of our WPMU DEV community recommend. So, the results are a bit different. We won’t cover every recommendation, but we have narrowed down specifics mentioned more than others.
We’ll break them down by the most discussed categories…
Keep in mind, we are not affiliated with ANY of these companies (well, except for us, WPMU DEV, of course). These are strictly companies that were mentioned by our members as top choices for what they use in their WordPress development business.
So, let’s open up this thing and get started!
WordPress Management
WPMU DEV
You might be a bit familiar with this company.
We asked, “What do you use for WordPress management?” And here are a few answers.
“WPMUDEV for managed hosting, technical support, premium plugins, automated updates and backups.â€
– Keith, WPMU DEV Member
“Definitely WPMUDEV. I don’t want to blow their horn too much but honestly, it’s just really nice having half this stuff available. That being said, I wouldn’t want to replace any of them. I like them all.â€
– G-Kodes, WPMU DEV Member
Not to pat ourselves on the back, but WPMU DEV is key to developers’ toolkits around here. Obviously, we asked on our platform, so it’s natural that we’d rank at the top. Still, even if asked elsewhere, we have the essential tools for management, and we’re pretty confident we’d get mentioned.
We’re used for our award-winning plugins, hosting, 24/7/365 support, the capability of managing multiple sites from our Hub dashboard, domains, client billing – and much more.
Every aspect of running a successful WordPress development business can be obtained here – where you’re reading this!
If you’re not a member, sign up for free and get started. You’ll find that everything you need is right at your fingertips in one place.
ManageWP
ManageWP was also recommended by some users.
Like us (WPMU DEV), ManageWP is another popular management platform where you can organize your websites from one dashboard.
It can add unlimited sites, including team and client collaboration, incremental backups, white-label capabilities, and other features.
Regarding plugins, it doesn’t feature any built from ManageWP (like WPMU DEV), but you can add plugins into their system – where they can be updated, monitored, and overwritten.
In our poll, ManageWP seems to complement WPMU DEV as another system of management that works well for some developers.
Site Development and Plugins
Divi
Divi is no stranger to the WordPress community.
With a seemingly endless variety, Divi is the go-to theme builder for many WordPress developers. Its visual page builder makes setting up a spectacular website quick and easy, which is why it’s the most popular theme.
Aside from being easy to use, Divi collaborates well with our services and plugins (such as Smush and Hummingbird).
Additionally, almost any website can be created for practically any use. It features over 200 website elements and packs for business, eCommerce, and services – you name it.
Every aspect of Divi is highly customizable, so developers can ensure their clients get the site needed.
Astra
Trusted by over 2 million websites and many of our developers.
Featuring pre-built websites, Astra is a page builder that’s also extremely easy to implement and popular among our developers.
Everything is highly customizable – from layouts, headers, and colors – it all can be adjusted how you want. Plus, you can mix and match any of your favorite third-party tools, like WooCommerce integration.
For an accessibility-ready website, Astra continues to be a popular choice.
Elementor
Elementor has the power to build websites in a streamlined way.
With its live drag-and-drop editor, website designs, and hosting aspect, Elementor is a platform that many of our developers agree is worth using in their toolbox.
With Elementor, creating landing pages, blogs, eCommerce stores – anything is easy. It’s all customizable, and additional CSS can be added.
Their biggest attribute is having an “all under one roof†solution for editing, themes, and hosting. They keep everything updated, perform backups, and include top-notch support.
We discussed our domains and hosting above as a reason developers use us, but it’s worth mentioning it again. That’s because it’s all easily managed in The Hub – with easy registration, domain transfers, and more.
Plus, with domain reselling, you can purchase domains from us at wholesale prices and sell them to your clients. Additionally, you can white-label the domain service and hosting and use that as an add-on to your development business.
Be sure to check out some of our domain registration and hosting resources. We have articles that cover it all, including:
These are just several resources. More information can be found on our blog and documentation.
Namecheap
Cheap domains? Namecheap strives for that.
Namecheap has various services for domains, hosting, security, and email. It allows you to transfer domains, select various hosting options (e.g. shared, reseller, VPS, etc), and more.
With over 2 million users, it’s a highly trusted company for domains and hosting.
In regards to hosting, they have a walk-through that helps individuals determine what type of hosting is right for them. It’s interesting to figure out what is best for each unique situation.
With Namecheap focused on WordPress and its discounted prices, it’s a widely used platform for developers.
GoDaddy
GoDaddy is a household name.
With domains, email, hosting, and WordPress implementation, GoDaddy is also popular choice for many developers. After all, it’s a brand that’s been around a while (since 1997), so it’s an established go-to company for many needs.
It’s by far the biggest company out of the others mentioned, with over 21 million customers worldwide.
Plenty of TLDs are available, plus they have hosting, security, and support.
Bluehost
Bluehost was recommended by quite a few developers in our survey.
With hosting and domain, Bluehost offers some very appealing discounts to web developers. You can get an eCommerce store, WooCommerce integration, and more at a good rate.
Plus, they have a dashboard for developers where you can manage all of your WordPress sites in one spot. Additionally, they offer 24/7 support.
Along with WPMU DEV, Bluehost was one of the most recommended services for hosting and domains when we surveyed our developers.
Communication
Google Workspace
Google has a ton of solutions for developers and their businesses.
Whether it be Gmail, Meet, Drive, Calendar, or Docs, Google Workspace checks a lot of the boxes in communication for developers.
Here at WPMU DEV, we use Google Workspace for our email, calendars, and docs (in fact, the drafts of all of these posts are written on Gdocs).
Google has a reputation for quality and efficiency. Rarely does Google Workspace stop working or have issues. It’s no wonder that it’s such a popular communication tool.
Also, implementing everything under one system is quite beneficial (e.g. adding an appointment from Gmail to Google Calendar). It’s a streamlined process for flawless integration.
MS Teams
MS Teams is another popular collaboration tool.
Microsoft Teams is a powerful platform that provides many benefits for developers’ businesses.
One major highlight is having centralized communication for file sharing, messages, and other information in one place – keeping things organized and reducing the need for emails.
Additionally, it’s a good way for developers to collaborate with other team members. For example, if you’re working with a graphic designer, you can go back and forth seamlessly.
Like Google, it integrates with other Microsoft products, such as SharePoint, OneDrive, and Outlook. This helps with working across various platforms in the Microsoft universe.
Slack
Slack is no stranger to us.
Slack is another platform that we use here at WPMU DEV. It’s also used by developers worldwide as a go-to source for cloud-based communication.
It features organized communication with channels and direct messaging. The messaging is done in real-time, eliminating the need for email.
Plus, you can share files and documents in just a few clicks across channels and messages.
When it comes to integration, we integrate Google Calendar and Jira. Other integrations, such as Trello and Zoom, are available, too.
Another big benefit of Slack is the Huddles. It’s how we communicate via voice in meetings all around the world. This can be done in specific channels, where team members can hop on and participate in calls quickly and easily.
WhatsApp
WhatsApp is a good communication tool for messaging.
With voice and video calls, chats, and private messages, WhatsApp is a communication tool for developers and clients.
It features end-to-end encryption so that personal messages and calls are secured. Nobody, not even the app itself, can read or listen to them.
Plus, you can create groups, so if you’re working with a team on a development project, you can all be in the loop in one spot.
They even have a WhatsApp Business that offers business solutions for banking, eCommerce, and much more.
Loom
For a quick messaging solution, Loom has you covered.
Loom is a popular solution with over 14 million users who are used to saving time from meetings by providing a quick video.
You can record your screen and camera from any device. They have desktop and mobile apps and a Chrome extension. When sharing with your clients or team members, paste a link to your video so recipients can view it without logging in or creating an account.
Also, you can use emoji reactions, time-stamped comments, and interactive features for interactions. Whatever works best for the clearest lines of communication.
Organization
Jira
Jira is a great way to stay organized.
Like Google WorkSpace and Slack, Jira is another software we use daily at WPMU DEV. Other developers mentioned Jira as one of the best, too.
It breaks big ideas into smaller chunks across teams via stories, issues, and tasks. For example, for this blog, we have our individual writers and the topics they’ll be writing about. Then, as the process goes from conception to rough draft and final, its progress is moved along for the team to see.
Great for teams of all sizes, Jira can organize and streamline workflow better than a lot of software out there. So if you’re a developer that has a team working on a specific goal, your progress will be easily monitored and can be adjusted along the way.
TidyCal
A way to book meetings and more.
TidyCal is a perfect solution for setting client availability, creating a meeting length, and much more.
You can set up a specific date, show the number of spots available, and create your booking page. From this, you can embed on WordPress sites, set up multiple booking types, and create email reminders.
It’s a quick and easy way to set up appointments, meetings, and everything your development business needs.
Trello
Trello’s another way to improve workflow.
“I use Trello for project management and to organize my worklists.â€
– Marianna, WPMU DEV Member
With boards, lists, and cards, Trello has what it takes to get your development projects on target.
You can keep tasks in order and assign specific members to each to meet deadlines on time. It keeps all the projects organized in one place, viewable from every angle.
With their system, you can see the big vision and edit any upcoming projects to get a real sense of the pipeline heading your way (or your team member’s way).
In a nutshell, Trello simplifies things and organizes your workflow. It’s a top choice for many developers surveyed.
Figma
Figma is a good fit for designers in WordPress.
Figma is a collaboration tool that allows designers and other team members to work together in real time. With all the remote work developers do, it’s a great platform to get design work done.
Each design version is saved, so designers can easily make any adjustments or edits. With all the complex designs that can go into web development, this is useful in case you need to revert to the original design.
Our designers at WPMU DEV use Figma for various illustrations and design projects (including the banners you see on our blog).
Notion
When it comes to working with your team, consider Notion.
“Notion. I’m in it all day, every day. I even built a client dashboard template, and want to create more for others.â€
– Keith, WPMU DEV Member
Notion is a collaboration tool with many organizing, integration, and customization features.
It’s great for product roadmaps, managing the execution of projects, and keeping everything in one place. You can set up brand guidelines for specific development clients, including code guidelines.
Plus, you can customize the workflow to your team’s style to have the perfect system that works for you.
Regarding integration, it works well with Google Docs, Dropbox, Trello, Asana, and many more third-party companies.
Design
Adobe
With Photoshop, Illustrator, and more, Adobe Creative Cloud is often a designer’s choice for creating images.
The ultimate creative toolkit is Adobe Creative Cloud, which includes awesome design tools such as Photoshop, Illustrator, InDesign, and more.
Creative Cloud is a membership-based program. It includes fonts, stock images, collaboration tools, and the capabilities to create, design, edit, and so forth.
Plus, there are communities for Adobe users, like Behance – where designers can show off their work.
As an established brand, Adobe products have been and will continue to be, a top choice among designers in the WordPress industry.
Canva
Canva is another designer software company.
“Canva for work with some client graphics.â€
– Keith, WPMU DEV Member
Canva is another top choice for developers and designers we surveyed. One difference from Adobe products is it has ready-made templates, images, and content.
You can invite people to edit, brainstorm ideas on whiteboards, and scale content. Once a project is ready for launch, you can easily present, download, schedule, and share designs.
When it comes to templates, there are a lot to choose from. Everything from real estate businesses to blogs. Plus, there are infographics, backgrounds, videos, and much more.
Payments
Stripe
Stripe is used around the world as a payment platform.
Stripe is a payment solution for millions of companies worldwide. It’s easy to implement to accept payments and send payouts in numerous platforms.
Not only is it used online, but it’s also implemented in-person.
Regarding development business, its easy-to-use API can be used as a client payment method quickly and easily. We use Stripe as an option for our products (e.g. Client Billing and our Forminator plugin).
Considering WordPress developers have clients worldwide, it’s the perfect solution for global commerce.
PayPal
PayPal is no stranger to eCommerce and more.
PayPal is another payment method used by clients and customers for WordPress development businesses. Like Stripe, it can easily be implemented and used worldwide.
Their secure platform lets you set up payment options and make payments with just a few clicks. Additionally, they have systems for invoicing, installment payments, and POS systems.
Along with being a top choice for developers, we also use PayPal as an option with our products.
Office Essentials
Spotify
Spotify is essential for music for many developers.
Spotify features albums, singles, playlists, podcasts, and more from favorite artists and entertainers. If you’re the type that needs some background noise to be productive, or if you enjoy listening to the latest album from your favorite band while working on code, Spotify might prove to be an essential in your toolbox.
Almost any song or album imaginable is on their platform. Plus, they automatically create a customized playlist for you, or you can create your own. If you enjoy podcasts, there are thousands of options.
It’s no wonder Spotify became an important part of developers’ workflow. Its digital streaming of music can boost mood and productivity and makes working from home much more enjoyable.
Pandora
Pandora is another popular choice for background music while working.
Pandora is another streaming platform that came out as a favorite for developers. Like Spotify, it creates uniquely personalized music and podcasts experience.
You select what interests you, and Pandora creates stations based on songs, artists or genres you like. Then, it will play related content.
From this, you can select songs you like or don’t like. Pandora will then tweak the preferences to what you’ve selected.
It’s a bit more like a radio than Spotify, but that’s not bad. Pandora helps you discover new music, play what you enjoy, and gives you a nice variety. It’s used by developers worldwide to get through a busy day working on WordPress-related business.
BONUS ESSENTIAL: Coffee
Yes, this is essential for some developers.
For some developers, coffee is the boost they need to get through the day. It awakens the senses, helps keep them alert, wakes them up, and tastes great! So, we thought this might be a nice bonus essential to add to a developer’s toolbox. Just don’t spill it on your computer.
All the Tools are in One Place
What does your toolbox look like? Hopefully, whatever it is, you have the essentials all in one place and easily accessible to ensure your development business runs smoothly!
These were some top picks based on our survey from our members, so results will vary across the WordPress spectrum. However, you might find some of these tools essential to add to your toolbox today – or, more likely, are using some already.
If WPMU DEV isn’t a part of your development, try us today. We have all the essentials in one place, including hosting, plugins, domains, site management, and more. Plus, 24/7 support, a member community, and other resources.
And as you can see, there was no hammer in this toolbox. You won’t need it to smash your computer out of frustration since these recommended tools help your development business run smoothly. After all, if our members use them, there’s a good chance many will work for you!
In this step-by-step tutorial, you’ll learn how to set up tiered/quantity-based pricing on your WooCommerce store, along with adding a frontend tiered pricing table to your single product pages.
By selling your books as downloadable audio files, you can make money without having to pay for shipping or printing. You can also sell the same audio file an unlimited number of times.
In this article, we will show you how to easily sell audiobooks online using WordPress.
Another option is recording that information as an audiobook. This is a great way to collect everything you want to say into a single, downloadable file that’s easy to distribute and sell to other people.
Unlike traditional printed books, you don’t have to pay printing or shipping fees for your audiobooks. You also don’t have to worry about physical storage, supplies, or managing your inventory. All of this means lower costs and bigger profits, which makes audiobooks the perfect way to make money online with WordPress.
If you have an ebook, then there are plenty of services that can help you turn it into an audiobook including ACX. Every audiobook you make on ACX will be available on Audible.com, Amazon.com, and iTunes, but it’s also a good idea to add the audiobook to your own website.
With that in mind, let’s see how you can sell audiobooks online. Simply use the quick links below to jump straight to the method you want to use.
Unlike general eCommerce plugins, Easy Digital Downloads has the specific features you need to promote, sell, and distribute digital products with ease. This means you don’t have to waste time and effort with unnecessary settings, such as configuring your store’s shipping.
Even better, if you’re using SiteGround then Easy Digital Downloads already comes pre-installed on their EDD plan, so you can start using it straight away.
Upon activation, go to Downloads » Settings in the WordPress dashboard.
Even though you’re selling audiobooks, you’ll need to set your store’s location. This allows Easy Digital Downloads to auto-fill some fields in the order form, which will help improve the customer experience.
Easy Digital Downloads also uses your location to calculate sales tax.
To add your location, simply open the ‘Business Country’ dropdown menu. You can then choose where your business is based.
Next, find the ‘Business Region’ field.
Here you can open the dropdown and choose the region where your store operates from.
After making these changes, go ahead and click on Save Changes to store your settings.
In the Payment Gateways section, check the box next to each gateway that you want to add to your WordPress blog or website.
If you add more than one payment method, then you’ll need to choose a default gateway.
You can use any gateway you want, but Stripe can accept credit cards as well as Apple Pay and Google Pay. This is why we recommend using Stripe as the default payment gateway.
With that done, click on the ‘Save Changes’ button.
You’ll now see some new tabs where you can configure each payment method.
Configuring the payment gateway will be slightly different depending on which gateway you’re using, but Easy Digital Downloads will walk you through the process.
Once you’ve set up at least one payment gateway, you’re ready to start uploading audiobooks to your WordPress website.
To create a digital product, select Downloads from the left-hand menu. Then, click on the ‘Add New’ button.
You can now type a name for the product into the ‘Enter download name here’ field. This will appear on the audiobook’s page, so you’ll want to use something that catches the visitor’s attention and accurately describes the book.
Next, type out the description that will appear on the ebook’s product page. You’ll want to give visitors all the information they need to decide whether this book is right for them.
Many online stores use product categories and tags to help shoppers find what they’re looking for. If you’re selling lots of audiobooks, then these categories and tags help visitors find related audiobooks, which can get you more sales.
You can create new categories and tags in the Categories and Tags boxes.
Next, you’ll want to set a price by scrolling to the Download Prices section. Here, type in how much visitors will pay to download the audiobook.
You’re now ready to upload the audio file that you want to sell. When it comes to audio, WordPress supports mp3, ogg, and wav. It also supports m4a, although this format may not work on all browsers.
In the File Name field, type a name for the file that shoppers will get when they buy the audiobook. Then, simply click on ‘Upload a File.’
You can now choose any audio file from the WordPress media library, or you can upload a new audiobook from your computer.
Finally, you’ll need to add a product image, which will usually be your audiobook’s front cover. Simply scroll to the Download Image section and then click on the ‘Set Download Image’ link.
This launches the WordPress media library where you can choose an image or upload a new file from your computer.
When you’re happy with your digital download, click on the Publish button to make it live.
Easy Digital Downloads will now create the audiobook as a downloadable product, but visitors still need a way to access the product page.
This might mean adding the page to your website’s menu, creating a sales page where you advertise all your audiobooks, or even adding the book to a custom home page.
No matter what method you choose, you’ll need to know the audiobook’s URL.
To get this link, simply go to Downloads » Downloads. Then, find the audiobook you just created, and click on its ‘Edit’ link.
You will then find the URL directly below the product title.
Now, you can link to this product page from any area of your website, simply by using its URL. To learn more, see our step-by-step guide on how to add a link in WordPress.
Easy Digital Downloads also creates a ‘Purchase’ button for this particular audiobook. Visitors can click this button to add the audiobook to their cart.
You can add the button for this book to any page, post, or widget-ready area. This allows visitors to start the purchasing process without even Needing to visit the individual product’s page.
To get the audiobook’s shortcode, simply scroll to its Download Settings section. You can then copy the text in the ‘Purchase Shortcode’ field.
Every time someone buys an audiobook from your website, Easy Digital Downloads will send them an email and download link.
While this email has everything the customer needs to access their download, it’s a good idea to customize it. For example, we recommend adding your own logo and branding.
To customize the default email, simply go to Downloads » Settings. Then click on the ‘Emails’ tab.
When you’ve finished making changes, you may want to send a test email so you can see how the message will look to your customers.
To do this, simply click on the ‘Send Test Email’ button and Easy Digital Downloads will send an email to your admin email address.
Have you clicked on the ‘Send Test Email’ button, but haven’t got a test email? If your site isn’t sending emails correctly, then customers won’t be able to download your audiobook.
When you’re happy with how the email looks, you can go ahead and click on the ‘Save Changes’ button.
This is all you need to start selling audiobooks online. However, Easy Digital Downloads has lots more advanced features that can help you sell audiobooks.
Method 2. How to Sell Audiobook Memberships (Best for Recurring Revenue)
Another option is using your audiobooks to create recurring revenue streams.
For example, you might offer members unlimited monthly or annual access to all your audiobooks for a membership fee. In this way, you can get reliable recurring revenue over a longer period of time.
A membership site is also a great choice if you’re releasing your audiobooks as a series.
If you want to get recurring revenue, then MemberPress is the best WordPress membership plugin. It allows you to accept payments, create an unlimited number of membership levels, restrict access to audiobook pages based on membership subscription, and more.
Upon activation, go to the MemberPress » Settings page to configure the plugin settings.
To start, you’ll need to set up a payment gateway.
Out of the box, MemberPress supports PayPal (Standard, Express, and Pro), Stripe, and Authorize.net. You simply need to select the payment method you want to use and then type in the required credentials, such as your PayPal email address.
You may want to add multiple methods, so members can use their preferred gateway. When that’s done, don’t forget to click on the Update Options button to save your settings.
With the setup out of the way, it’s time to create one or more membership levels. These are the subscriptions that visitors will buy to access your audiobooks, or other content.
MemberPress allows you to offer different content for different membership levels. For example, you might create Bronze, Silver, and Gold memberships and then give members access to different audiobooks.
To create the first membership plan, go to the MemberPress » Memberships page and then click on the ‘Add New’ button.
On the next screen, you’ll need to provide a title for the membership plan and then add details in the post editor.
After that, you can set the pricing, billing type, interval, and expiration under the ‘Membership Terms’ section.
Next, scroll to the Membership Options box below the editor.
Here, you can customize the plan permissions and membership options.
When you’re happy with how the plan is set up, go ahead and click on ‘Publish.’ To create more membership levels, simply repeat the same process described above.
Once you’ve created all the membership levels, it’s time to add some access rules. These allow you to restrict access to your audiobooks based on the user’s membership plan.
Just go to MemberPress » Rules and then click on the Add New button.
Here, you can create all kinds of access rules, but you’ll typically start by selecting the audiobook that you want to restrict access to.
Under ‘Protected Content,’ open the dropdown menu and choose an option from the list. This might be the specific page where you embedded the audio file, content that has a particular tag, or any other option from the list.
After that, open the ‘Access Conditions’ dropdown and choose ‘Membership.’
In the second dropdown menu, select the membership level people will need in order to access this content.
There are more settings that you can configure, but this is all you need to create a simple access rule.
When you’re happy with how the rule is set up, click on ‘Save Rule.’ To create more access rules, simply follow the same process described above.
Now that everything is set up, you’ll need to make sure visitors can buy memberships and log into their accounts. Thankfully, MemberPress comes with ready-made forms that you can add to your site.
We recommend adding the MemberPress login widget to a widget-ready area, so members can log in from any page.
Simply head over to Appearance » Widgets and add the ‘MemberPress login’ widget to the sidebar or similar section.
Don’t forget to click on the ‘Update’ button to save your widget settings.
There are a few different ways to add a signup page to your website, but MemberPress automatically creates a registration page for each membership level. This means you can simply add these pages to your main navigation menu.
In your WordPress dashboard, go to Appearance »Menus. In the left-hand menu, simply click to expand the ‘Memberships’ section.
You’ll now see a list of all the different MemberPress levels.
To add a membership to the navigation menu, simply check the box next to it and then select ‘Add to menu.’
When you’re happy with how the menu is set up, click on ‘Save Menu.’
At this point, you’ve created a website where visitors can buy audiobook subscriptions. However, MemberPress has lots more settings you can use to sell audiobooks, grow your brand, and get more members.
Method 3. How to Sell Audiobooks With WooCommerce (Best For Online Stores)
Easy Digital Downloads makes it easy to sell audiobooks on any WordPress blog or website, without you having to configure lots of unnecessary settings like shipping and handling.
However, if you’ve already created a WooCommerce store, then you can sell digital products like audiobooks using this popular eCommerce plugin.
Although it’s mostly used to sell physical products, you can add support for digital products by going to WooCommerce »Settings and then clicking on the ‘Products’ tab.
Here, click on the ‘Downloadable products’ link.
You can now open the ‘File download method’ dropdown and choose an option from the list.
When you’re selling digital downloads, there is a risk that customers may share the direct link with other people. This allows people to download your audiobook without paying.
‘Force Downloads’ helps to protect your site from direct linking, so it’s the recommended method. However, just be aware that very large files may result in a timeout, especially if your server has limited resources.
If this happens, then you may need to change your WordPress hosting plan or select a different file download method.
You may also want to enable the checkbox next to ‘Allow using redirect mode (insecure) as a last resort.’ If WooCommerce encounters any problems, then this setting will deliver the audiobook via an unsecured redirect link rather than showing an error.
This is a much better customer experience.
The second option is ‘X-Accel-Redirect/X-Sendfile,’ which serves the file directly to the customer. This protects the audiobook from unauthorized downloads without impacting your site’s performance.
However, this method requires you to install and enable the X-Accel-Redirect/X-Sendfile module on your server, so it’s not very beginner-friendly. Depending on your plan, you may also need to speak to your WooCommerce hosting provider.
The final option is ‘Redirect only,’ which uses a direct link to the file. This means your audiobook isn’t protected and anyone can access it using the URL. That said, we don’t recommend the ‘Redirect only’ method.
After selecting a download method, you can choose whether visitors must be logged into an account in order to download the audiobook.
To make this decision, either enable or disable the ‘Downloads require login’ checkbox.
By default, customers can download the audiobook while their order is processing.
If you want to wait until the order is complete, then uncheck the following box: ‘Grant access to downloadable products after payment.’
By default, WooCommerce will download the audiobook to the customer’s computer.
Most of the time this is the best customer experience, but you can set the file to open in a new tab instead. The customer can then decide whether they want to save the file.
There are some use cases where this may be the better option. For example, if you’re showing the customer a free sample, or your audiobooks are short enough to enjoy in one sitting.
In this case, you may want to check the box next to ‘Open downloadable files in the browser.’
When you’re happy with the settings you’ve entered, click on ‘Save Changes.’
With that done, you’re ready to add the audiobook as a downloadable product by going to Products »Add New. Here, you can type in a title, add a description, upload a product image, and set the price as normal.
Then, scroll to ‘Product Data’ and check the box next to ‘Downloadable,’ which adds some new settings.
To start, click on ‘Add File.’
You can now either choose the audiobook from your media library or upload a new file from your computer.
After that, type in a filename for the audiobook.
By default, customers can download the audiobook as many times as they want, for as long as they want.
If you want to limit the number of downloads per customer, then type a number into the ‘Download limit’ field.
If you want the download link to expire after a certain number of days has passed, then type a number into the ‘Download expiry’ field.
When you’re happy with how the audiobook is set up, click on the ‘Publish’ button. The audiobook will now appear as a downloadable product on your online store.
If you liked this article, then please subscribe to our YouTube Channel for WordPress video tutorials. You can also find us on Twitter and Facebook.
Are you seeing a 500 internal server error in WordPress?
The internal server error is one of the most common WordPress errors. Since the error doesn’t give any other information, many beginners find it quite frustrating.
In this article, we will show you how to easily fix the 500 internal server error in WordPress.
Here is a quick overview of the topics we’ll cover in this article.
The 500 internal server error is a common web server error. It is not specific to WordPress websites and can happen with any website.
The 500 in the error message is technically an HTTP error code. Looking up this code will only show its standard description.
“500 Internal Server Error response code indicates that the server encountered an unexpected condition that prevented it from fulfilling the request.“
This is a generic catch-all error message which means that the server was unable to assign a better more helpful error message when it encountered the issue.
The error page looks different depending on which web server software (Nginx or Apache) your website is using and which browser you are using.
Here is how the Apache error page may look.
It may look different if you are using Nginx and Google Chrome.
It will also look different if Google chrome is unable to find an error page to display:
For beginners, this can be incredibly frustrating. There is no clue or message that would point them in the right direction to quickly fix it.
Asking how to fix an internal server error is like asking your doctor how to fix the pain you’re experiencing without telling them where the pain is.
However, if we know the common causes that trigger this error, then we can try fixing them one by one to resolve the error without breaking anything.
What Causes The Internal Server Error in WordPress?
Internal server error in WordPress is often caused by a corrupt .htaccess file, poorly coded plugins, or your active WordPress theme.
Other possible causes of the internal server error in WordPress that we know of are: PHP memory limit or corrupt core WordPress files.
In some conditions, the internal server error may only show up when you are trying to access the WordPress admin area while the rest of the site works fine.
That being said, now let’s take a look at how to go about troubleshooting the internal server error in WordPress.
Video Tutorial
If you prefer written instructions, then continue reading.
Fixing The 500 Internal Server Error in WordPress
Before you begin troubleshooting, make sure that you have a complete WordPress backup of your website on hand.
If you have access to the WordPress admin area, then you can a WordPress backup plugin to create a complete backup of your website. We recommend using Duplicator to handle this.
On the other hand, if you don’t have access to the WordPress admin area, then you can manually create a WordPress backup using phpMyAdmin and an FTP client.
After that, you can follow the following steps to troubleshoot and fix the internal server error on your website.
Clear WordPress and Browser Cache
Browsers and your WordPress caching plugins can sometimes mistakenly store a cached copy of an error page.
After that, if you have access to the WordPress admin area of your website, then you can empty the WordPress cache by visiting your caching plugin’s settings page.
The .htaccess file is a server configuration file that is also used by WordPress to set up redirects.
One of the most common causes of the internal server error is the corrupt .htaccess file.
The easiest way to fix this is by simply visiting the Settings » Permalinks page in the WordPress admin area and then clicking on the ‘Save Changes’ button without making any changes at all.
WordPress will now try to update your .htaccess file or generate a new one for you. You can now visit your website to see if this has resolved the internal server error.
If you can still see the error, then you need to make sure that WordPress was able to generate or write to the .htaccess file.
You can now try to manually replace the .htaccess file. First, you need to login to your website using FTP or the File Manager app under your hosting account control panel.
Next, you need to rename your main .htaccess file to something like .htaccess_old. This lets you keep the file as a backup, but WordPress won’t recognize it.
To rename the .htaccess file, you will need to login to your site using FTP or File Manager app in your hosting account’s cPanel dashboard.
Once you are connected, the .htaccess file will be located in the same directory where you will see folders like wp-content, wp-admin, and wp-includes.
Simply, right-click on the .htaccess file and rename it to .htaccess_old.
Next, you need to create a new .htaccess file.
Inside your site’s root folder, right-click and then select ‘Create new file’ option in your FTP client or File Manager app.
Name this new file .htaccess and click OK to save it.
Now, this .htaccess file is currently empty and you need to add default WordPress rewrite rules to it.
Simply right-click on the file and then select View/Edit in your FTP client or File Manager app.
The empty file will open in a plain text editor like Notepad or TextEdit. Now, you need to copy and paste the following code inside it.
# BEGIN WordPress
<IfModule mod_rewrite.c>
RewriteEngine On
RewriteBase /
RewriteRule ^index.php$ - [L]
RewriteCond %{REQUEST_FILENAME} !-f
RewriteCond %{REQUEST_FILENAME} !-d
RewriteRule . /index.php [L]
</IfModule>
# END WordPress
This code is the default rule set used by WordPress. Don’t forget to save your changes and upload the file back to the server.
You can now visit your website to see if this has resolved the internal server error.
If it did, then give yourself a pat on the back because you fixed the internal server error.
Important: Before you move on with other things, make sure that you go to Settings » Permalinks page in the WordPress admin area and click the save button without making any changes. This will regenerate the .htaccess file for you with proper rewrite rules to ensure that your post pages do not return a 404 error.
If checking for the corrupt .htaccess file solution did not work for you, then you need to continue reading this article.
Increasing the PHP Memory Limit
Sometimes the internal server error can happen if a script is consuming all the PHP memory limit.
The easiest way to increase the PHP memory limit is by editing the wp-config.php file. Be careful when you do this if you’re a beginner. You want to follow these instructions carefully because even small mistakes in WordPress core files can break your site.
To begin, simply connect to your WordPress website using an FTP client or the File Manager app under your hosting account control panel.
You’ll find wp-config.php file inside the main folder of your website. Right-click on it and select ‘Download.’ This will ensure that you have a backup of the file in case something goes wrong.
When you’ve saved that, you can right-click on it and select ‘View/Edit.’
Inside the wp-config.php file, you need to add the following code just above the line that reads ‘That’s all, stop editing! Happy publishing’.
If you are seeing the internal server error only when you try to log in to your WordPress admin or upload an image in your wp-admin, then you should increase the memory limit by following these steps:
Create a blank text file on your computer and name it php.ini
Paste this code in there: memory=256MB
Save the file
Upload it into your /wp-admin/ folder using FTP
If increasing the memory limit fixed the problem for you, then you have only fixed the problem temporarily. You still need to find the cause that is exhausting your memory limit.
This could be a poorly coded plugin or even a theme function. We strongly recommend that you ask your WordPress web hosting company to look into the server logs to help you find the exact diagnostics.
If increasing the PHP memory limit did not fix the issue for you, then you are in for some more troubleshooting.
Deactivate All WordPress Plugins
If none of the above solutions worked for you, then this error is most likely being caused by a specific plugin installed on your website.
It is also possible that it is a combination of plugins that are not playing nice with each other.
If you can access the WordPress admin area of your website, then you can simply go to the plugins page and deactivate all WordPress plugins.
However, if you are unable to access the WordPress admin area, then you can deactivate all WordPress plugins using FTP.
Simply connect to your WordPress website using an FTP client or the file manager app under your hosting account control panel.
Once connected, navigated to the /wp-content/ folder and rename the plugins folder to plugins.deactivated.
WordPress looks for plugins in the plugins folder. If the plugins folder is not found, then it will automatically deactivate all plugins.
You can now try visiting your website to see if this resolved the internal server error on your website.
To restore all your plugins, you can simply rename the plugins.deactivated folder back to plugins.
Your plugins will now be restored but they will still be deactivated.
You can now activate plugins one by one and visit your website to figure out which plugin is causing the internal server error.
If deactivating all plugins didn’t fix the internal server error on your website, then continue reading.
Switch to a Default WordPress Theme
One possible cause of the internal server error could be some code in your WordPress theme.
To find out if this is the case, you need to switch your theme to a default WordPress theme.
If you have access to the WordPress admin area, then simply go to the Appearance » Themes page. If you have a default theme already installed then you can simply click on the Activate button to switch theme.
If you don’t have a default theme installed, then you can click on the Add New button at the top and install a default theme (Twenty Twenty-Three, Twenty Twenty-Two, etc).
Now in case you don’t have access to the WordPress admin area, you can still switch to a default theme.
Simply, connect to your WordPress website using an FTP client and navigate to the /wp-content/ folder.
Right-click to select the themes folder and download it to your computer as a backup.
Next, you need to delete the themes folder from your website. Once it is deleted, go ahead and create a new themes folder.
Your new themes folder will be completely empty which means you don’t have any WordPress themes installed at the moment.
Next, you need to visit the WordPress themes directory and download a default WordPress theme to your computer.
Your browser will then download the theme as a zip file to your computer.
Locate the file on your computer and then unzip it. Windows users can unzip file by right-clicking on it and then selecting Extract All. Mac users can double-click on the zip file to extract it.
You’ll now see a folder containing your WordPress theme.
Switch back to your FTP client or File Manager up and upload this folder to the empty themes folder.
Once uploaded, WordPress will automatically start using the default theme.
You can now visit your website to see if this resolved the internal server error.
If this didn’t work, then you can reupload your WordPress themes from the backup or switch back to the theme you were using.
Don’t worry there are still a few more things you can do to fix the error.
Re-uploading Core Files
If the plugin and theme options didn’t fix the internal server error, then it is worth re-uploading the /wp-admin/ and /wp-includes/ folders from a fresh WordPress install.
This will NOT remove any of your information, but it may solve the problem in case any file was corrupted.
First, you will need to visit the WordPress.org website and click on the Download button.
This will download the WordPress zip file to your computer.
Go ahead and extract the zip file. Inside it, you will find a wordpress folder.
Next you need to connect to your WordPress website using an FTP client.
Once connected go to the root folder of your website. It is the folder that has wp-admin, wp-includes, wp-content folders inside it.
In the left column open the WordPress folder on your computer.
Now you need to select all files inside the wordpresss folder and upload them to your website.
Your FTP client will now transfer those folders to your server.
It will ask you whether you would like to overwrite the files. Select ‘Overwrite’ and then select ‘Always use this action’.
Your FTP client will now replace your older WordPress files with new, fresh copies.
If your WordPress files were corrupted, then this step will fix the internal server error for you.
Enable Debug Logs in WordPress
WordPress comes with a built-in system to keep logs for debugging.
Once activated, the plugin will turn on debugging logs on your WordPress website.
If you don’t have access to the admin area of your WordPress website, then you can turn on debugging by adding the following code to your wp-config.php file.
Once you have turned on debug logs, you can view these logs by using an FTP client and navigating to the /wp-content/ folder.
You can open the debug log file in a text editor and it will show you a list of errors and warnings that occur on your website.
Some of these errors and warnings can be harmless incidents that may not need fixing. However, if you are seeing an internal server error on your website then these may point you in the right direction.
Ask your Hosting Provider
If all methods fail to fix the internal server error on your website, then it is time to get some more help. Contact your web hosting support team and they will be able to check the server logs and locate the root cause of the error.
If you liked this article, then please subscribe to our YouTube Channel for WordPress video tutorials. You can also find us on Twitter and Facebook.
Do you want to add a full-screen welcome mat to your website?
A welcome mat is a full-screen, dynamic overlay that can help you get more newsletter subscribers, eBook downloads, sales to your products, and more.
In this article, we’ll share how to create a welcome mat for your WordPress site, along with some great welcome mat examples to learn from.
Why a Welcome Mat Can Boost Your Conversions
More than 70% of visitors leaving your WordPress website will never return unless you convert them into email subscribers or customers.
A welcome mat is a large, full-screen interstitial that blocks the view of the rest of your website’s content to capture the user’s attention.
That might sound like a bad idea, but it’s a great way to get your message in front of visitors straight away.
If visitors don’t want what you’re offering, then they can simply close the welcome mat.
Of course, you’ll want to give people a good reason to sign up if you’re showing a welcome mat instead of an exit-intent popup, such as a discount code or even a freebie.
For example, you may have seen popular eCommerce stores offer a special discount using a full-screen welcome mat with gamification.
In other cases, you may have seen popular bloggers using a full-screen welcome mat to grow their email newsletter.
That being said, let’s take a look at how to easily add a welcome mat to your website.
How to Create a Welcome Mat for Your Website
The easiest way of creating a welcome mat in WordPress is using OptinMonster. It is the best lead generation software in the world and allows you to easily create optin forms, including welcome mats.
First, you’ll need to visit the OptinMonster website and signup for an account. You will need at least the Basic plan to create fullscreen overlays.
The plugin connects the OptinMonster app to your website. Once you’ve activated the plugin, you’ll see the setup wizard in your WordPress dashboard. Go ahead and click the ‘Connect Your Existing Account’ button.
Next, a new window will open.
Simply click the ‘Connect to WordPress’ button.
Now, you’re ready to create your welcome mat.
Creating a Welcome Mat for Your Website
You can head to OptinMonster » Campaigns to create a new campaign.
Go ahead and click the ‘Create Your First Campaign’ button to start creating your welcome mat.
A new window will now pop up where you can select pre-built templates or choose ready-to-use campaigns and lead magnets, inspired by successful brands. OptinMonster also gives you the option to hire a specialist to customize your campaigns.
For this tutorial, we will use the ‘Templates’ option.
This will take you to the OptinMonster campaign builder.
Next, choose ‘Fullscreen’ for your campaign type.
You’ll need to choose a template for your campaign. We will use the ‘Entrance’ template, but you can pick a different one if you want.
Once you’ve selected a template, go ahead and enter a name for your campaign and click the ‘Start Building’ button.
Next, you can customize your campaign using the drag-and-drop builder. You can change anything you like here.
There are different blocks that can be added to the campaign, like images, text, buttons, and more. You’ll also want to edit the text to correspond to your offer.
Simply click on any element, and you’ll see that you can edit it in the left-hand pane.
For instance, we will change the headline of the full-screen welcome mat for our demo campaign.
The next step is to let your welcome mat slide in. You can do this by clicking the Settings gear icon on the bottom left-hand side.
From here, you need to toggle the ‘Display a Page Slide?’ option to enable it.
This means your welcome mat will slide down from the top of the screen instead of fading into view.
Next, you need to switch to the ‘Success’ view of your welcome mat. This is what your users will see after they perform the desired action. If you want, you can customize the success view or use the default template.
Once you’re happy with your welcome mat, you can set up how it will display on your site.
Displaying the Welcome Mat on Your WordPress Site
You can set how to display your welcome mat popup by switching to the ‘Display Rules’ tab in OptinMonster.
There are lots of personalization and targeting options like users’ location, what items they have in their eCommerce cart, what they have done previously on your site, exit intent, and more.
By default, OptinMonster campaigns display on all pages of your site after the visitor has been there for 5 seconds.
Since this is a welcome mat, you’ll probably want it to display immediately. Just change this value to 0 seconds.
By default, the welcome mat will display on every page of your site. You can easily include or exclude specific pages by using OptinMonster’s personalization rules.
You can click the ‘Next Step’ button when you’re done.
Next, you’ll see more options for displaying your campaign. For instance, you can add an effect or play a sound when the campaign appears on a user’s screen.
For this tutorial, we’ll use the default settings and click the ‘Next Step’ button.
On the next screen, you will see a summary of your display rules settings.
You can edit the settings before publishing the campaign.
Once you are ready to make your welcome mat live, simply go to the ‘Publish’ tab at the top of the screen.
Go ahead and change the Publish Status from ‘Draft’ to ‘Publish.’
Don’t forget to click ‘Save’ to store your changes and close the campaign builder.
Next, you will see WordPress Output Settings for your campaign. Make sure that your campaign is published.
If it isn’t, then simply click the Status dropdown menu and select the ‘Published’ option. Don’t forget to click the ‘Save Changes’ button when you’re done.
To check out your campaign, you can visit your website in a new incognito browser window.
You should see your welcome mat slide in seamlessly from the top of your screen.
Examples of Great Welcome Mats
Let’s take a look at some welcome mat examples from different industries. For each, we’ll go through what they’re doing well, plus any minor changes we might suggest.
1. Singularity
This welcome mat from Singularity prompted users to sign up and watch the livestream of the Singularity University Global Summit. It was hugely successful and captured over 2,000 new email signups in under 9 days.
We particularly like the great use of the logo, the clear fonts, and the bright “Remind Me!” button.
2. Goins, Writer
This welcome mat from Goins, Writer offers a free guide. It’s a clear, simple offer, and the minimalist design is in keeping with the rest of the website.
We feel that the “Yes” and “No Thanks” buttons are clear and easy to use, and the use of numbers in the headline makes for a compelling offer.
3. AVweb
This welcome mat has a large, clear image of a small airplane. It’s instantly eye-catching.
We like the great image, and the clear “Sign Me Up!” call to action. One small possible tweak would be to shorten the tagline to avoid having it cover the top of the image.
4. Loaded Landscapes
This welcome mat from Loaded Landscapes is a little different from other examples. The background is slightly transparent.
We like the clear offer and the enthusiasm of the red call to action button. The background of the site beneath the welcome mat could be a little distracting, so it might be worth changing it to be fully opaque, however.
5. OptimizeMyBnb
This welcome mat was used on a specific page, which was included as a clickable link inside a book the website owner sold through third-party retailers. These retailers didn’t pass on customers’ details, though. Using a welcome mat in this way helped capture customers’ email addresses.
We feel the very clear headline, subheading, and call-to-action text all worked well, and that the ‘no, thanks’ button is used well to give the user sense of FOMO.
If you’re looking for more inspiration, here are some things you can do with a fullscreen welcome mat:
Present a targeted offer or coupon
Showcase new products and services
Let visitors know what to expect from the site
Win new subscribers by highlighting their best content
Point visitors to their social media profiles
Collect email subscribers as part of a prelaunch phase
If you’re serious about improving your website conversions, then welcome mat and even exit fullscreen interstitials are some of the highest converting elements you can add to your website.
We hope this article helped you learn how to create a welcome mat for your website and that you found the examples inspiring. You may also want to take a look at our comparison of the best email marketing services, and our list of the must-have WordPress plugins.
If you liked this article, then please subscribe to our YouTube Channel for WordPress video tutorials. You can also find us on Twitter and Facebook.
Vlogging is a powerful way to connect with people and build a personal brand. However, if you simply upload vlogs to third-party platforms like YouTube, then you may struggle to grow your audience, make money, and become a successful vlogger.
In this article, we will show you how you can start a vlog and make money.
Which Is the Best Website Builder for Your Video Blog?
There are many website builders that can help you create a vlog site, but we recommend using WordPress and a separate video hosting platform.
To learn more about why WordPress is such a good choice, please see our complete WordPress review with pros and cons.
There are two types of WordPress software: WordPress.com and WordPress.org. We recommend using WordPress.org, also called ‘self-hosted WordPress.’ This will give you full ownership and control of your site.
Using WordPress.org allows you to install third-party plugins and themes, including plenty that are designed specifically for vloggers.
Also, while you can upload videos to WordPress, it’s far better to use a separate video hosting platform such as YouTube or Vimeo.
Videos take up a lot of your hosting resources, which will slow down your website. Instead, we recommend uploading your vlogs to a separate hosting platform such as YouTube or Vimeo, which has all the server resources you need.
After uploading your vlogs to one of these sites, you can then embed your vlog in a WordPress page or post by simply copying and pasting a link. WordPress has built-in support for most major video hosting platforms.
If you really want to save time and impress your viewers, then you can use a plugin like Smash Balloon to create a video feed that will update automatically every time you post a new vlog.
If you don’t already have a video hosting platform in mind, then don’t worry. Later in this guide, we’ll help you find the perfect platform for your vlogs.
Step 1. Setting Up Your Video Blog Website
To create a video vlog, you’ll need a domain name and web hosting.
Although the WordPress software is free, hosting and domain names are where the costs can really start to add up.
A domain name typically costs $14.99/year and hosting costs start from $7.99/month. This is a lot for hobby vloggers, new creators, or anyone who is working with a tighter budget.
Thankfully, Bluehost has agreed to offer our users over 60% off on web hosting and a free SSL certificate as part of this deal. This is absolutely essential if you plan to sell premium videos and make money from your vlogs. You will also get a free domain name when you sign up!
Simply click the link below to create a vlogging website for as little as $2.75 per month.
Because you get a free domain when you sign up with Bluehost, you’ll need to be sure it’s the right fit for your video blog. For expert tips, check out our guide on how to choose the best domain name.
Once you’ve completed the purchase, you’ll get an email with instructions on how to log in to your web hosting control panel. This is your hosting account dashboard where you can manage your vlog, including setting up email notifications and asking for WordPress support if you need it.
It’s also where you’ll install the WordPress software, so let’s do that now.
Step 2. Install WordPress on Your Video Blog
When you sign up with Bluehost using our link, you’ll get access to a one-click WordPress installer. Simply log into your Bluehost account and click on ‘One Click Install.’
You can now follow the onscreen instructions to set up WordPress.
Once WordPress is set up, you’re ready to start customizing your vlog site.
Step 3. Select a Video Theme
WordPress themes are professionally designed templates that change how your vlog looks and acts.
There are lots of different premium and free WordPress business themes to choose from. You can generally categorize these as multipurpose WordPress themes, or niche industry themes. However, most WordPress themes are designed to show text.
Since we’re starting a vlog, we need a theme that’s designed specifically for videos.
Even if you’re using a separate video hosting platform, embedded videos still take time to load. With that in mind, it’s important to find a lightweight theme that won’t slow down your website. Wherever possible, we also recommend using a theme that has built-in lazy loading.
On top of that, vlogs often need special features such as parallax scrolling, lightbox popups, and fullscreen video backgrounds.
That’s a lot to keep in mind, so you may want to look at our expert pick of the best WordPress video themes.
After installing a theme, you may want to customize it by going to Appearance » Customize in the WordPress dashboard. This will launch the theme customizer where you can fine-tune the theme settings and see your changes in the live preview.
If you’re using one of the newer full-site editing themes, then you’ll need to go to Appearance » Editor instead.
Here, you can fine-tune the theme using blocks.
Just remember that you can customize your theme at any point. You can even completely change your WordPress theme, if you realize it doesn’t quite meet your needs.
This means you don’t need to finalize your site design now. In fact, it may be easier to fine-tune your vlog once you’ve added some content.
Step 4. Create a Custom Homepage
WordPress comes with two content types called posts and pages.
You’ll typically use posts to create articles and blogs, while pages are static “one-off†types of content. For example, you might publish an about page, a privacy policy, or a custom archive page.
There are a few different ways to show videos in WordPress. However, since we’re creating a video vlog you’ll typically embed one or more videos in a blog post.
By default, the WordPress homepage shows your posts in reverse chronological order, so your latest vlog appears at the top of the homepage.
However, you may want to move this blog list to another page, and use a custom homepage instead. This custom homepage can introduce your vlog to visitors and let them know what you have to offer.
You might even create a YouTube gallery of all your best videos, which is a great way to catch a visitor’s attention and make them want to watch more of your content.
Smash Balloon allows you to create all kinds of galleries, including showing a specific YouTube playlist or favorites feed, a single video, or even your latest live stream.
Once you’re happy with the design, it’s time to set it as your homepage. To do this, go to Settings » Reading in the WordPress dashboard.
Here, scroll to ‘Your homepage settings’ and select ‘A static page.’
Next, open the ‘Homepage’ dropdown and choose the page that you want to use.
After that, simply scroll to the bottom of the screen and click on ‘Save Changes.’ Now, if you visit your website you’ll see the new homepage in action.
With that done, make sure you create a separate blog page to display your vlogs.
Step 5. Set Up Your Video Hosting Platform
Before you can start adding videos to your WordPress website, you’ll need to upload them to a separate video hosting platform. In this way, you can show countless high-resolution videos on your website without affecting its performance.
There are lots of different video hosting platforms that you can use, but we recommend YouTube as it’s the most popular choice.
It’s free to create a YouTube account and you can upload as many videos as you want.
YouTube even has a Partners Program that you can join to make money from your videos. This program also offers more benefits like analytics, longer videos, and editing tools.
If you don’t want to use YouTube, then there are many other popular platforms including Vidyard, Wistia, and SproutVideo. For a closer look at all the top video sites, please see our expert pick of the best video hosting sites for bloggers.
After choosing a platform, you’ll need to create an account and upload all the vlogs that you want to show on your WordPress website.
For instructions on how to do this, check out the online documentation for your chosen video hosting platform.
Step 6. Create Your First Vlog
To create your first vlog, simply go to Posts » Add New in your WordPress dashboard.
WordPress has a block-based editor that allows you to create beautiful content layouts for your vlogs. Here, you can add text, images, audio clips, and more.
The easiest way to add vlogs to WordPress is by using the built-in auto-embed feature. If you’re using one of the big video hosting platforms, then you can simply paste the video’s URL into the WordPress content editor, and WordPress will handle the rest.
Just head over to your chosen video hosting platform and find the vlog that you want to show on your WordPress blog. You can then simply copy the video’s URL.
After that, switch back to the WordPress dashboard and paste the URL in the content area. If you paste it into a standard Paragraph block, WordPress will automatically try to place it in the correct block, such as the YouTube block.
Even if you don’t see the platform-specific block, it will use the Embed block and display the video inside the content editor.
As you’re working on the vlog, you can see how it’ll look to visitors by clicking on ‘Preview.’
This will open the page in a new tab.
The WordPress post editor also has sections for Categories and Tags. You can use these to organize your vlogs so it’s easier for visitors to find interesting content. To learn more, please see our guide on how to add categories and tags in WordPress.
When you’re happy with how the vlog looks, go ahead and click on the ‘Publish’ button in the top-right corner of the screen.
To add more vlogs to your website, simply follow the same process described above.
Step 7. Add a Contact Form to Your Vlog
Some viewers might want to contact you directly. This may include affiliate marketers, sponsors, advertisers, and other brands who are looking to build relationships with creators, or other vloggers who want to collaborate.
These people could ring your phone number or send a message to your business email address, but we always recommend adding a contact form to your website.
This makes it easier for potential partners to contact you, so you don’t miss out on any opportunities to grow your brand and make money from your vlogs.
The easiest way to add a contact form to your WordPress website is by using the free WPForms plugin. WPForms comes with a built-in Simple Contact Form template that you can customize using the drag-and-drop editor.
You can then add the form to any page, post, or widget-ready area using the ready-made WPForms block.
Once you’ve added some content to your vlog, it’s a good idea to add a navigation menu so visitors can find their way around the different videos.
The exact location of your menu will depend on your WordPress theme. Most themes have several options, so you can create multiple menus and then show them on different areas of your vlog.
Whether you create a single menu or multiple menus, it’s easy to add navigation to your vlog. For a complete guide, please see our post on how to add a navigation menu.
Menus encourage people to explore your site, but sometimes visitors may want to search for a specific vlog. WordPress comes with a built-in search feature, but it’s quite basic and not very good at finding relevant content.
It is very easy to use and gives much more accurate search results. It allows visitors to search for a keyword in the post or page title, content, URL slug, categories, tags, taxonomies, WordPress excerpts, and even comments.
All of this can help visitors find interesting vlogs, fast.
If you want to get more viewers, then you’ll need to optimize your vlog for SEO. This will help search engines understand your content and show it to people who are looking for videos just like yours.
AIOSEO is the best WordPress SEO plugin on the market and has everything you need to get your vlogs onto the first page of Google, without having to learn any complicated SEO jargon.
AIOSEO comes with the easiest setup wizard that helps you choose the best SEO settings for your business. AIOSEO will even scan your vlogs and show an actionable checklist on how you can optimize that specific vlog.
Additionally, AIOSEO has a video sitemap feature that you can use to show search engines what’s the most important content to index.
Did you know that 70% of people who leave your site will never come back? Thankfully there are lots of ways to turn abandoning visitors into loyal viewers.
To start, it’s smart to create an email newsletter so people who enjoy your vlogs can subscribe. After that, you can email these subscribers every time you post a new vlog.
You can also keep them engaged with your brand by sending them fun surveys and polls, notifying them about any giveaways and contests you’re running, or even simply asking them for feedback on your latest vlog.
All of this can help you create a sense of community and build a stronger relationship with your viewers.
If you do build an email list, then you’ll want to make sure your messages arrive safely in the subscriber’s inbox and not in their spam folder. With that in mind, we recommend using an SMTP service provider to improve your email deliverability rates.
Another option is to use push notifications with software like PushEngage to send targeted, personalized messages to viewers after they leave your vlog.
Push notifications are short, clickable notifications that appear as a popup on the user’s desktop or mobile devices. Some of the biggest websites in the world use push notifications to keep users engaged, including Facebook.
These notifications go directly to the user’s web browser or mobile device so they have a high chance of getting the person’s attention, which makes them perfect for notifying viewers when you post a new vlog.
Creating lots of quality, engaging vlogs takes a lot of time and effort, so you may want to make money from your videos.
If you’ve created a contact form, then potential sponsors and partners already have a way to contact you, which is a great start. However, there are lots more ways to make money online with WordPress.
Here are some of the best ways to make money from your vlog.
Google AdSense
There are many reasons why it’s smart to embed videos on your own website, rather than simply uploading them to platforms like YouTube.
One major benefit is that you can show Google AdSense ads next to your videos.
When you sign up for Google AdSense, Google acts as a middleman between you and the advertiser. Instead of you having to find the right partners for your vlog, Google allows advertisers to bid for keywords matching your content. This allows you to get the best possible rates for the ads on your vlogging website.
Many vloggers make money by recommending products and services to their viewers. For example, many lifestyle vloggers film daily routine videos showing off their favorite skincare or fitness products.
By using affiliate links, you can earn money every time a viewer buys a product or service based on your recommendation.
For the best results, it’s a good idea to only recommend quality items that you already use and trust. If you encourage viewers to buy poor-quality or scammy products, then you’ll damage your band and almost certainly lose viewers.
If you build a strong, positive relationship with your viewers then they may want to support your work as a vlogger. This is particularly true if you’re a hobby vlogger or someone who is just starting out.
Although they’re mostly used by non-profits, some vloggers use donation forms so that viewers can support their work. These forms are often presented as ‘buy me a coffee’ or ‘buy me a beer.’
Most of the time, you’ll want your vlogs to be publicly available so you can get as many views as possible and build your audience.
However, some vloggers may want to create a video membership site in WordPress. This allows people to pay for different perks, such as early access to the latest vlogs, exclusive live streams, or premium members-only videos.
You can also offer perks that don’t involve videos, such as a members-only forum, blog posts, or the ability to chat with you directly on channels like Discord.
The easiest way to create a membership site is by using MemberPress. It is the best WordPress membership plugin on the market and allows you to accept payments, create unlimited subscription levels, restrict access to video pages based on levels, and more.
Sell Your Videos as Digital Downloads
Depending on the kind of vlogs you create, you may decide to sell some of your premium videos as digital downloads. For example, if you’re a health and fitness vlogger then you might create videos teaching your followers different exercise routines.
For some niches, this can be a way to monetize the audience you’ve built from your vlogs.
With Easy Digital Downloads, you have complete control over how you distribute your videos. You can allow customers to download files as many times as they want or restrict file downloads by time or attempt.
If you liked this article, then please subscribe to our YouTube Channel for WordPress video tutorials. You can also find us on Twitter and Facebook.
Do you want to add your WordPress products to Google Shopping?
Adding your online store products to Google Shopping can help you increase traffic, reach more customers, and generate greater revenue.
In this article, we’ll show you how to easily add WordPress products to Google Shopping.
Why Should You Add WordPress Products to Google Shopping
Google Shopping is a virtual marketplace like Amazon and Etsy, where users can search, view, and compare products from different online stores that have paid to advertise their products.
If you have a WooCommerce store, then adding your products to Google Shopping can prove to be extremely beneficial for your business.
Your products will be shown to all users browsing through Google shopping which will increase traffic on your WordPress website, generate more revenue and bring in more customers.
That being said, let’s see how you can add WordPress products to Google Shopping.
How to Add WordPress Products in Google Shopping
Step 1: Creating a Google Merchant Account
To add your products to Google Shopping, you have to start by creating an account in the Google Merchant Center. This is the place where your product information will be stored for viewing by Google Shopping.
First, go to the Google Merchant Center page and click the ‘Sign up for free’ button.
After that, Google will ask you about your online business.
Just check the answers that apply to you, and then provide your website’s URL.
After you’ve provided the details, you’ll be redirected to another page.
Here, you simply have to click the ‘Create a Google Merchant Account’ button at the bottom of the page.
Now, you will be asked to provide your business details. You can start by writing your business name.
Next, select the country where your business is based from the dropdown menu below the ‘Registered Country’ option.
After that, click the ‘Continue to Merchant Center’ button.
You’ve successfully created your Google Merchant Account. Now all you have to do is provide your business info and shipping details.
Once you’ve filled in those details, simply click the ‘Save’ button at the bottom to store your settings.
Step 2: Linking Your Google AdWords Account
Now you’ll have to link your Google AdWords account to your Google Merchant Center account so that you can show your products via Google Shopping.
To link your account, simply go to the Google Merchant Center dashboard and click the gear icon at the top of the page.
Clicking it will open up a ‘Tools and Settings’ prompt. Here you simply have to choose the ‘Linked Account’ option present.
This will take you to the ‘Linked Accounts’ page.
Now you simply have to click the ‘+’ button to create your Google Ads account.
This will open up a ‘Create Your Google Ads Account’ prompt.
Simply choose your preferred time zone and currency and then click the ‘Create’ button.
You have now successfully created your Google Ads account.
This is how it will look once your account has been created.
Step 3: Adding WordPress Products to Google Shopping
To add your WordPress products to Google Shopping, we will be using the ELEX Google Shopping plugin to display your WooCommerce products in Google Shopping.
Upon activation, head over to the Google Shopping Feed » Create Feeds page from the WordPress admin sidebar.
From here, simply fill in your business details and click the ‘Continue’ button at the bottom.
Next, you’ll be taken to the ‘Map Category’ page. Here you simply have to select your product categories.
Simply type your product categories in the ‘Google Categories’ tab and click ‘Continue’
After that, you’ll be directed to the ‘Map Attributes’ page.
This is where you’ll have to fill in your product details including product id, product description, product link, pricing, image, and more.
Here select and fill in as many attributes as possible for more visibility in Google Shopping and click the ‘Continue’ button.
Now that you’re on the ‘Filtering Options’ page, simply fill in the details as required for your online store.
For example, you can include how many items you have in stock or note how many have sold already.
Next, simply click the ‘Generate Feed’ button at the bottom.
After you’ve created your Google Shopping feed, go to the Google Shopping Feed » Manage Feeds page from the admin sidebar.
Here you will be able to view your Google Shopping Feed. Now you have to simply click the ‘Download’ button beside it.
Once you’ve downloaded your feed as an XML file, go back to the ‘Google Merchant Center’ dashboard and click the Products » Feeds option from the sidebar.
This will open up the ‘Primary Feeds’ page where you have to click the ‘+’ button to add a new feed.
This will take you to the ‘New Primary Feed’ page where you can start by filling in basic details. First, start by adding all your target countries.
Next, select your preferred language and then click the ‘Continue’ button.
Then, you have to choose a name for your feed and select a method to connect your data to the Merchant center.
For this tutorial, we will be uploading the feed XML from WordPress.
After that, just click on the ‘Continue’ button.
Now that you’re on the ‘Setup’ page, simply type the name for your Google Shopping Feed.
Next, just upload the Feed file you got from WordPress and click the ‘Create Feed’ button.
You have now successfully added your WordPress products to Google Shopping.
Bonus: How to Add Google Merchant Center Schema in WordPress
To improve your product search visibility in Google Shopping and increase conversion rates, you should add a Google Merchant schema in WordPress.
Schema markup is an HTML code that provides more details about your products to search engines.
A GMC listing schema will make your search snippets more prominent and will allow your products to be featured as popular products for the relevant search terms.
The easiest way to add a Google Merchant Center listing schema to WordPress is by using the All in One SEO for WordPress.
Upon activation, a setup wizard will open up. Simply go ahead and click the ‘Get Started’ button.
After that, you need to follow the onscreen instructions in the setup wizard to configure the plugin. If you need help, please see our guide on how to properly set up AIOSEO in WordPress.
After the AIOSEO plugin has been set up, you need to visit the Products » All Products page from the admin sidebar.
From here, simply click on the ‘Edit’ link below a product to open up the ‘Edit Product’ page.
Once there, you need to scroll down to the ‘AIOSEO Settings’ section and click on the ‘Schema’ tab.
Now, you need to make sure that the schema type is set to ‘Product’ by default.
If that is not the case, then simply click on the ‘Generate Schema’ button.
It will open up the Schema Catalog which will list all the available schema templates.
From here, you need to click the ‘Add Schema’ (+) button beside the Product option to set it as your primary schema.
Note: You may see the ‘Article’ schema already applied. If so, you can remove it as you add the new one because this particular page isn’t an article or blog post in Google’s eyes.
Next, you will need to fill in the product information to add the GMC listing schema.
For that, you need to click the ‘Edit Schema’ button next to the ‘Schema in Use’ option.
This will open up the ‘Edit Product’ modal where you will need to fill in the product details.
If you’re using WooCommerce, then AIOSEO will automatically pull most of the product data from your product information.
However, if you want to fill in the information manually, you need to simply toggle the ‘Autogenerate Fields’ switch to ‘No.’
The product attributes that you will need to add include the product name, description, image, ISBN, price, material, color, shipping details, and more.
We recommend that you provide all the details so that the schema markup can make your product snippets more engaging.
Once you’re done, simply click the ‘Update Schema’ or ‘Add Schema’ button to store your settings.
You have now successfully added the Google Merchant Center listing schema to WordPress, and your products can now be featured on the platform and hopefully earn you more sales.
If you liked this article, then please subscribe to our YouTube Channel for WordPress video tutorials. You can also find us on Twitter and Facebook.