Do you want to add a multilingual search in WordPress?
If you have a multilingual WordPress site, then adding a multilingual search feature can help users find information more quickly by searching in their own language.
In this article, we’ll show you how to easily add multilingual search in WordPress and delight your users with a better user experience.
Why Should You Add Multilingual Search in WordPress?
Often users have trouble finding information on multilingual websites because either there is no search feature that they can use, or the search feature shows them content in the wrong language.
Adding a multilingual search feature helps users easily find the content they are looking for. This improves user experience which means users will stay longer on your website.
Research shows that engaged users are more likely to convert, subscribe, or make a buying decision.
That being said, let’s take a look at how to easily add a multilingual search in WordPress without breaking your website or writing any code.
Note: Keep in mind that the free version of TranslatePress only allows you to translate your website into one other language. So if you want to add multilingual search in WordPress for more than two languages, then you’d need to buy the TranslatePress Premium version.
Once you have translated some content on your WordPress website. It is time to add the search form.
Add a Search Block to your WordPress Site
WordPress comes with a built-in search block that you can add anywhere on your website.
If you’re using a block-based theme like Ultra, then you’ll be using the full site editor to add the search block.
Simply visit the Appearance » Editor page from the WordPress dashboard.
This will launch the full site editor which looks a lot like the block editor you use for writing posts and pages.
Now, click on the add block button (+) to add the Search block.
You can move the search block up and down to display it anywhere on the page.
Search block also comes with a few style options that you can choose from the block toolbar or settings.
Once you are finished, don’t forget to click on the Save button to save your changes.
You can now visit your website to see the search form in action.
On the other hand, if you’re using a theme that does not support the full-site editor, then you can add a search form as a widget.
Simply go to the Appearance » Widgets page from the WordPress admin dashboard.
Here, click the Add widget block button (+) and add the Search block to your widget area.
Once the ‘Widget Block Menu’ opens up, locate the ‘Search’ block and add it to your WordPress sidebar.
Don’t forget to click the ‘Update’ button at the top to save your changes.
Once you’ve saved the changes, visit your site and see the search box in action.
Method 2: Adding Multilingual Search Using SearchWP (Recommended)
The default WordPress search feature used by TranslatePress is not very good. It is quite basic and only looks for search terms in certain places.
It is the best WordPress search plugin on the market and allows you to easily replace the default WordPress search with a more powerful search feature.
SearchWP automatically builds a search index and matches search keywords in content, title, categories, tags, shortcodes, documents, products, and more.
Plus, it automatically replaces the default search form upon activation so you don’t need to replace it if you were already using it on your site.
That being said, let’s take a look at how to easily add a better multilingual search to your WordPress site.
After that, go to the SearchWP » Settings page and then click on the ‘License’ menu option to enter your license key.
You can get the license key from your ‘SearchWP Accounts’ page. Simply copy the license key from there.
After that, paste it into the ‘License Key’ field and then click on the Activate button.
Now, you are ready to create your first custom search engine.
Simply go to the SearchWP » Settings page from the dashboard.
From here, you will see SearchWP’s first default search engine for you. It is pre-configured to work for most websites including multilingual websites.
You’ll see all your post types with different attributes. Next to each attribute there will be a slide that you can move to assign weight for that attribute.
You can also click on the Add/Remove Attributes button to include more areas in the search.
For instance, you can add custom fields and taxonomies to the attributes as well.
If you are unsure about a setting, you can leave it as it is. The default options would work for more use cases.
Finally, click on the Save Engines button to store your settings.
SearchWP will now start building your search index in the background.
Now, all you need to do is add the search form to your site.
Add a Search Block to your WordPress Site
SearchWP replaces the built-in search feature, which means you can use the default WordPress search form and it would still use SearchWP to show the results.
If you haven’t already added a search form to your website, then here is how you would add it.
If you’re using a block-based theme, then you’ll be adding a search block using a full-site editor.
Simply go to the Appearance » Editor page from the admin dashboard.
On the edit screen, click on the add block button (+) at the top and add the search block.
You can move the search block to the area where you want to display the search form by moving it up or down.
Finally, don’t forget to click on the Save button to save your changes.
If you’re using a theme that doesn’t support the full-site editor, then you’ll need to add a search widget to your website’s sidebar or widget-ready area.
For that, head over to the Appearance » Widgets page from the dashboard.
Now click on the add block button (+) at the top to open up the ‘Widget Block Menu’.
From here, locate and add the Search widget to your preferred widget area.
Don’t forget to click the ‘Update’ button at the top to save your changes.
Next, simply visit your website and use your improved search box.
If you liked this article, then please subscribe to our YouTube Channel for WordPress video tutorials. You can also find us on Twitter and Facebook.
Learn how to display your Instagram Feed on your Elementor website with this step-by-step guide. Follow the instructions to install & activate the plugin, create an access token, configure your feed, and embed it in Elementor.
Recently one of our readers asked if there is an easy way to add box shadows in WordPress?
Shadows can make your most important content stand out and grab your visitors’ attention. They can also help flat website designs appear more engaging and interesting.
In this article, we will show you how to easily add box shadows in WordPress, step by step.
Why Add Box Shadows in WordPress?
A box shadow, sometimes also known as a drop shadow, is a visual effect that makes it look like an onscreen object is casting a shadow.
We tend to pay more attention to objects that appear closer to us. That’s why many website owners add box shadows to their most important content to make it look like it’s hovering above the page.
For example, if you add a big shadow to a call to action button, then it will look physically closer to the visitor. This will draw the person’s attention toward this important button.
With that said, let’s see how you can add box shadows to your WordPress blog or website. Simply use the quick links below to jump straight to the method you want to use.
Method 1. How to Add Box Shadows Using Code (Recommended)
When adding box shadow, the best practice is to only add it on your most important website elements. If you add a unique shadow effect to each WordPress block, then it can make your site look messy and confusing.
It’s also important that you keep your box shadows consistent across the site. The best way to do this is by defining the style in CSS using WPCode.
WPCode is the best code snippets plugin used by over 1 million WordPress websites. It makes it easy to add custom code in WordPress without having to edit the functions.php file.
With WPCode, even beginners can edit their website’s code without risking mistakes and typos that can cause many common WordPress errors.
In the above snippet, you may need to replace the px values depending on the kind of shadow you want to create.
To help you out, here’s what the different px values mean, going from left-to-right:
Horizontal offset. When you set a positive value, the shadow gets pushed to the left. If you type in a negative value like -5px, then the shadow will be pushed to the right. If you don’t want to add a horizontal offset, then you can use 0px instead.
Vertical offset. If you use a positive value, then the shadow will be pushed downwards. If you type in a negative value then the shadow will be pushed upwards. If you don’t want to offset the shadow vertically, then just type in 0px.
Blur radius. This blurs the shadow so that it doesn’t have any harsh edges. The higher the value, the greater the blur effect. If you prefer to use sharp edges, then type in 0px.
Spread radius. The higher the value, the greater the shadow’s spread. This value is optional, so skip this one if you don’t want to show a spread.
Color. Although grey is the most common color for shadows, you can use any color you want by typing in a hex code. If you’re not sure what code to use, then you can explore different colors using a resource like HTML Color Codes.
When you’re happy with the snippet, scroll to the ‘Insertion’ section. WPCode can add your code to different locations, such as after every post, frontend only, or admin only.
We want to use the custom CSS code across our entire WordPress website, so click on ‘Auto Insert’ if it isn’t already selected. Then, open the ‘Location’ dropdown menu and choose ‘Site Wide Header.’
After that, you’re ready to scroll to the top of the screen and click on the ‘Inactive’ toggle, so it changes to ‘Active.’
Finally, click on ‘Save Snippet’ to make the CSS snippet live.
Now, you can add the custom CSS class to any block.
In the WordPress content editor, simply select the block where you want to add a box shadow. Then, in the right-hand menu click to expand the ‘Advanced’ section.
Here, you’ll see fields where you can add different classes.
In ‘Additional CSS Class(es),’ type in shadow-effect.
When you’re ready to publish the box shadow, just click on the ‘Publish’ or ‘Update’ button.
Now if you visit your website, you’ll see the box shadow live.
Method 2. Add a Box Shadow Using a Free Plugin (Quick and Easy)
If you’re not comfortable writing code, then you might prefer to create shadows using Drop Shadow Box. This free plugin allows you to add box shadows to any block using the built-in WordPress page and post editor.
First, you’ll need to install and activate the plugin. If you need help, then please see our guide on how to install a WordPress plugin.
There are no settings to configure, so you can start using this plugin straight away.
To add a drop shadow, simply click on the ‘+’ icon and start typing in ‘Drop Shadow Box.’ When the right block appears, give it a click to add it to the page or post.
This adds the drop shadow as an empty box, so the next step is adding some content.
To do this, go ahead and click on the ‘+’ inside the Drop Shadow Box block.
Then, simply add the block you want to use and configure it as normal.
For example, in the following image we’ve added an Image block and selected a picture from the WordPress media library.
With that done, click to select the Drop Shadow Box block. In the right-hand menu, you’ll see all the settings you can use to style this block.
WordPress sets the shadow’s width automatically but you can change this by opening the ‘Width’ dropdown and then choosing either ‘Pixels’ or ‘%.’
You can then resize it using the settings that appear.
The Drop Box Shadow plugin comes with a few different effects such as curved edges and an eye-catching ‘Perspective’ effect.
To preview the different effects, simply open the ‘Effect’ dropdown and choose from the list. The preview will update automatically so you can try different styles to see what you prefer.
You can also change whether the plugin shows the shadow inside the box, outside the box, or both using the ‘Inside Shadow’ and ‘Outside Shadow’ toggles.
After that, you can change the color of the box and border using the settings under the ‘Colors’ header.
Just be aware that ‘Background’ refers to the inside of the Drop Shadow Box, while ‘Border’ appears outside of the block.
If you want to create a softer, curved shadow box then you can enable the ‘Rounded corners’ toggle. Finally, you can change the alignment and padding, similar to how you customize other blocks in WordPress.
To create more box shadows, just follow the same process described above.
When you’re happy with how the page looks, simply click on ‘Update’ or ‘Publish’ to make all your new box shadows live.
Method 3. Add a Box Shadow Using a Page Builder (Advanced)
If you want to add box shadows to landing pages, custom homepages, or any part of your WordPress theme, then we recommend using a page builder plugin.
It also lets you add box shadows to any block using its advanced drag-and-drop editor.
First, you need to install and activate the SeedProd plugin. For more details, see our step-by-step guide on how to install a WordPress plugin.
Note: There’s also a premium version of SeedProd that comes with more professionally-designed templates, advanced features, and WooCommerce integration. However, we’ll be using the free version as it has everything you need to add box shadows in WordPress.
After activating the plugin, SeedProd will ask for your license key.
All of SeedProd’s templates are easy to customize, so you can use any design you want.
When you find a template that you like, simply hover your mouse over it and click on the checkmark icon.
You can now type in a name for your landing page into the ‘Page Name’ field. SeedProd will automatically create a ‘Page URL’ using the page name.
It’s smart to include relevant keywords in your URL wherever possible, as this can help search engines understand what the page is about. This will often improve your WordPress SEO.
To change the page’s automatically-generated URL, simply type into the ‘Page URL’ field.
When you’re happy with the information you’ve typed in, click on ‘Save and Start Editing the Page.’ This will load the SeedProd page builder interface.
This simple drag-and-drop builder shows a live preview of your page design to the right. On the left is a menu showing all the different blocks and sections you can add to the page.
When you find a block that you want to add, simply drag and drop it onto your template.
To customize a block, go ahead and click to select that block in the SeedProd editor. The left-hand menu will now update to show all the settings you can use to customize the block.
For example, if you click on a Headline block then you can type in your own text, or change the text color and font size.
As you’re building the page, you can move blocks around your layout by dragging and dropping them. For more detailed instructions, please see our guide on how to create a landing page with WordPress.
To create a box shadow, click to select any block in the SeedProd page editor. The settings in the left-hand menu may vary between blocks, but you’ll typically need to click on an ‘Advanced’ tab.
Here, look for a ‘Shadow’ dropdown menu under the ‘Styles’ section. Simply open this dropdown and choose a shadow style such as Hairline, Medium, or 2X Large.
The preview will update automatically, so you can try different styles to see what looks the best on your page design.
If you don’t want to use any of the ready-made styles, then click on ‘Custom.’
This adds some new settings where you can change the color, blur, spread, and position of the custom shadow.
That done, you can continue working on the page by adding more blocks and box shadows.
When you’re happy with how the page looks, click the ‘Save’ button and then choose ‘Publish’ to make it live.
Method 4. How to Add a Box Shadow Using CSS Hero (Premium Plugin)
If you’re not comfortable working with code but still want to create advanced box shadows, then you can try CSS Hero. This premium plugin allows you to fine-tune every part of your WordPress theme without having to write a single line of code.
CSS Hero allows you to create a unique shadow for each block, so it’s also a great choice if you want to create lots of different shadow effects.
Upon activation, you’ll see a ‘Proceed to Product Activation’ button at the top of the screen. Go ahead and click on this button.
This will take you to the CSS Hero website where you can log into your account and get a license key. Simply follow the onscreen instructions, and you’ll be redirected back to your site in a few clicks.
Next, click the ‘Customize with CSS Hero’ text in the WordPress admin toolbar.
By default, clicking on any piece of content will open a panel with all the settings you can use to customize that content.
This is great if you want to add a box shadow to your website’s homepage. However, if you want to customize any other page then you’ll need to switch from ‘Select’ mode to ‘Navigate’ mode, as this allows you to interact with menus, links, and other content as normal.
To do this, click on the ‘Select / Navigate’ toggle in the toolbar so that it shows ‘Navigate.’
You can now navigate to the page or post where you want to add the shadow.
As soon as you reach that page, go ahead and click on the ‘Select / Navigate’ toggle again so that it shows ‘Select.’
With that done, click on the paragraph, image, button, or any other content where you want to add a box shadow.
In the left-hand panel, click on ‘Extra.’
You can now go ahead and click on ‘Make Shadow,’ which shows all the settings you can use to create a box shadow.
To start, you can change whether the shadow appears inside or outside the block using the ‘Shadow Position’ settings.
After making this decision, you can fine-tune the shadow’s orientation using the small dot in the ‘Orientation’ box.
Simply drag and drop the dot into a new position to see it move in the live preview.
When you’re happy with the shadow’s position, you can change its color, blur, and spread.
CSS Hero will show these changes immediately, so you can try different settings to see what looks the best.
To add a box shadow to other blocks, just follow the same process described above.
When you’re happy with how the page looks, click on ‘Save & Publish’ to make it live.
If you liked this article, then please subscribe to our YouTube Channel for WordPress video tutorials. You can also find us on Twitter and Facebook.
Interested in starting a business and considering using the internet to conduct your transactions? Do you long for the day when you can sit back and watch as your online store generates passive income without any effort on your part? It’s natural to wonder how to sell online without keeping your own inventory or how […]
Some users may need to create a website anonymously to protect their privacy and additional security.
In this step-by-step guide, we’ll show you how to easily create a truly anonymous website. We’ll also talk about protecting your identity online.
Why Create an Anonymous Website?
An anonymous website conceals the identity of who runs or owns a particular website.
Some users may want to remain anonymous for a number of reasons.
Whistleblowers trying to expose corruption.
Journalists under authoritarian regimes
Citizen watchdog groups
Or users who just want to remain anonymous for privacy reasons
Creating an anonymous website makes it difficult to find out who created and runs the website.
Important: Please keep in mind that there is no guaranteed way to remain completely anonymous. While you can make it difficult to trace, there is still a chance that it can be tracked.
Hostinger is one of the best WordPress hosting companies on the market and allows you to pay using Bitcoin and other cryptocurrencies to keep your purchase as anonymous as possible.
Buying Hosting and Domain Name Anonymously
First, you need to make sure you have VPN turned on whenever you are working on your anonymous website.
After that, you need to visit the Hostinger website and click on the ‘Start Now’ button.
This will bring you to the pricing and plans selection page.
We recommend choosing a 48-month plan which gives you the best discount. Plus, you wouldn’t need to worry about future payments for a long time.
Click to select the plan you want to buy, and then go to the payment section.
From here, first, you need to provide the anonymous email account you created earlier.
After that, you need to select ‘Coingate’ as the payment method and then click on the ‘Submit Secure Payment’ button.
This will take you to the payment wizard.
First, you need to select a cryptocurrency that you want to pay with and click Continue.
Next, you need to enter your anonymous email address and click on the ‘Continue’ button.
Note that you don’t need to create a Coingate account to pay using this method.
On the next screen, you’ll see the QR code to make the payment through your Bitcoin wallet app.
You can also pay manually, by sending the amount to the Bitcoin wallet address mentioned on the screen.
Upon completion of the transaction, you will be redirected back to the Hostinger website.
You will receive an email from Hostinger with a link to log in to the hosting control panel.
Once you log in to your hosting account control panel, you’ll see a notification to claim your free domain name.
During domain registration, ICANN requires website owners to provide their personal information such as name, address, email, and phone number.
You need to provide at least the email address you created earlier so that you can be reached for verification.
During the registration, you may also see an option to turn on Domain Privacy.
This feature hides any information you provide during domain registration from WHOIS searches. Anyone who checks will see Hostinger’s proxy info.
After domain registration, you may receive an email to verify your registration.
Installing WordPress to Make Your Anonymous Website
Now that you have completed the domain name and hosting setup, it is time to install WordPress.
Hostinger allows you to easily create a WordPress website. Click on the ‘Manage’ button next to your URL under the hosting panel.
This will bring you to your back-end dashboard.
From here, you need to visit the Website » Auto Installer page and then click on the ‘Select’ button under WordPress.
This will launch the auto-installer wizard.
Simply follow the on-screen instructions to finish the setup.
After that, you will see your new website options under the Hostinger control panel.
From here, first, you need to click on the ‘Install’ button next to the ‘SSL Certificate’ option.
After that, you need to click on the toggle next to ‘Force HTTPs’ option.
SSL (Secure Sockets Layer) allows your website to use secure HTTPs. Using it improves your WordPress security by encrypting all traffic to and from your website.
Having an SSL certificate is also a factor in ranking well in search engines and a part of a solid website SEO plan.
Finally, click on the ‘Edit Website’ button to launch and start editing your new WordPress website.
Working on Your WordPress Website Anonymously
By design, WordPress is privacy-conscious software to the extent that you can choose what information you want to share on your website.
First, you may want to visit the Users » Profile page and choose a pseudonym for the default admin or author of your website.
Don’t forget to click on the ‘Update Profile’ button to save your changes.
Next, you need to decide whether you want to allow users to comment on posts and pages across your website.
Simply go to Settings » Discussion page to configure comments. Uncheck all options under the ‘Default Post Settings’ section to disable comments, trackbacks, and pingbacks.
Don’t forget to click on the ‘Save Changes’ button to store your settings.
Adding Content to Your WordPress Site
WordPress comes with two default content types called posts and pages. Posts are part of a blog and are displayed in reverse chronological order, meaning that newer posts appear first.
Pages are standalone pages that are not part of a blog. They are used to create a website structure and layout. See our list of must-have WordPress pages for all types of websites.
To add a page, simply visit the Pages » Add New to create one.
WordPress comes with a powerful editor called the Block Editor. See our complete WordPress block editor tutorial to familiarize yourself with the interface.
Similarly, to create a post you will need to visit Posts » Add New page.
Choosing a Theme (Template) For Your Website
WordPress comes with a powerful templating engine that allows you to change the appearance of your website by installing themes.
There are thousands of free and paid WordPress themes available. You can choose one that looks closer to what you have in mind for your website.
You can look for themes under the Appearance » Themes page. It will show you a bunch of default themes that come with your WordPress install.
For more themes, click on the ‘Add New’ button at the top to find more free themes.
Plugins are like apps for your WordPress website. They allow you to add new features and extend the functionality of WordPress.
There are more than 60,000 free plugins available in the WordPress.org plugin directory alone. Plus, there are premium WordPress plugins sold by third-party developers with priority support and guaranteed updates.
However, you also need to consider which plugins you need to use to keep your WordPress website secure, private, and anonymous.
Following are our top picks for the best WordPress plugins to install on your anonymous website.
WPForms – It is the best WordPress contact form plugin and allows you to easily create forms for your website.
All in One SEO for WordPress – It is the best WordPress SEO plugin on the market and helps your anonymous website get more traffic from search engines.
SeedProd – It is a powerful WordPress page builder that allows you to use a drag-and-drop interface to create any type of page for your website.
OptinMonster – It is a conversion optimization software, which helps you convert website visitors into email subscribers and customers.
MonsterInsights – The best WordPress Google Analytics plugin which helps you see where your visitors and coming from and what they see on your website.
Following are some of the most commonly asked questions about creating an anonymous website.
1. Is it possible to create a fully anonymous website?
Yes, it is possible to create a fully anonymous website. However, you’ll need to be very vigilant about it. Each internet activity creates an information trail leading back to the person who initiated the activity. This trail can be traced by hackers, government agencies, and ISPs. As an anonymous website owner, it will be your job to anonymize all activities.
You can do this by minimizing the activities around your website and using a VPN to hide your IP address. Be careful about any social interactions as they may reveal personally identifiable information.
2. What is anonymous offshore hosting?
Anonymous offshore hosting is a website hosting service that allows users to purchase hosting and domain name without providing real name or credit card information.
Some of these lesser-known companies host their servers in countries with stricter privacy laws. These companies also promise to not store user logs or share them with third-country agencies.
However, these anonymous offshore hosting companies often have very bad customer service and outdated technology.
3. Can a website owner be traced?
Yes, a website owner can be traced even if they are trying to remain anonymous. However, an anonymous website owner can use privacy tools to make it harder to be traced.
Even then if someone is determined to figure out and has the technology, tools, and resources, then they may be able to find out who is running an anonymous website.
4. Can I buy a domain name anonymously?
Yes, you can buy a domain name anonymously from a domain name registrar that accepts cryptocurrencies as a payment method.
Hostinger, also allows you to register additional domain names using cryptocurrencies. During the registration, you can use a separate anonymous email account as the contact address for your domain name.
We hope this article helped you learn how to create a truly anonymous website. You may also want to see our guide on how to create a private blog or take a look at our complete WordPress security guide to keep your anonymous website secure.
If you liked this article, then please subscribe to our YouTube Channel for WordPress video tutorials. You can also find us on Twitter and Facebook.
Do you want to enable automatic updates for major WordPress updates?
Automatic updates are enabled for minor releases on WordPress. This means that the WordPress.org team can automatically install security updates without requiring user input.
However, it does not automatically update your website when there is a new major release. Luckily, you can easily turn on automatic updates for major releases as well.
In this article, we’ll show you how to enable automatic updates in WordPress for major versions.
How WordPress Automatic Updates Work
The automatic updates feature was introduced in WordPress 3.7. This allowed WordPress to automatically install new minor releases to improve the security of your WordPress website.
There is an option to disable automatic updates in WordPress. However, we recommend that you keep automatic updates enabled because they usually address crucial security issues and vulnerabilities.
Now if you just run one or two WordPress websites, then you can simply follow our guide to safely update your WordPress site when there is a new major WordPress release. However, updating WordPress manually can be time-consuming if you manage multiple sites.
Luckily, managed WordPress hosting providers like WP Engine automatically update WordPress for all new releases, not just minor ones.
You can also enable auto-updates on a shared hosting provider like Bluehost and SiteGround. But first, you’ll just need to make sure that you have a proper backup system in place in case something goes wrong.
With that being said, let’s take a look at how to easily set up automatic updates for major WordPress releases. Here’s what we’ll cover in this tutorial:
The most important layer of security you can add to any website is to set up a backup system. Whether you turn on automatic updates or not, you should always have an automatic backup system in place for every WordPress website.
There are several helpful WordPress backup plugins that you can use to set up automatic backups on your WordPress site.
We recommend using Duplicator because it is the best WordPress backup plugin on the market, and it’s free. Duplicator allows you to easily set up automatic backups of your complete WordPress website.
It also allows you to automatically store your backup files in a remote location such as Google Drive or Dropbox or Amazon S3.
Once you have set up automatic WordPress backups, you can go ahead and turn on automated WordPress updates for major releases.
Method 1: Enable Automatic Updates for Major Releases From Dashboard » Updates
When you visit the Dashboard » Updates page in your WordPress admin area, you will see the message, ‘This site is automatically kept up to date with maintenance and security releases of WordPress only.’ These are the minor releases we mentioned above.
If you would like all WordPress updates to be handled the same way, then simply click the link labeled ‘Enable automatic updates for all new versions of WordPress.’
Now major WordPress releases will be automatically installed as well.
If you decide to turn off automatic updates in the future, then simply return to the Dashboard » Updates page and click the link that says ‘Switch to automatic updates for maintenance and security releases only.’
Now major WordPress versions will not be installed automatically, just minor releases and security updates.
Method 2: Enable Automatic WordPress Updates for Major Releases Using a Plugin
The plugin method gives you more control over what is updated on your site. For example, it includes options to automatically update WordPress core, plugins, themes, and more.
Upon activation, you need to visit Dashboard » Updates Options page to set up the plugin.
Under the ‘Quick configuration actions’ section, you should click the ‘Custom’ button. After that, click the ‘Auto update all releases’ button under the ‘WordPress core updates’ section.
Note: Be cautious clicking the ‘Auto update everything’ button under ‘Quick configuration actions’. This will turn on automatic updates for everything, including WordPress core, plugins, themes, and translations.
The plugin will automatically store your settings and enable the major WordPress releases to be automatically updated.
Method 3: Manually Enable Automatic Updates for Major Releases in WordPress
This method requires you to add code to your WordPress files.
First, you need to add the following line of code to your site’s wp-config.php file.
define( 'WP_AUTO_UPDATE_CORE', true );
There is one little problem with this code. It also enables what are called ‘nightly’ updates, or ‘nightlies.’ These are still under development and may contain bugs, so should not be installed on a live WordPress website.
This filter will disable automatic updates for nightly builds or development updates.
Your WordPress site is now ready to automatically update itself without your input whenever there is a new WordPress version available.
Frequently Asked Questions about WordPress Automatic Updates
1. Why do I need to install WordPress updates?
WordPress is a regularly maintained software. Thousands of developers contribute to making WordPress better and more secure.
You need to install WordPress updates as soon as they are available. This ensures that your website has the latest security patches, new features, and the best speed and performance.
2. Are updates safe for my website?
As the world’s most popular website builder, WordPress updates immediately become available to millions of websites. The core team works very hard to ensure that they are absolutely safe for all websites to install.
However, we recommend everyone always back their WordPress website before updates. This allows you to quickly revert back in case anything goes wrong after an update.
3. Can I also automatically update WordPress plugins?
By default, WordPress requires you to manually install plugin updates. However, you can enable automatic updates for plugins as well.
4. Can I install updates on all my websites from a single dashboard?
By default, you’ll need to log in to each WordPress website to install updates. Luckily, you can use tools to manage multiple WordPress sites. These tools make it easier to install updates on all your WordPress sites without having to log in to each site.
If you liked this article, then please subscribe to our YouTube Channel for WordPress video tutorials. You can also find us on Twitter and Facebook.
Do you want to track key metrics like email signups or sales for your site?
If you want your site to be successful, then you need detailed metrics like which pages are getting you the most signups, which traffic source is producing the best results, and more.
In this article, we’ll show you how to set up Google Analytics goals for your WordPress site.
What Are Goals in Google Analytics?
Goals are user interactions that you can track using Google Analytics.
You can set up goals to measure conversions, track sales, email sign-up forms, and more.
All this can help you make more money online and increase your website conversions.
Note: Google Analytics 4 (GA4) replaces Goals with Events, and on July 1, 2023, GA4 will replace the current Universal Analytics. In this post, we will show you how to set up tracking for both Events and Goals simultaneously using the MonsterInsights Dual Tracking feature, as well as how to use Events in GA4 itself.
Why You Need to Create Good Goals in Google Analytics
With goals, you can find out all sorts of details about your site. For instance:
If you sell digital products, you could use goals to find out which sources are driving the most sales.
If you run an eCommerce store, you could use goals to see where customers will most likely abandon the checkout process.
If you’re a personal trainer with a fitness blog, you could use goals to see which posts encourage prospects to fill out your contact form.
Creating the right goals for your site is important. If you have an online store, there’s not much point in setting a goal to track how many people visit your About page. Instead, your goal should be how many customers buy from you.
Let’s look at how to set up goals in Google Analytics. Here’s what we’re going to cover. Use the quick links to jump straight to that part of the tutorial:
First, you’ll need to install and activate the MonsterInsights plugin. For more details, please check out our guide on how to install a WordPress plugin.
Note: You’ll need the Pro version of the plugin or higher to unlock advanced tracking features and reports like the eCommerce report and the form conversions report. There is also a MonsterInsights Lite version you can use for free to get started.
After activating MonsterInsights, you’ll see the welcome screen in your WordPress dashboard. Simply click the ‘Launch the Wizard’ button and follow the onscreen instructions.
You can also use the Dual Tracking feature to set up Google Analytics 4 (GA4) tracking in WordPress. GA4 is the latest version of Analytics, and it will replace Universal Analytics on July 1, 2023.
After the sunset date, you won’t be able to track data in Universal Analytics and will have to start from scratch. That’s why we recommend swapping to GA4 sooner rather than later. For more details, please see our guide on switching to Google Analytics 4 in WordPress.
Automatically Track Goals by Using MonsterInsights
Now that you’ve connected Google Analytics with your WordPress site, you can use MonsterInsights to set up goals automatically.
This method is recommended for beginners because you don’t have to manually create goals, edit code, and worry about your tracking working properly.
MonsterInsights helps you track conversions like eCommerce sales, form submissions, file downloads, link clicks, video plays, and more.
Let’s take a closer look at each of these in detail.
Tracking eCommerce Conversion in WordPress
Do you want to find out how many visitors are converting into paying customers?
In Google Analytics, you’d have to set up goals to track specific actions customers perform. This can be tricky for beginners, and it might require editing the tracking code.
The best part is that you don’t have to modify the tracking code. MonsterInsights handles everything else for you.
After setting up tracking, you can head to Insights » Reports and click on the ‘eCommerce’ tab to view your report. Once you’ve had some sales, it’ll look something like this:
You won’t have to manually set up goals or events to track eCommerce conversions. The plugin will let you see all sorts of other insights, like your top conversion sources, the total of products added to carts, and the total removed from carts.
You can even see how many days it typically takes people to make a purchase, and how often people visit before making a purchase.
MonsterInsights also shows the percentage of new customers that bought a product for the first time from your store. It even shows a percentage of abandoned checkouts. You can use this data to reduce cart abandonment and convert users into paying customers.
Tracking Form Submissions in Google Analytics
Another great way to use Google Analytics and MonsterInsights is to track form conversions.
You can do this for any type of form. Here are just a few examples:
Non-fiction author: A form where people sign up for your email newsletter to hear about your upcoming books.
Realtor: A contact form where prospective clients fill in their details so you can call them back and arrange viewings.
Personal trainer: A booking form that customers use to book and pay for their personal training session.
To start tracking form conversions in MonsterInsights, go to Insights » Addons and find the Forms addon. Simply click the Install button beneath it to install and activate it.
This addon lets you track form submissions as ‘Events’ in Google Analytics 4. You don’t have to set up anything extra.
Once you’ve installed and activated the addon, you’re done! Just go to Insights » Reports and click on the ‘Forms’ tab to see your report.
After you’ve had some form submissions, it’ll look something like this:
Tracking Link Clicks and File Downloads in Google Analytics
MonsterInsights automatically adds tracking for link and button clicks on your WordPress site. It works out of the box, and you don’t have manually set up goals for tracking different user actions on your site.
You can view the report inside your WordPress dashboard. Simply go to Insights » Reports and click the ‘Publishers’ tab.
For instance, you can see which outbound links users click the most on your website.
Using this information, you can sign up for affiliate programs, get backlinks, submit guest posts, and uncover partnership opportunities.
If you have affiliate links on your site, then MonsterInsights also tracks them in Google Analytics. You can see your top-performing affiliates and promote them throughout your site to get more conversions.
MonsterInsights also automatically tracks file downloads on your site. If you offer downloadable content like ebooks, software, plugins, PDFs, and spreadsheets, then the analytics plugin tracks them in Google Analytics.
Tracking Video Plays in Google Analytics
If you have video content embedded on your site, then MonsterInsights can track them in Google Analytics and show which media content performs the best. It automatically tracks YouTube and Vimeo embeds along with other videos uploaded to your Media Library.
All you need to do is install the MonsterInsights Media addon by going to Insights » Addons from your WordPress dashboard.
Once the addon is active, you can view reports in your WordPress dashboard.
Simply head to Insights » Reports and click the ‘Media’ tab.
Here, you’ll see a graph of how many people played videos on your site in the past 30 days.
If you scroll down, then you can view more details about individual videos. For instance, the report will show video plays, average watch time, average percentage watched, and completion rate for each piece of media content.
If you don’t want to use MonsterInsights, or if you want to track a different type of goal, then you can do this manually in Google Analytics.
Do note that the latest version of Analytics (GA4) doesn’t have goals. You can only set up goals manually in Universal Analytics.
First, log in to your Universal Analytics account and click the ‘Admin’ tab on the bottom left.
Next, you’ll need to head to the View column.
From here, simply click on ‘Goals.’
Next, you can start creating a new goal.
Simply click the ‘+ New Goal’ button.
There are 4 types of goals you can create:
Destination: This tracks whether a visitor went to a specific page, like a thank you page, after filling in a form.
Duration: This tracks how long a visitor spends on your website.
Pages/Screens per session: This tracks how many pages someone looks at on your site.
Event: This can track all sorts of things, like button clicks, video plays, and downloads. It requires a bit more setup than the other options.
In many cases, Destination or Event goals will work best for tracking your key metrics.
We’re going to create a Destination goal for this example. Give your goal a name, click the radio button next to ‘Destination’ to set the type, and then click the ‘Continue’ button.
Next, you will need to enter the destination for your goal. This will normally be a specific page.
Note: Only enter the part of the URL that comes after your website’s domain name.
For instance, if your page is: https://www.example.com/thank-you-for-booking/
Then you should enter: /thank-you-for-booking/
You can add a value for the conversion if you want. This makes sense if people are completing a payment form or if you know how much each lead is worth to you on average.
If you want to track a funnel, such as a customer moving through a checkout process, then you can also do this as part of the destination goal. This can help you pinpoint areas you might want to improve.
You can click the ‘Verify this Goal’ link to see what conversion rate the goal would have based on your data from the previous 7 days.
If you get 0% and know that you’ve had some form submissions, check the destination URL you’ve entered.
Once you’re happy with your goal, click the ‘Save’ button. You should then see your goal listed in a table. You can edit it, switch it off and on, or create more goals here.
You can’t delete goals once you’ve created them, so you will need to simply switch them off if you no longer want to use them.
You can view your goal data in Google Analytics by going to Conversions » Goals, then clicking on Overview.
In the left-hand menu, you can dig further into your goals.
For instance, ‘Reverse Goal Path’ shows you what content visitors viewed before reaching the goal. Goal Flow can be used to examine all sorts of things, like the source that the visitors came from.
How to Replace Goals with Events in Google Analytics 4
As we mentioned before, Google Analytics 4 (GA4) is the new version of Google’s analytics platform. One of the main differences between GA4 and Universal Analytics is that there are no goals in the latest version.
That’s because Google Analytics 4 uses a completely different method of tracking and recording data. Instead of goals, it uses events to track user interactions and activities on your website.
You can create a custom event by logging into your GA4 property and then heading to the Admin settings.
After that, go to the Property column.
Simply click on the ‘Events’ option.
Next, you will need to add a new event in GA4.
Go ahead and click the ‘Create event’ button.
A new window will now slide in from the right, where all your custom events will be listed once they’re created.
You can click the ‘Create’ button to get started.
Next, you will need to enter details for your custom event.
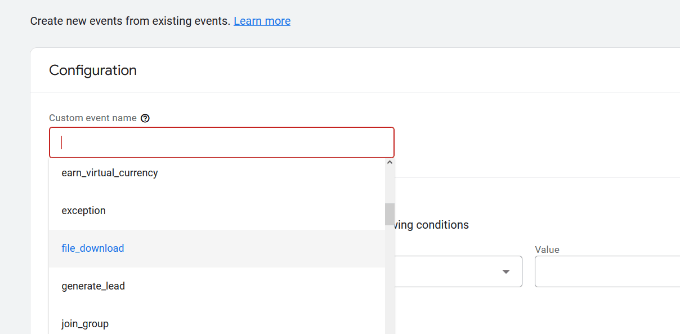
You can start by entering a custom event name. GA4 already has many prebuilt events, so you can select one from the dropdown menu. For example, we will choose the ‘file_download’ event for this tutorial.
When you select an event name, GA4 will automatically enter the specific Parameter and Operator for the event. In this case, the event will be tracking the ‘event_name’ when it ‘equals’ a Value you will enter next.
In the ‘Value’ field, we will enter ‘.pdf’ so it tracks the number of downloads when a user downloads a file with the PDF extension. You might also use .epub for ebooks or even a specific word you use to organize filenames such as ‘v2’ or ‘_2023version.’
Once you’ve entered all the details, don’t forget to click the ‘Create’ button at the top.
You should now see your new event under the Custom events area of your dashboard.
Next, you can view reports to see the performance of your custom events.
Simply head to Reports » Engagement » Event: Event name from the menu on your left.
While setting up Events in GA4 is pretty easy, if you want to track multiple things, it can take a long time.
That’s why we think that if you want a simple way to set up event and goal tracking in Google Analytics, then MonsterInsights is definitely the way to go.
Setting up manual goals in Google Analytics might work for you if you’re confident using the Google Analytics interface, or if you have a lot of extra time on your hands.
What matters is that you create and track meaningful goals for your site. This is where MonsterInsights is beneficial, as you can use the data to boost signups, increase sales, and make more money or impact with super easy setup and reporting.
If you liked this article, then please subscribe to our YouTube Channel for WordPress video tutorials. You can also find us on Twitter and Facebook.
Do you want to delay posts from appearing in your site’s RSS feed?
Delaying posts from appearing immediately can save you from sending out unfinished work accidentally, give you time to edit typos you might see, and help you beat content scrapers in SEO.
In this article, we will show you how to delay posts from appearing in WordPress RSS feed.
Why Delay Your RSS Feed in WordPress?
Sometimes you may publish a something on your WordPress blog with a typo that you just didn’t see. The mistake is then distributed to your RSS feed and all of your subscribers. If you have email subscriptions on your WordPress blog, then those subscribers will get it as well.
By adding a delay between your RSS feed and your live site, you get a little window of time to catch an error on a live site and fix it.
RSS feeds are also used by content scraping websites. They use it to monitor your content and copy your posts as soon as they appear live. If you have a new website with little authority, then a lot of times these content scrapers may end up beating you in the search results.
By delaying an article in your RSS feed, you can give search engines enough time to crawl and index your content first.
Having said that, let’s see how to easily delay posts from appearing in WordPress website‘s RSS feed.
How to Delay Posts in Your WordPress RSS Feed
To begin, we recommend using WPCode to delay posts from appearing in your site’s feed. WPCode lets you add custom code to WordPress safely and easily without having to worry about your site breaking.
For advanced users, you can copy/paste the following code into your theme’s functions.php file instead. You’ll need to modify the code to change the time interval. Remember that editing your core WordPress files can be dangerous, which is why we recommend WPCode. You’ll also lose any custom code snippets when you update your theme.
Upon activation, you can navigate to Code Snippets »Add Snippet. After that, simply search for ‘rss’ or scroll down to the ‘RSS Feeds’ category.
Then, just hover your mouse over ‘Delay Posts in RSS Feeds’ in the results and simply click on ‘Use snippet.’
Next, you will be taken to the ‘Edit Snippet’ screen, where WPCode has pre-configured the snippet settings for you.
By default, your posts will be delayed from appearing in your RSS feed by 10 minutes from the time it’s published.
If that delay is good for you, then all you have to do is click on the switch to change it to ‘Active’ and press the ‘Update’ button.
If you want to alter the length of the delay, you can do so by changing the number on Line 10 and the unit of time on Line 13.
For example, you can delay the post by one hour if you replace $wait = '10'; and $unit = 'MINUTE' with $wait = '1' and $unit = 'HOUR'.
If you need to adjust the delay again, simply repeat those steps, and if you want the posts to go back to hitting the feed immediately, simply toggle the switch back to ‘Inactive’ and press ‘Update.’
Don’t Forget to Check Out the WPCode Snippet Library
WPCode also comes with a huge collection of other code snippets, too. You can see what’s there at Code Snippets » Library in your admin dashboard.
You may be able to replace some single-use plugins on your site by simply activating snippets you find in the library.
If you liked this article, then please subscribe to our YouTube Channel for WordPress video tutorials. You can also find us on Twitter and Facebook.
Do you want to use cookie retargeting in WordPress?
Cookie retargeting is the secret tool already used by many of the most popular websites. It allows you to show custom on-site messages to your users based on their past behavior which helps you boost sales.
In this article, we’ll show you how to use cookie retargeting in WordPress to show custom on-site messages and boost conversions.
What is Cookie Retargeting?
Cookie retargeting is a marketing technique where websites use cookies to track user behavior and offer a personalized experience.
There are two types of cookie retargeting techniques.
First, there is off-site cookie retargeting. This method is used to track user activities across the web.
Facebook pixel and Google remarketing are two of the most popular advertising programs that allow you to use their massive reach and show targeted ads to people who visit your website.
Secondly, you have on-site cookie retargeting, which allows you to show targeted messages to users based on how they interact with your WordPress website.
What are cookies?
Cookies are small text files containing pieces of data. Websites set cookies in users’ browsers to store temporary information such as login status, user preferences, session details, and more.
How to Use On-Site Cookie Retargeting to Boost Conversions?
There are a number of ways website owners use on-site retargeting messages to boost conversions and increase sales.
For instance, eCommerce stores can show custom offers to users based on how they interact with other offers. This allows you to create a dynamic sales funnel that leads users to make a purchase.
Another use-case scenario would be lead generation. With on-site retargeting, if a user closes one sign-up form, then you can show them a different message with another offer.
On-site retargeting messages are highly effective because:
It shows personalized messages to users at a time when they are already engaged with your website.
Allows you to create customized campaigns that get better with each user interaction until they convert
You save money on paid advertising campaigns by utilizing your existing website traffic to the max
That being said, let’s take a look a how to use cookie retargeting in WordPress.
Creating On-Site Retargeting Campaign in WordPress
The best way to create on-site retargeting messages is by using OptinMonster. It is the best conversion optimization and lead generation software in the world.
You can use it to easily create attention-grabbing signup forms, popups, welcome mats, in-line offers, custom offers, and more.
First, you need to signup for an OptinMonster account by visiting the website and clicking the ‘Get OptinMonster Now’ button. You’ll need at least their Pro plan for cookie retargeting and Growth plan for follow-up campaigns.
This plugin acts as a connector between your WordPress site and the OptinMonster app.
Upon activation, you will see the welcome screen. Simply click the ‘Connect Your Existing Account’ button.
Next, a new window will open, where you’ll need to sign in to your account and connect your website with OptinMonster.
Go ahead and click the ‘Connect to WordPress’ button.
Now, you’re ready to create a new campaign.
First, you’ll need to go to OptinMonster » Campaigns from your WordPress admin panel and then click the ‘Create Your First Campaign’ button.
This will take you to the OptinMonster website, where you’ll be asked to choose a campaign type and a template.
You can choose any campaign type or template, but for this tutorial, we’ll be creating a lightbox popup.
You can select any template that you’d like to use for your campaign.
Next, you’ll be asked to provide a name for your campaign and click the ‘Start Building’ button.
After that, you’ll enter the drag-and-drop campaign builder interface.
It is a powerful design tool where you can simply point and click on any item to edit it. You can also add new items like buttons, images, columns, and more to your popup campaign.
Next, you can switch to the ‘Display Rules’ tab at the top.
Here, OptinMonster will give you different options for displaying your onsite targeting campaigns.
For instance, you can show the popup after users spend a certain time on the page, are from a particular location, or are about to exit your website.
By default, OptinMonster will show your campaign after a visitor spends at least 5 seconds on the site. Plus, it appears on all the pages.
Once you are satisfied, simply switch to the publish tab.
Next, you’ll need to make your campaign live by changing its status from Draft to Publish. Don’t forget to click the ‘Save’ button when you’re done.
Now by default, OptinMonster will show this campaign to all users who visit your website. Users will be able to close the popup or perform their desired action.
Creating a Retargeting Campaign to Show Custom Messages
Now that you have launched your first campaign, let’s add another campaign using the follow-up retargeting feature.
Click on the create new campaign button in the OptinMonster dashboard and select your campaign type and template. Since we have used a lightbox popup, we’ll be using a ‘Floating bar’ as our retargeting campaign.
After selecting a template, you’ll enter your campaign name.
Then simply click the ‘Start Building’ button to continue.
After that, you’ll enter the OptinMonster builder where you can design your campaign using simple drag-and-drop tools.
You can edit the optin text, adjust the countdown timer to generate FOMO, add a coupon, and so much more.
Once you are satisfied with the design, it is time to select which users you want to show this custom message to.
Simply switch to the Display Rules tab at the top of the builder. OptinMonster offers a ton of display rules that you can choose from. You can also add multiple rulesets.
Next, under the If menu, go to the ‘Personalization’ display rules options and select Has Closed.
After that, select ‘Campaign’ and then select your previous campaign.
Next, you need to switch to the ‘Publish’ tab.
Here, simply change your campaign status from Draft to Publish under ‘Publish Status.’ Once that’s done, simply click the ‘Save’ button and exit the campaign builder.
You can now visit your website in the incognito browser tab to see your campaign and the follow-up retargeting message.
Adding Cookie Retargeting with Custom Messages
Cookie retargeting allows you to show custom messages to users based on their previous actions, cart status, shopping history, and more.
This allows you to create promotions and upsells designed for customers at different stages of your sales funnel.
When customizing your campaign, simply switch to the ‘Display Rules’ tab.
Under the If menu, you can go to the ‘Targeting (Who)’ display rules options and select Cookie Targeting.
Next, you’ll need to enter the cookie key and value. The key is the cookie name, and the value parameter is the contents of the cookie.
OptinMonster lets you select different operators to use for the display rule. These include options like match exactly, contain, exist, start with, ends with, and more operators.
For instance, if you are using WooCommerce, then you can use WooCommerce cookies to target users who have added products to their cart. This way, you can cross-sell items in their cart, reduce cart abandonment, and more.
After adding cookie retargeting rules, go to the ‘Publish’ tab.
From here, simply change the Publish Status from Draft to Publish for your campaign.
OptinMonster will now display your custom message based on the cookie-targeting rules you have set.
We hope this article helped you learn how to use cookie retargeting in WordPress to show custom on-site messages. You may also want to see our guide on how to recover abandoned cart sales in WooCommerce as well as our comparison of the best live chat software for websites.
If you liked this article, then please subscribe to our YouTube Channel for WordPress video tutorials. You can also find us on Twitter and Facebook.
Do you want to embed a Facebook video in WordPress?
The videos that you post to Facebook also make great content for your website. By embedding a Facebook video feed, you can keep your site fresh and interesting while also growing your Facebook following.
In this article, we’ll show you an easy way to embed Facebook videos in WordPress.
Why Add Facebook Videos in WordPress?
Videos are a great way to connect with your audience and keep them engaged. This is true no matter whether you’re running a personal blog or a business website.
Creating engaging and entertaining videos takes time and effort so if you’re posting videos to Facebook, then it makes sense to re-use them on your WordPress website.
By linking your website to your Facebook account, any new videos that you post to Facebook will appear on your website automatically. In this way, you can keep your website fresh with very little day-to-day effort.
Embedded videos can even help grow your Facebook page. If website visitors see lots of interesting videos and playlists then they’ll want to follow you on Facebook. This can get you some extra followers and more engagement.
With that being said, let’s see how you can easily embed a Facebook video in WordPress.
Installing a Facebook Video Plugin in WordPress
The easiest way to embed a Facebook video in WordPress is by using the Custom Facebook Feed Pro plugin.
In this guide, we’ll be using the pro version of Smash Balloon as it allows you to embed videos in WordPress including HD, 360o, and Facebook Live videos.
Smash Balloon Pro also lets you show photos in a custom Facebook feed, and display the total number of likes, shares, comments, and reactions below each post. However, if you’re just starting out and have a limited budget, then there’s also a free version you can use.
Upon activation, head over to Facebook Feed » Settings and enter your license key into the ‘License Key’ field.
You’ll find this information under your account on the Smash Balloon website.
After entering the key, click on the ‘Activate’ button.
Connect Your Facebook Page or Group to WordPress
Smash Balloon Custom Facebook Feed allows you to embed videos from Facebook pages and groups. You can even show the videos in a lightbox popup so people can watch the full video directly on your WordPress website.
The first step is connecting your Facebook page or group to WordPress, so go to Facebook Feed » All Feeds and then click on ‘Add New.’
Smash Balloon lets you show posts from your Facebook timeline, photo albums, Facebook statuses, events, and more.
Since we want to embed Facebook videos in WordPress, you’ll need to select ‘Videos’ and then click on ‘Next.’
Now, you need to select the Facebook page or group where you’ll get the videos from.
To do this, click on ‘Add New.’
Next, choose whether you want to show videos from a Facebook page or group.
Once you’ve done that, click on ‘Connect to Facebook.’
This opens a popup where you can log into your Facebook account and choose the pages or groups that you want to use with Smash Balloon.
After that, click on ‘Next.’
Now, Facebook will show all the information that Smash Balloon will have access to, and the actions it can perform.
To restrict Smash Balloon’s access to your Facebook account, simply click to disable any of the switches.
Just be aware that this may affect the videos that you can embed on your WordPress blog or website so we recommend leaving all the switches enabled.
When you’re happy with how the permissions are set up, click on ‘Done.’
After a few moments, you should see a message confirming that you’ve connected your WordPress website to Facebook.
With that done, you’re ready to click on ‘OK.’
Smash Balloon will now return you to the WordPress dashboard automatically.
How to Embed Facebook Videos in WordPress
At this point, you’ll see a popup with the Facebook group or page that you just linked to your website. Simply select the radio button next to the page or group you want to use and then click on the ‘Add’ button.
If you accidentally closed the popup, don’t worry. You can simply refresh the page to reopen the popup.
Once you’ve done that, WordPress will take you back to the Facebook Feed » All Feeds page automatically. Just like before, click on ‘Add New,’ select ‘Videos’ and then click on the ‘Next’ button.
Now, select your Facebook page or group, and click on ‘Next.’
On this screen, you can choose the template that you want to use for the video feed.
All of these templates are fully customizable so you can fine-tune the design depending on how you want to show the Facebook videos on your website.
We’re using the ‘Default’ template, but you can choose any template you want. After making your selection, click on ‘Next.’
After that, you can choose whether to show all the videos from your Facebook page or group or just the videos from a specific playlist.
If you choose ‘Show from a specific playlist,’ then you’ll need to enter that playlist’s URL.
Once you’ve made a decision, go ahead and click on the ‘Next’ button.
Smash Balloon will now create a feed based on your source and the template you’ve chosen. This is a good start, but you may want to fine-tune how the videos appear on your site.
How to Customize Your Embedded Facebook Videos
The Smash Balloon Custom Facebook Feed plugin gives you lots of ways to customize how the videos appear on your website. That being said, it’s worth taking a look at these settings.
In the WordPress dashboard, go to Facebook Feed » All Feeds. Here, find the video feed you just created and click on the ‘Edit’ button next to it, which looks like a small pencil.
This opens the Smash Balloon feed editor, which shows a preview of your Facebook video feed to the right.
On the left-hand side, you’ll see all the different settings you can use to customize how these videos appear on your WordPress website. Most of these settings are self-explanatory, but we’ll quickly cover the major areas.
If you want to change the template, then click on ‘Template.’
Then, select the ‘Change’ button.
This opens a popup showing all the different templates you can use for your video feed.
Simply select the design you want to use instead, and then click on ‘Update.’
The next setting is ‘Feed Type,’ which allows you to show different content in your feed. For example, you might decide to show photos, albums, or events instead of videos.
Since we want to embed Facebook videos, you’ll typically want to ignore this area.
Next, click on ‘Feed Layout.’
Here, you can choose between different layouts, such as masonry and grid, and change the feed height.
As you make changes, the preview will update automatically so you can try different settings to see what looks the best.
By default, Smash Balloon will show the same number of videos on desktop computers and mobile devices such as smartphones.
You can preview how your videos will look on desktop computers, tablets, and smartphones using the row of buttons in the upper-right corner.
Mobile devices usually have smaller screens and may struggle to process lots of large, high-resolution videos. Visitors may also be using their mobile data rather than free Wi-Fi.
With that being said, you may want to show fewer videos on smartphones and tablets. To do this, simply type a different number into the ‘Mobile’ field under ‘Number of Posts.’
By default, the Facebook feed shows fewer columns on smartphones and tablets, compared to desktop computers. This helps all your videos fit comfortably on smaller screens.
You can change the number of columns that Smash Balloon uses on tablets, mobiles, and desktop computers using the ‘Columns’ settings.
The next settings page is ‘Color Scheme.’
Smash Balloon uses the colors inherited from your WordPress theme by default, but on this screen, you can switch to a ‘Light’ or ‘Dark’ color scheme instead.
Smash Balloon can add a header to your feed, which is your Facebook profile picture and the name of the page or group. This lets visitors know where the embedded videos come from, and where they can find this content on Facebook.
To add this section, click on ‘Header’ in the left-hand menu.
You can then click on the ‘Enable’ toggle.
After adding a header you can change how this area looks, including hiding or adding your Facebook profile picture, changing the size of the bio text, and more.
If you want to remove the header completely, then click to turn off the ‘Enable’ toggle.
By default, Smash Balloon shows the title of each video. If you want to hide the title, then select ‘Posts’ from the main Smash Balloon editor menu.
Then, go ahead and click on ‘Post Style.’
On this screen, you can hide the video titles by clicking on the ‘Show Video Title’ slider.
This can be useful if you haven’t added titles to all your videos, or your titles don’t make sense outside of Facebook.
On this screen, you can also hide or show the video descriptions. For example, you may use these descriptions to provide extra information about the video.
To add the description, simply click to enable the ‘Show Video Description’ switch.
By default, Smash Balloon doesn’t add the Facebook ‘like’ button to your video feed. If visitors like your embedded videos then they may want to follow you on Facebook.
With that being said, you may want to add a ‘like’ button to the feed, by selecting ‘Like Box’ from the editor’s left-hand menu.
After that, simply click on the ‘Enable’ button so that it turns blue.
Smash Balloon adds this button below your video feed, but you can change this by opening the ‘Position’ dropdown and choosing ‘Top.’
On this screen, you can also change how the ‘like’ section looks including changing its width, showing how many people follow you on Facebook, adding a custom call to action, and more.
When you’re happy with how the button looks, you can move on to the next settings page by selecting ‘Load More Button.’
The Load More button encourages visitors to scroll through more of your video feed, so Smash Balloon adds it to your embedded Facebook feed by default.
Since it’s such an important button, you may want to customize this button by changing its background color, hover state, label, and more.
Another option is to remove the button completely, by clicking the ‘Enable’ toggle. For example, you might remove this button and then encourage visitors to check out your Facebook page in order to see more of your videos.
By default, Smash Balloon allows visitors to watch your Facebook videos without leaving your WordPress website.
They can simply click on any video thumbnail to open it in a lightbox, as you can see in the following image
Visitors can scroll through the videos in your feed using the arrows.
If they want to like a photo, leave a comment, or share the video to their page, then they can click on the ‘View on Facebook’ link.
There are a few different ways that you can customize Smash Balloon’s default lightbox.
To see your options, click on ‘Lightbox’ in the left-hand menu.
Here, you can change the color of the lightbox’s text, links, and background colors.
The lightbox feature allows visitors to watch your videos in a popup. If you prefer, then you can disable the lightbox so that all your videos play as small thumbnails, embedded inside the page content.
In this way, you can encourage people to visit your Facebook page, to see the full-size video. To disable the lightbox, simply click on the ‘Enable’ toggle to turn it from blue to grey.
When you’re happy with how the video feed looks, don’t forget to click on ‘Save.’
You’re now ready to embed the Smash Balloon feed in your website.
How to Add Facebook Videos to WordPress
With Smash Balloon, you can add the video feed to your WordPress website using a block, widget, or shortcode.
If you’ve created more than one feed using Smash Balloon, then you’ll need to know the feed’s code if you’re going to use a widget or block.
To get this code, go to Facebook Feed »All Feeds and then look at the feed="" part of the shortcode. You’ll need to add this code to the block or widget, so make a note of it.
In the following image, we’ll need to use feed="6"
If you want to embed your Facebook feed in a page or post, then we recommend using the Custom Facebook Feed block.
Just open the page or post where you want to embed your Facebook videos. Then, click on the ‘+’ icon to add a new block and start typing ‘Custom Facebook Feed.’
When the right block appears, click to add it to the page or post.
The block will show one of your Smash Balloon feeds by default. If you want to use a different video feed instead, then find ‘Shortcode Settings’ in the right-hand menu.
Here, simply add the feed="" code and then click on ‘Apply Changes.’
The block will now show the videos from your Facebook page or group. Just publish or update the page to make the video feed live on your website.
Another option is to add the feed to any widget-ready area, such as the sidebar or similar section. This allows visitors to watch your Facebook videos from any page of your site.
Simply go to Appearance » Widgets and then click on the blue ‘+’ button.
After that, find the ‘Custom Facebook Feed’ widget.
Then, just drag it onto the area where you want to show the video feed.
The widget will show one of your Smash Balloon feeds automatically.
To show a different feed instead, type or paste the feed’s code into the ‘Shortcode Settings’ box and then click ‘Apply Changes.’
You can now make the widget live by clicking on the ‘Update’ button. For more information, please see our step-by-step guide on how to add and use widgets in WordPress.
Finally, you can embed videos on any page, post, or widget-ready area using a shortcode.
Simply go to Facebook Feed »All Feeds and copy the code in the ‘Shortcode’ column. You can now add this code to any Shortcode block.
Sometimes you may want to embed a specific Facebook video in a page or post. For example, you might have a Facebook video that talks about the same topics as your latest blog, or a promotional video showing the product you’ve just launched on your online store.
To embed a specific video, you’ll need to buy and install the Featured Posts extension as it allows you to display a particular post or event using its ID.
To start, go to Facebook Feed » Extensions.
Here, find the ‘Featured Posts’ extension and click on its ‘Add’ button.
This will open the Smash Balloon website in a new tab, with instructions on how to purchase the extension.
Once you have the extension, you can install it in exactly the same way you install a plugin. If you need help, then please see our guide on how to install a WordPress plugin.
After activating the plugin, go to Facebook Feed » All Feeds and click on ‘Add New.’
Under ‘Advanced Feed Types,’ select ‘Single Featured Post’ and then click ‘Next.’
You can now choose the page or group that you want to use as your source by following the same process described above.
On the next page, you’ll need to enter the ID of the video that you want to embed.
To get this ID, visit Facebook in a new tab and then open the video that you want to embed.
You can now go ahead and copy the URL.
After that, just post the URL into your WordPress dashboard and click on ‘Next.’
Once you’ve done that, you can style the video and then add it to your site following the same process described above.
If you liked this article, then please subscribe to our YouTube Channel for WordPress video tutorials. You can also find us on Twitter and Facebook.


 Interested in starting a business and considering using the internet to conduct your transactions? Do you long for the day when you can sit back and watch as your online store generates passive income without any effort on your part? It’s natural to wonder how to sell online without keeping your own inventory or how […]