Are you looking to embed a Discord widget in WordPress?
Discord is a well-known VOIP chat application that allows you to build your own communities and enables your users to communicate with each other through text, voice, and video. As of 2022, Discord has about 150 million active users.
In this article, we will show you how to embed a Discord widget into WordPress.
Why Should You Add a Discord Widget to Your Website
Discord chat allows users to communicate with each other over messages, voice calls, and video calls.
By embedding a Discord widget in your WordPress site, you can provide a way for your users to connect with each other. This widget will display the total members of your Discord server, and it will also provide an invite link for new members to join.
Your WordPress users will be able to join your Discord chat rooms through the link provided by the widget, so you can build a huge community for your website.
That being said, let’s see how you can add a Discord widget in WordPress.
How to Embed a Discord Widget in WordPress
To embed a Discord widget in WordPress, you must visit the official Discord website. You will need to create a Discord user account and create a Discord server for your community.
Step 1. Creating a Discord Username and Server
Once there, simply click the ‘Login’ button present at the top right corner if you already have a Discord account.
If you don’t have an account, click the ‘Open Discord in your browser’ button.
You will be then asked to choose a username for your Discord account.
This will be your handle for others to find you, but you can change your display name on a server-by-server basis.
Next, Discord will take you to the ‘Channels’ page and then ask for your date of birth.
Simply enter your details and click the ‘Next’ button.
Then, you’ll be asked to create your first Discord server. Now, you can either create your own template or choose any of the premade ones.
For this tutorial, we will be using the ‘Gaming’ server template.
After that, you’ll be asked to choose a ‘Server Name’ for your Discord chatroom. You can also upload an image for the server.
After choosing a name of your liking and uploading an image, simply click the ‘Create’ button to create your Discord server.
Lastly, you’ll be asked to provide your email account and choose a password for your Discord account.
Once you provide these details, click the ‘Claim Account’ button.
Now, an email will be sent by Discord to the email account you provided to verify your details.
Once you verify your account, your Discord server will be set up.
Now all you have to do is embed the Discord widget in WordPress.
For that, first, you need to click the arrow icon present beside your server name at the top of the Discord ‘Channels’ page.
This will open up a dropdown menu.
Here, you simply have to click the ‘Server Settings’ option to open up your Discord server settings.
Once you’re on the ‘Server Settings’ page, click the ‘Widget’ option from the sidebar.
This will open up the ‘Server Widget’ section where you simply have to toggle the switch present beside ‘Enable Server Widget’.
After that, simply scroll down to the ‘Premade Widget’ section and click the ‘Copy’ button present below the ‘Premade Widget’ option.
You can now embed the Discord widget anywhere on your website by pasting this code.
Step 2. Embedding the Discord Widget in WordPress
First, go to the WordPress page or post where you want to embed the Discord widget.
Then, simply choose the ‘Custom HTML’ block from the block editor and paste the code.
After that click the ‘Publish’ button at the top to embed the Discord widget.
This is how your Discord widget will look on your WordPress website.
Note that you can embed the Discord widget in any block-enabled area of your themes, such as a sidebar, header, or footer.
If you liked this article, then please subscribe to our YouTube Channel for WordPress video tutorials. You can also find us on Twitter and Facebook.
Fine tuning your website through manual optimization can be tricky, but our new Safe Mode feature in Hummingbird puts that problem in the rearview.
Now, you can now test optimization in a temporary area that allows for non-permanent changes, so you can work out any kinks, then push them to your live site. For free!
Introducing Safe Mode for Manual Asset Optimization – allowing you to optimize in a private space while your users still enjoy a fully functioning site.
In this article, we’re going to look at how Safe Mode in Hummingbird works, while touching on a few related features and settings in the plugin. Plus, we’ll take a look at an additional (surprise!) feature also included in this release.
Continue reading, or jump ahead using these links:
Hummingbird makes your website faster by optimizing site performance with fine-tuned controls. Setting enhancements make things easy and efficient, giving you new ways to boost PageSpeed Insights.
First, it identifies files that can be optimized (HTML, Javascript, and CSS), then offers a variety of means (compress, combine, or move) to make that happen.
The result gives you marked improvement in your website’s performance.
There are two different modes for asset optimization in Hummingbird:
Automatic – use our preset options to optimize your assets and improve page load times.
Manual – configure each file yourself to achieve the setup best suited to your specific site needs.
Drilling down even further, there are two options within Automatic Optimization mode:
Speedy – compresses & auto-combines smaller files together, and optimizes your fonts for faster delivery.
Basic – compresses all your files to deliver a faster version of each.
Automatic mode allows for a quick setup, providing positive gains without the time commitment that manual adjustment requires.
Both of the Automatic options can be configured for Files (CSS, JavaScript), and/or Fonts.
Hummingbird lets you optimize CSS, JS, and font files.
Manual mode allows you to tinker with any and every file individually, so you can optimize your site on a very granular level.
It’s a good idea to test files one at a time to measure results; that way if something doesn’t work it’s easy to identify what caused it and revert back without issue.
We’ve mapped out specific steps for what to do in each mode, so that you can easily follow along in Hummingbird and produce optimal results.
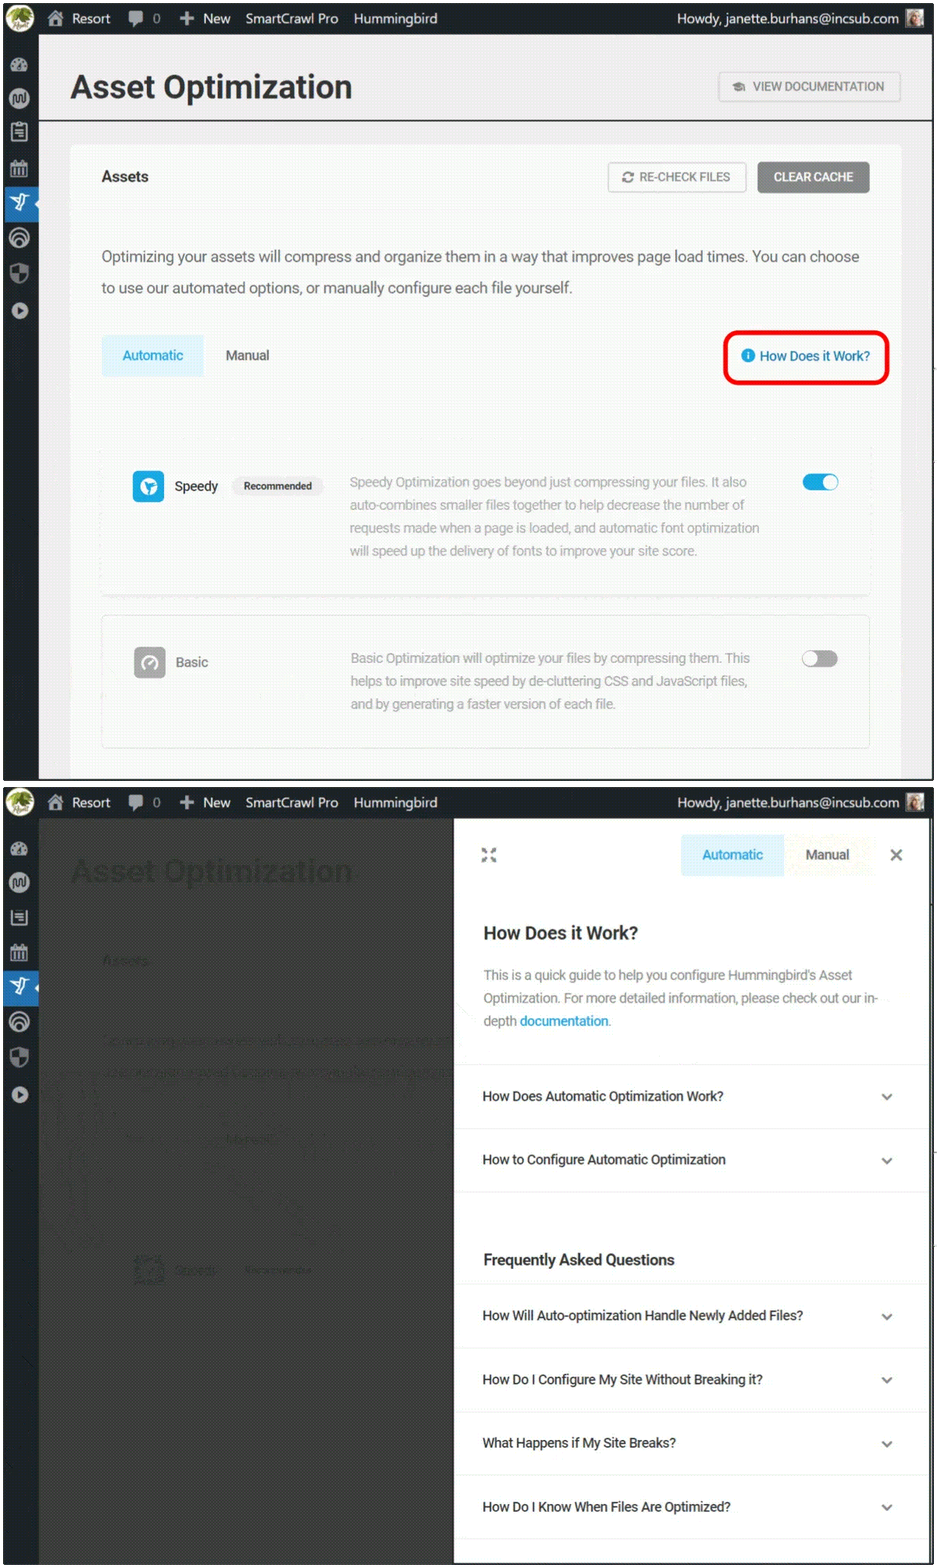
You can see these anytime by navigating to Hummingbird > Asset Optimization > Assets, then click on the How Does it Work? text at right.
There is a page for Automatic and one for Manual; just click on the corresponding header button that you’d like to read about.
Get one-click access to summarized details on both modes of asset optimization.
If you’re just starting out with Hummingbird, we recommend selecting Automatic optimization in Speedy mode to start. As you use and test your site and the plugin further, you can switch to auto basic or manual mode to check for possible improvements.
And of course, you can always view our detailed documentation, or reach out to our customer support gurus, available 24/7/365.
Testing Changes in Safe Mode
We’re going to zero in today on optimization done in Manual, as that’s where the new Safe Mode lives.
Hummingbird’s Safe Mode allows you to test different asset optimization settings in a safe environment, without affecting your website visitors’ experience.
You’ll be able to preview your site from the frontend and check for any errors in your browser’s console, then publish your changes to go live once you’ve got everything just right.
To enable this feature, go to Asset Optimization > Manual Asset Optimization, and click on the toggle button next to Safe Mode.
From here, you can also click on the filter icon, which will open a panel for finding files faster. You can free type or select from the dropdown menu.
You can filter to search for files while in Safe Mode.
When you’re in Safe Mode, clicking on any icon box will change its state.
You will see a solid outline around it, indicating it’s been selected, and a circular info icon will also appear on the far left of the row.
These visuals are to remind you’re in preview mode, and will remain until you click Publish, committing the changes you’ve made.
Visual cues will alert you to unsaved changes.
With Safe Mode enabled, you can start tweaking your files for peak optimization.
Each asset will have a status icon indicating its current state, and these vary based on the asset they’re attached to.
As an example, the Compress option can have the following states:
Gray icon – files that are already compressed
White icon – indicates which files can be compressed
Blue icon – New assets selected for compression
Can’t be compressed – marks files that can’t be compressed
Hover your mouse over any icon for a popup description of what action this change would make.
Need info on a particular icon? Just hover over it for a status popup.
To see the effect any change makes, click the Preview button.
The Preview button shows up once you turn Safe Mode on, taking the place of the Publish Changes button.
Hitting Preview will load the frontend of your site, where you can check on the asset optimization you configured, making sure it doesn’t generate errors or break anything on your site.
What our Preview page looks like in Hummingbird’s Safe Mode.
As you can see, the preview page has three clickable buttons at the top: Go Back, Copy Test Link, and Publish.
Click on Copy Test Link if you want to gauge asset optimization you’ve made using a third-party performance test. Just paste the copied text into your preferred tool.
Click on the Publish button if you’re content with the change(s) you made, and are ready to save.
Click on the Go Back button if you’ve gotten an error message, a site break, or had no observable performance improvements, so you can continue to tweak your assets further.
Once you’ve completed this exercise, turn Safe Mode OFF, as leaving it on can cause page load delays on your live site.
And there you go! Maximum optimization achieved, which is completely changeable at any time.
What’s The Other New Feature in Hummingbird 3.4?
There’s another new feature in the latest release that I wanted to mention, as it’s sure to make your search experience in Hummingbird better.
In the past, if you were working with a particular encrypted file from your performance test reports, locating it on the Manual Asset optimization tab by filename was a bit messy.
That was because Hummingbird generates special filenames for optimized files, and there was no direct way to find them there. Until now!
Copy filenames, then use Ctrl/Cmd+F to quickly find them in the browser search.
With this release, you can copy filenames from the performance reports, then look them up directly in the browser search in the Manual Asset Optimization tab.
This makes finding optimized files easier and faster.
Get Your Site Humming with Optimal Performance
Hummingbird is the ultimate performance suite for all users – whether you’re looking for simple, one-click solutions, or want to fine-tune your site performance down to the last CSS file.
You’ll get faster loading pages and higher search rankings and PageSpeed scores with Hummingbird’s speed optimization.
Now with Safe Mode for asset optimization, you can manually configure and test any files without worrying about a site break or interrupting the visitor experience on your site.
Hummingbird is only one of our highly rated and multi-functional Pro plugins. You can try them all – along with WPMU DEVs membership or hosting – for free! Everything comes with our money-back guarantee, fully supported by our always on-call, 5-star support.
We’ll help you keep your sites humming and your clients happy.
Fine tuning your website through manual optimization can be tricky, but our new Safe Mode feature in Hummingbird puts that problem in the rearview.
Now, you can now test optimization in a temporary area that allows for non-permanent changes, so you can work out any kinks, then push them to your live site. For free!
Introducing Safe Mode for Manual Asset Optimization – allowing you to optimize in a private space while your users still enjoy a fully functioning site.
In this article, we’re going to look at how Safe Mode in Hummingbird works, while touching on a few related features and settings in the plugin. Plus, we’ll take a look at an additional (surprise!) feature also included in this release.
Continue reading, or jump ahead using these links:
Hummingbird makes your website faster by optimizing site performance with fine-tuned controls. Setting enhancements make things easy and efficient, giving you new ways to boost PageSpeed Insights.
First, it identifies files that can be optimized (HTML, Javascript, and CSS), then offers a variety of means (compress, combine, or move) to make that happen.
The result gives you marked improvement in your website’s performance.
There are two different modes for asset optimization in Hummingbird:
Automatic – use our preset options to optimize your assets and improve page load times.
Manual – configure each file yourself to achieve the setup best suited to your specific site needs.
Drilling down even further, there are two options within Automatic Optimization mode:
Speedy – compresses & auto-combines smaller files together, and optimizes your fonts for faster delivery.
Basic – compresses all your files to deliver a faster version of each.
Automatic mode allows for a quick setup, providing positive gains without the time commitment that manual adjustment requires.
Both of the Automatic options can be configured for Files (CSS, JavaScript), and/or Fonts.
Hummingbird lets you optimize CSS, JS, and font files.
Manual mode allows you to tinker with any and every file individually, so you can optimize your site on a very granular level.
It’s a good idea to test files one at a time to measure results; that way if something doesn’t work it’s easy to identify what caused it and revert back without issue.
We’ve mapped out specific steps for what to do in each mode, so that you can easily follow along in Hummingbird and produce optimal results.
You can see these anytime by navigating to Hummingbird > Asset Optimization > Assets, then click on the How Does it Work? text at right.
There is a page for Automatic and one for Manual; just click on the corresponding header button that you’d like to read about.
Get one-click access to summarized details on both modes of asset optimization.
If you’re just starting out with Hummingbird, we recommend selecting Automatic optimization in Speedy mode to start. As you use and test your site and the plugin further, you can switch to auto basic or manual mode to check for possible improvements.
And of course, you can always view our detailed documentation, or reach out to our customer support gurus, available 24/7/365.
Testing Changes in Safe Mode
We’re going to zero in today on optimization done in Manual, as that’s where the new Safe Mode lives.
Hummingbird’s Safe Mode allows you to test different asset optimization settings in a safe environment, without affecting your website visitors’ experience.
You’ll be able to preview your site from the frontend and check for any errors in your browser’s console, then publish your changes to go live once you’ve got everything just right.
To enable this feature, go to Asset Optimization > Manual Asset Optimization, and click on the toggle button next to Safe Mode.
From here, you can also click on the filter icon, which will open a panel for finding files faster. You can free type or select from the dropdown menu.
You can filter to search for files while in Safe Mode.
When you’re in Safe Mode, clicking on any icon box will change its state.
You will see a solid outline around it, indicating it’s been selected, and a circular info icon will also appear on the far left of the row.
These visuals are to remind you’re in preview mode, and will remain until you click Publish, committing the changes you’ve made.
Visual cues will alert you to unsaved changes.
With Safe Mode enabled, you can start tweaking your files for peak optimization.
Each asset will have a status icon indicating its current state, and these vary based on the asset they’re attached to.
As an example, the Compress option can have the following states:
Gray icon – files that are already compressed
White icon – indicates which files can be compressed
Blue icon – New assets selected for compression
Can’t be compressed – marks files that can’t be compressed
Hover your mouse over any icon for a popup description of what action this change would make.
Need info on a particular icon? Just hover over it for a status popup.
To see the effect any change makes, click the Preview button.
The Preview button shows up once you turn Safe Mode on, taking the place of the Publish Changes button.
Hitting Preview will load the frontend of your site, where you can check on the asset optimization you configured, making sure it doesn’t generate errors or break anything on your site.
What our Preview page looks like in Hummingbird’s Safe Mode.
As you can see, the preview page has three clickable buttons at the top: Go Back, Copy Test Link, and Publish.
Click on Copy Test Link if you want to gauge asset optimization you’ve made using a third-party performance test. Just paste the copied text into your preferred tool.
Click on the Publish button if you’re content with the change(s) you made, and are ready to save.
Click on the Go Back button if you’ve gotten an error message, a site break, or had no observable performance improvements, so you can continue to tweak your assets further.
Once you’ve completed this exercise, turn Safe Mode OFF, as leaving it on can cause page load delays on your live site.
And there you go! Maximum optimization achieved, which is completely changeable at any time.
What’s The Other New Feature in Hummingbird 3.4?
There’s another new feature in the latest release that I wanted to mention, as it’s sure to make your search experience in Hummingbird better.
In the past, if you were working with a particular encrypted file from your performance test reports, locating it on the Manual Asset optimization tab by filename was a bit messy.
That was because Hummingbird generates special filenames for optimized files, and there was no direct way to find them there. Until now!
Copy filenames, then use Ctrl/Cmd+F to quickly find them in the browser search.
With this release, you can copy filenames from the performance reports, then look them up directly in the browser search in the Manual Asset Optimization tab.
This makes finding optimized files easier and faster.
Get Your Site Humming with Optimal Performance
Hummingbird is the ultimate performance suite for all users – whether you’re looking for simple, one-click solutions, or want to fine-tune your site performance down to the last CSS file.
You’ll get faster loading pages and higher search rankings and PageSpeed scores with Hummingbird’s speed optimization.
Now with Safe Mode for asset optimization, you can manually configure and test any files without worrying about a site break or interrupting the visitor experience on your site.
Hummingbird is only one of our highly rated and multi-functional Pro plugins. You can try them all – along with WPMU DEVs membership or hosting – for free! Everything comes with our money-back guarantee, fully supported by our always on-call, 5-star support.
We’ll help you keep your sites humming and your clients happy.
Your small business or online store relies on email. However, keeping up with marketing emails, transactional emails, email notifications, and engaging with users can become overwhelming. Automating these emails can save you time and effort while delivering you better results.
In this article, we’ll show you how to send automated emails in WordPress to streamline your workflow and grow your business.
For example, you can use email to welcome new users and let them know when new content or products are available. Email is also useful for marketing campaigns and updating your customers on the progress of their orders.
You can even use email to notify yourself when there is a new post waiting for you to review, or that a WordPress update needs to be installed.
Since email is used for so many tasks on your WordPress website, it only makes sense to save time and effort by automating as many emails as possible.
With that being said, let’s take a look at how to send automated emails in WordPress. Here are the topics we’ll cover in this tutorial:
Making Sure Your WordPress Email Is Being Sent Reliably
Before you start automating your emails, it’s important to make sure that emails from your website are being delivered reliably.
By default, most WordPress hosting companies do not have the mail function configured properly. To prevent their servers from abuse, many hosting companies even turn it off completely. In these cases, your WordPress emails will fail to reach users.
Luckily, you can fix this easily by using WP Mail SMTP. This plugin lets you send your WordPress email through a reliable SMTP platform which is configured specifically to send emails like SendLayer, Gmail, Outlook, etc.
The free version of WP Mail SMTP should be more than sufficient for most websites. For more details, see our guide on how to fix WordPress not sending email.
Sending Automated Drip Emails Using Constant Contact
A good place to start thinking about email automation is the way you market your store or business. And one of the best ways to automate marketing is with a drip campaign.
What Is an Automated Drip Campaign?
Automated drip campaigns are email messages that automatically guide your users along a specific journey. They’re great for boosting user engagement on your WordPress site.
For example, these messages can welcome new users, promote important content, upsell products, target specific geographic regions, and encourage users to register for events.
To send automated drip notifications by email, we recommend using Constant Contact because it’s the best email marketing service on the market. However, you can use any other major email marketing platform, including Sendinblue, HubSpot, and others.
To start, you can visit the Constant Contact website and create an account. The software gives you a 60-day free trial, so you can try it out before committing to a premium plan.
Once you sign up, you can visit the Constant Contact dashboard to create a contact list.
Constant Contact has already created a default list for you. However, you can create your own list by going to the ‘Contacts’ tab in the top menu, and then clicking the ‘Create List’ button.
A popup window will appear where you can enter a name for your list.
After that, simply click the ‘Save’ button.
You can add contacts to the list by going to the ‘Contacts’ tab and then clicking the ‘Add Contacts’ button.
A popup window will open with multiple options for adding new contacts.
Now you can add your contacts manually, upload them in a spreadsheet or CSV file, or import them from other apps.
Creating an Automated Drip Campaign
Once you’ve added your contacts, you need to create the drip campaign.
To do that, head over to the ‘Campaigns’ tab and then click the ‘Create’ button.
Next, Constant Contact will show you multiple options for creating a campaign.
Go ahead and select the ‘Email Automation’ campaign.
From here, you can select single-step automations or multi-step automation.
Single-step automations send just a single email, such as a welcome email. Multi-step automations let you create a series of emails that are automatically sent to your subscribers so you can let them know about your products and services, send special offers, and more.
In this tutorial, you’ll create a multi-step automation for when new subscribers join your email list. Go ahead and select the ‘A contact joins a list’ option.
Next, you will have to enter a name for your campaign.
Make sure you click the ‘Save’ button.
Constant Contact will then ask you to choose what activity will trigger the email. For example, the drip series is automatically triggered when a user joins your email list, opens an email, clicks a link, or buys a product.
You can use the default ‘Contact joins a list’ option as the trigger type. Then you can choose the email list you created earlier. Go ahead and click the ‘Save’ button when you’re done.
Creating the Emails for Your Drip Campaign
Now you need to create the emails to send in your automated drip campaign. The first one you create will be sent automatically when the user signs up.
To begin, simply click the ‘Create New Email’ option.
Constant Contact will now show different email templates to choose from.
For this tutorial, we’ll use the ‘Agent Welcome’ template.
You can customize the email template using the drag-and-drop email builder.
You can choose multiple elements from the menu on your left and place them on the template.
You also need to add the email’s content by removing the placeholder text and adding your own. Once you’ve done this, simply click the ‘Continue’ button at the top right of the editor and the email will be added to the drip series.
Next, you can add a second email by clicking the ‘+ Add to series’ button and then the ‘Create New Email’ button.
You’ll need to select a template and customize the new email as you did earlier. You can set the delay before the drip campaign sends its next email.
By default, this value is set to 4 days. You can change this by clicking the ‘Edit’ button in front of the section titled ‘Wait 4 days.’
This will open the ‘Time Delay Editor’ where you can choose when the next email in the drip campaign will be delivered. You can click the ‘Confirm’ button when you’re done.
Now, you should see all your emails in the campaign summary area.
Go ahead and click the ‘Activate’ button in the upper-right corner to launch your campaign.
Constant Contact will then show a prompt to verify whether you wish to activate your campaign.
Simply click the ‘Continue’ button, and the tool will check if everything is working properly and activate your campaign.
You’ve now successfully launched your automated drip email campaign.
Sending Automated Transactional Emails With FunnelKit Automations
If you are running a WooCommerce store, then your customers will receive different transactional emails. These help them get order confirmations, track their order status, get invoices, and find more information about your online store.
You can customize and automate these emails using FunnelKit Automations, a popular WooCommerce plugin for marketing automation. It is a sister product to FunnelKit (formerly WooFunnels), a powerful sales funnel builder for WooCommerce.
Creating Email Automation Workflows With FunnelKit Automations
Upon activation, you need to go to Campaigns » Automations (Next-Gen) to add a new automation from your FunnelKit Automations dashboard. Here you will see a library of email types that make it simple to create new automations.
You can import an email automation workflow with a single click, then use the visual email automation builder to make any customizations that you need.
Automating Marketing Emails Using Uncanny Automator
Of course, you’ll also still need to send marketing emails outside of your drip campaign. These are most effective when they are personalized and timely.
For example, you can use automated emails to showcase products similar to what your customer has already bought. Or you can automatically send users an email as soon as you publish a new article on your website.
The free version easily connects with popular email marketing services such as Mailchimp, HubSpot, and others, making it easy to automate your email.
For this tutorial, we’ll use the free version of Mailchimp because it’s popular and they offer a free forever plan where you can send up to 10,000 emails per month to 2000 subscribers.
Upon activation, head over to the Automator » Add New page to create your first recipe. In this tutorial, we’ll send an automated email to subscribers whenever we publish a new post.
You’ll be asked to select which type of recipe you want to create. You should choose ‘Logged-in users’ and then click the ‘Confirm’ button.
Setting Up the Automation Trigger
Next, you need to choose whether the automation will be triggered by Uncanny Automator or WordPress.
Since you will be sending an automated email when a new WordPress post is published, you should click on the ‘WordPress’ option.
Now you can choose from a long list of available WordPress triggers.
You need to select the trigger labeled ‘A user publishes a type of post with a taxonomy term in a taxonomy.’
You can use the search feature to find this trigger more quickly.
If you like, you can get specific about the types of posts that will trigger the email. You can choose a post type and a specific category or tag from the drop-down menus.
For this tutorial, we’ll go with the default settings.
Make sure you click the ‘Save’ button when you have finished setting up the trigger.
Setting Up the Automation Trigger
Next comes the action part, where you choose what action will be triggered. To get started, simply click the ‘Add action’ button.
Now you will be shown a long list of integrations that are available for the action.
You should click the Mailchimp icon to connect it to your website.
This will bring up a popup where you need to follow the on-screen instructions to finish the connection by logging into your Mailchimp account or creating a new one. Once connected, you will be able to choose what action you want to perform on your Mailchimp account.
You should then choose the option ‘Create a send a campaign’.
Now you need to type a name for the campaign. You might like to use tokens so that the Mailchimp campaign name for each new post is different.
For example, you can click the ‘*’ button to the right of the field and select the ‘Post title’ token.
After that, you can use the drop-down menus to choose your audience and segment and fill in the subject and other details of your email.
You can compose your email in the ‘Email contents’ field. Make sure you use tokens so that the content is updated for each email campaign.
For instance, you can include tokens for the post title, post author display name, post excerpt, post URL, and featured image URL.
Once you are finished, you can switch the recipe from ‘Draft’ to ‘Live.’
From now on, when you publish a new article on your website, Mailchimp will automatically send an email to your subscribers.
You might also like to see our guide on how to automatically send a coupon to users who leave reviews in WooCommerce. It’s another good example of how you create automated emails using Uncanny Automator to build customer loyalty.
Bonus: Sending Automated Notification Emails
Now that you have set up automated emails for your users, you can do the same for yourself and your team.
For example, you can create automated email notifications to keep track of issues that require your immediate attention, such as when an author submits a post for you to review.
You can also stop the WordPress notifications you don’t need from filling up your inbox, such as comment notifications.
If you liked this article, then please subscribe to our YouTube Channel for WordPress video tutorials. You can also find us on Twitter and Facebook.
Do you want to connect Salesforce to your WordPress forms?
Salesforce is one of the most popular customer management software on the market. Connecting it to your WordPress forms allows you to automatically add leads, customers, and other contacts to your CRM.
In this article, we’ll show you how to easily connect Salesforce to your WordPress forms.
Why Connect Salesforce to Your WordPress Forms?
Salesforce is one of the best CRM (customer relationship management) software on the market. Many of the world’s largest businesses use it to manage customers, leads, and business contacts from one single dashboard.
Most business websites use contact forms to generate leads and then manually add them to their CRM software. This takes time, and you may still forget to follow up with a potential customer.
Connecting Salesforce to your WordPress contact form allows you to remove this hurdle. As soon as a user submits their information, it will automatically be added to your Salesforce contacts.
From there, you can follow up with customers to boost conversions and sales from your WordPress website.
That being said, let’s take a look at how to easily connect Salesforce to your WordPress forms.
You can use it to easily create any type of form using a simple drag-and-drop form builder.
WPForms is a premium WordPress plugin, and you’ll need their Elite plan to use the Salesforce addon. There is also a WPForms Lite version which is available for free.
Upon activation, you need to visit the WPForms » Settings page to enter your license key. You can find this key under your account on the WPForms website.
Setting Up the Connection Between WPForms and Salesforce
Now, you need to set up a connection between WPForms and Salesforce. WPForms comes with the Salesforce addon which lets you easily connect the two apps together.
Simply go to the WPForms » Addons page and locate the Salesforce addon. You can then click on the ‘Install’ button, and it will be installed and activated automatically.
After that, you can go to the WPForms » Settings » Integrations page from your WordPress dashboard.
Here, you need to click on the Salesforce integration to open it up.
Under Salesforce settings, go ahead and click on the ‘Add New Account’ button.
WPForms will show you Salesforce settings with a Callback URL.
Simply keep the tab open in your browser or copy the Callback URL to a safe place. You’ll need it in a later step.
Now, you need to create an app in your Salesforce account. We’ll walk you through the process step by step.
Important Note: You need to have an Enterprise, Unlimited, Performance, or Developer edition of Salesforce. Otherwise, you will not be able to connect your WordPress forms. However, there is a free trial you can use to get started.
If you don’t already have an account, then you can create one by going to the Salesforce’ website and clicking the ‘Start My Free Trial’ button.
On the next screen, you can enter your details like name, work email, job title, company, phone number, and more to create an account.
After entering the data, go ahead and click the ‘Start My Free Trial’ button.
After completing the signup, you’ll reach your Salesforce account dashboard.
From here, you need to switch to the Salesforce Classic dashboard by clicking on your profile icon on the top, and then clicking the ‘Switch to Salesforce Classic’ option.
Next, you’ll the classic Salesforce dashboard.
After that, you need to click on the Setup link at the top to access the Salesforce dashboard settings.
On the next screen, navigate to the Build » Create menu from the column on the left.
From here, simply click the ‘Apps’ option in the menu.
This will bring you to the Apps section.
From here, click on the New button under the Connected Apps section.
Next, you now need to fill in the details for your app.
For the ‘Connected App Name,’ enter the name you want to use, so other users for your Salesforce account can see it.
The API name will default to the Connected App Name. You don’t need to enter or change it. For the contact email, enter your email address.
You don’t need to enter the logo image, icon, info URL, or description. These fields are for Salesforce users who will be publishing their apps.
Below this, you need to check the ‘Enable OAuth Settings’ box.
Once you check the box, you will see the OAuth settings.
First, you need to enter the Callback URL that you found earlier in your WPForms account.
Simply paste the link in the Callback URL field.
After that, scroll to the ‘Available OAuth Scopes’ section. The selected OAuth Scopes let Salesforce know what permissions your app should have.
Next, you need to enable 2 permissions here. They are ‘Manage user data via APIS (api)’ and ‘Perform requests at any time (refresh_token, offline_access).’
Simply select these and then click the ‘Add’ button to add those permissions.
There’s nothing else you need to change on this page. After adding the permissions, simply click the ‘Save’ button at the bottom of the page.
You should then see a message telling you to allow up to 10 minutes for your changes to take effect.
Then, just click on the ‘Continue’ button. On the next screen, you’ll see your API information.
We recommend that you wait 10 minutes before using your app. That way, you can be sure that your app will be ready. After the 10 minutes is up, you need to copy your ‘Consumer Key’ and ‘Consumer Secret’ to WPForms.
Simply click the ‘Manage Consumer Details’ button to continue.
Next, Salesforce will ask you to enter a verification to move ahead. You’ll receive the code in your email.
After entering the code, go ahead and click the ‘Verify’ button.
Next, you’ll see the ‘Consumer Key’ and ‘Consumer Secret’ codes. Go ahead and copy them.
Now, simply switch back to the tab with your WPForms Salesforce settings.
If you have closed this tab, then it’s easy to find it again in your WordPress admin. Just go to the WPForms » Settings » Integrations page.
Simply paste the Consumer Key and Consumer Secret into the Salesforce settings for WPForms.
Then, go ahead and click the ‘Connect to Salesforce’ button.
You will then be prompted to log in to your Salesforce. Simply log in to your account using your username and password.
Next, you need to click the ‘Allow’ button to give WPForms access to your Salesforce account.
After this, you will see your Integrations page again.
There should be a message at the top of the screen to let you know that the connection was successful.
Now that you have connected WPForms to your Salesforce account. You can start creating forms and send entries directly to your Salesforce account.
Creating a WordPress Form with Salesforce Integration
The next step is to create your form. You can connect any type of form to Salesforce.
Simply go to the WPForms » Add New page. This will launch the WPForms drag-and-drop form builder.
First, you can enter a name for your form at the top and then click on a template. We’ll use the ‘Simply Contact Form’ template for this tutorial.
In the form builder, you can drag and drop different fields from the left menu onto the template. For instance, you could add a phone number field.
Plus, you can rearrange their order and further customize each field in the form.
Once you are satisfied with the form, go to the Marketing » Salesforce tab to connect it with your Salesforce account.
Go ahead and click the ‘Add New Connection’ button.
You will then see a popup where you need to name your connection. Your site’s visitors will not see this. It’s just for your own use.
Just enter the name you want to use. Then, click the ‘OK’ button.
Now, you need to select your Salesforce account and ‘Salesforce Object.’
The object is the type of data you are sending to Salesforce, such as a contact or a lead.
Once you’ve chosen your Salesforce Object, you will see some new dropdowns.
Here, the ‘Custom Field Name’ column is the name of the field in your Salesforce account. The ‘Form Field Value’ is the name of the field on your form.
You need to select a ‘Form Field Value’ for each custom field you want to use. This means your form data will be entered into the correct field in Salesforce.
The only required field is the Full Name field in Salesforce. For this, select ‘Name’ as the Form Field value.
Next, go ahead and select a different field from the dropdown below this. Simply choose which WPForms field you want to map it to. To add more fields, click the blue + button.
We have included the email and phone fields from our form here:
Don’t forget to click the Save button at the top of the screen after adding your Salesforce connection.
Adding Your Form to a WordPress Page or Post
WPForms makes it super easy to add forms anywhere on your WordPress website.
Simply edit the post or page where you want to add the form or create a new one. On the content editor screen, click on the (+) add new block button and then add a WPForms block to your page.
Next, you need to choose your contact form from the dropdown list within the block.
Finally, go ahead and publish your page to see your form live on your site.
If you liked this article, then please subscribe to our YouTube Channel for WordPress video tutorials. You can also find us on Twitter and Facebook.
Our new Global IP Banning feature saves you loads of time securing sites. Simply create your IP block and allowlist once, then automatically sync to some or all of your WordPress sites with a few clicks.
A global IP allowlist and blocklist feature has been a top Defender security request for a while. So now…
“I logged into a client site this morning and saw a notification about the new global IP list-banning feature that allows us to sync our IP ban lists across Hub sites. I have raised this request in previous topics with Support and I am sooooooo happy that it has been made live. You guys rock!â€
Andre – WPMU DEV Member
It’s here, free to use, and managed directly from your Hub! As you’ll see, it’s easy to quickly apply the same allowlist and blocklist IPs to all of your sites in bulk.
So, let’s show you how it’s done! First though…
Why Block and Allow IPs?
Just to touch on it quickly, there are many reasons for configuring a WordPress site to allow or block IPs.
For example, maybe you want to monitor online behavior (e.g. to restrict specific web platforms from accessing an educational site). Or, to protect your website from attacks. Also, you may not want a particular country or place to access your online information.
So, there are practical scenarios (like not allowing access to unwanted sites) and security protocols (preventing unwanted or harmful sites or servers from connecting with your network or computer).
Whatever the purpose, allowing and banning IPs should be in your control. With Defender, they are.
Let’s show you how our Defender security plugin makes it easy.
IP Banning and Allowing From The Hub
The Hub makes it easy and simple to create and manage IP Banning.
You can block and allow IP addresses from this area and automatically sync those lists with all or several of your WordPress sites.
The IP Banning section is located in the MySites menu area.
IP Banning is a click away whenever you need to access it in The Hub.
In this section, you can see your Global Blocklist and Global Allowlist, where you’ll add your IPs.
These are the sections where all of the IPs will be entered.
Simply insert one IP address per line and keep in mind that IPv4 and IPv6 are supported. Plus, IP ranges are also accepted in CIDR or hyphenated format.
Once you have your IPs added, click ‘Save.’
Ever want to edit? It’s no problem. You can add and remove IPs at any time!
Selecting Sites to Block and Allow IPs
It’s up to you to determine what sites of yours you want IPs blocked or allowed. So, before syncing IPs with sites, decide what sites you want to associate with IP block and allow lists.
Head to Activate on Site(s) to pick what site you want to include.
All of your sites will be listed here.
After clicking, you’ll see all the available sites to activate global IP banning.
You’ll also be able to see any website that doesn’t have Defender activated and any other issues that would affect syncing.
Select all in one-click or individually.
If you want, you can search with Filters & Labels when browsing through your websites. There are options for filtering by ‘Hosted with us,’ ‘Hosted elsewhere,’ favorites/non-favorites, and labels.
Plus, you can enter a site title and search relevant sites.
Want just sites hosted with us? Click that option to filter and browse those.
When your sites are selected, tap Activate – and that’s it! It takes just a few moments for the sites to be included.
With that being said, it’s time to…
Sync IPs with WordPress Sites
It takes one click to sync your IPs with your WordPress sites. Just tap on the bright blue Sync IPs with Sites, and all the selected sites will be synced.
After listing all your IPs, click ‘Save’ before syncing.
A message informing you of what is about to take place will pop up to ensure you’d like to proceed.
Sounds good to still sync? Then click Continue.
Click ‘Continue’ will get the sync started.
After hitting Continue, you can sit back and relax as all of your chosen sites are synced with IPs on your blocklist and allowlist! It takes just a few moments.
Global IPs From Defender’s Dashboard
Now that you know how to set up global IPs from The Hub, you can also monitor and sync IPs in WordPress under Defender > Firewall > IP Banning.
You’ll see it synced up here as long as the Block/Allow Global IPs are activated.
After syncing, all the IPs you have entered in The Hub will be in a list.
One thing to note is that you can’t add new IPs from Defender’s WordPress admin. Simply add them in The Hub and re-sync – and that’s it!
It’s also an area where you can enable and disable the global IP feature anytime.
Allow and Block Global IPs with Ease
As you can see, allowing and blocking global IPs can be done in just a few clicks with Defender and The Hub. It’s never been simpler to control global IPs across any number of sites simultaneously!
If you aren’t using The Hub yet, sign up for free. The same goes for Defender, which also doesn’t cost a thing from wp.org.
Registering a new domain through WPMU DEV? This Domain Security Guide provides all the information you need to learn how to keep your domains safe, secure, and protected.
Keeping your online presence safe, secure, and protected from hackers, malicious software, and unforeseen events that can compromise your business is complex. Web security involves many areas, including web hosting security, website security, password security, the security of WordPress itself, and domain name security.
In this article, we cover all you need to know about securing your domain name. You will learn how to keep your domain name(s) safe, adding another layer of protection to the overall security of your business for greater peace of mind.
Domain hijacking or domain theft, is taking wrongful control of a domain name from the rightful name holder.
Domain hijacking is usually associated with cybercrime. It involves the theft of a domain name via unauthorized access to the domain management account, or changing a domain’s name servers by illegally accessing the domain name system (DNS), also known as DNS hijacking.
Domain hijacking also takes place more often than you can imagine.
Verisign is a global provider of domain name registry services and internet infrastructure. They are not only the authorized registry for top-level domains (TLD) like .com, .net, .name, .cc, etc., but every quarter, they also review the state of the domain name industry and provide a brief highlighting important trends in domain name registrations.
According to Verisign’s Domain Name Industry Brief (DNIB), there are currently over 350 million registered domains around the world. Based on this figure and the number of domain transfer disputes and other claims related to domain hijacking handled by GoDaddy’s Domain Compliance and Advanced Support Team (DCAST) team, GoDaddy calculated that malicious cyber-criminals make around 170,000 attempts every year to steal domains from their registered name holder (RNH).
This means that every hour of every day, around 20 attempts are made to steal someone else’s domain name.
According to GoDaddy, criminals attempt to steal domains 170,000 times every year.
Why is Domain Name Security Important?
Devices connect and communicate with each other on the web using unique IP addresses.
As an IP address is just a string of numbers (e.g. 2607:f8b0:4004:815::200e), it’s difficult for the human brain to remember these, so we map domain names to IP addresses to make finding sites easier.
For example, the string of numbers shown above is the IP address for Google’s website. It’s much easier to remember Google.com than to tell someone searching for answers online to “just 2607:f8b0:4004:815::200e it,” wouldn’t you agree?
This example also illustrates just why domain names are so important and necessary to protect. Domains not only represent your brand and your identity online, they are also the primary method the rest of the world has to communicate with your business online.
If someone takes over your domain, they not only control your online brand and identity, they also control all email addresses based on that domain, and can wreak absolute havoc with your website and your business.
As ICANN, the organization responsible for managing domain names worldwide puts it…
“Domain hijacking can have a lasting and material impact on a registrant. The registrant may lose an established online identity and be exposed to extortion by name speculators.
Domain hijacking can disrupt or severely impact the business and operations of a registrant, including (but not limited to) denial and theft of electronic mail services, unauthorized disclosure of information through phishing web sites and traffic inspection (eavesdropping), and damage to the registrant’s reputation and brand through web site defacement.”
Once a hijacker gains access to a domain’s account and its control panel, they can make account administrator and password changes, and redirect the domain to a new server (“DNS hijacking”), effectively gaining complete control of the domain.
If you want to read about the kind of hassles you can expect to deal with if your domain name gets hijacked, check out this insider account of the domain name hijacking of perl.com.
So, what can you do to protect your domain from being hijacked?
To answer this question properly, first let’s look at who is responsible for ensuring the various aspects of domain security.
Next, we’ll look at industry-wide domain name security recommendations and what you can do to keep your domain name(s) safe and secure.
Domain Name Security: Who Is Responsible For What?
Domain name security involves many players. These include:
ICANN (Internet Corporation for Assigned Names and Numbers). This is the global not-for-profit public-benefit corporation responsible for ensuring a stable, secure, and unified global Internet and the authority in charge of overseeing the infrastructure that allows any browser to connect to any domain on the internet anywhere in the world. ICANN also maintains the global database containing all of the world’s IP addresses and domain names, called the Domain Name System (DNS) and often referred to as the phonebook of the Internet, connecting web browsers with all websites.
Domain Registry – Every allowed top-level domain (TLD) – e.g. .com, .net, .store, .site, etc. is supervised by an organization officially appointed by ICANN. Domain registries, then, are the official organization responsible for managing all domains under that TLD.
Domain Registrar – An ICANN-accredited entity that makes the purchase and registration of domain names available to businesses and individuals. Essentially, they are domain name providers who can make adjustments to the domain name’s information in the database maintained by ICANN. A domain registrar can source and sell domains from different domain registries.
Domain Reseller – These are also domain name providers but not ICANN-accredited. Domain resellers are a distribution outlet for domain registrars. They pass on information to domain registrars, who then update ICANN’s global database.
Domain Registrant – These are the entities (companies, businesses, or individuals) who purchase and register domain names. It’s important to note that domain names cannot be owned, only leased.
See the chart below if you need help understanding how the domain name world is organized.
Who’s who in the domain name zoo!
A report compiled by ICANN detailing incidents and threats of domain name hijacking found that domain name hijacking incidents often result from a combination of security failures that can involve all of the above parties.
These failures include:
Flaws in registration and related processes
Failure to comply with the transfer policy
Poor administration of domain names by registrars, resellers, and registrants
How Domains Get Hijacked
In the above-mentioned report, ICANN found that many security incidents leading to domain name hijacking occur when registrars and resellers fail to adhere to its transfer policy and their registrant identity verification processes are insufficient to detect and prevent fraud, misrepresentation, and impersonation of registrants.
ICANN, however, also plays a role in this. Its policy on transfer of registrations between registrars makes transfer contact email addresses an acceptable form of identity.
All a domain hijacker needs to hijack a domain is the domain name and an administrative contact’s email address.
Registrant email addresses and contact information are often accessible via the Whois service. This allows anyone with an email address matching the transfer contact email address to impersonate registrants.
From there, it’s not difficult for malicious users and attackers to apply their ill-gotten social engineering skills to target a domain. They can do this by gathering contact information using Whois services and by registering expired domains used by administrative contacts.
Given the above, it’s no wonder that so many domain hijacking attempts are made every year.
Consider just how simple it can be for a fraudster to obtain the information needed to impersonate an authorized account administrator and contact a domain registrar hoping to gain access to a domain’s control panel:
It can be an “inside job” if someone in the company has access to the owner’s account information.
It can come from security breaches and compromises such as hacking the owner’s device or email account, or from the theft of personal documents containing account information.
It can even be someone calling up the registrar with a made-up story feigning a dire need to gain immediate access to the account as a result of an “emergency.” For example, by pretending to be a family member or an employee of a business that has closed down or saying that the account owner has died and the business needs urgent access to the domain to continue trading.
Other contributing factors to the high incidence of domain hijacking attempts mentioned in ICANN’s report include:
Registrants allowing registration records to become stale
ICANN’s policy requires registrars to request registrants to update their records annually, but registrars have no obligation to take any action other than to notify registrants.
A lack of accurate registration records and Whois information in the transfer process makes a domain name vulnerable to attacks.
Domain resellers can become “invisible” to ICANN
ICANN and registries deal with domain registrars, but have no relationship with domain resellers.
While resellers can operate with the privileges of a registrar when registering domain names, it is the responsibility of the registrar to ensure that policies are enforced by resellers and that records of domain name transactions are accurately maintained.
This “gap” in the business relationship chain leading from registrants to ICANN has been identified as an area with potential opportunities for attackers to exploit.
Dispute mechanisms are not designed to resolve urgent issues
ICANN’s Inter-Registrar Transfer Policy is not designed to prevent incidents requiring immediate and coordinated technical assistance across registrars and has no provisions to resolve the urgent restoration of domain name registration information and DNS configuration.
Registrants also have a part to play
ICANN, registries, registrars, and resellers need to do everything in their power to ensure that domains remain secure and protected.
As we’ll explore later in this guide, however, registrants also have an important part to play in keeping their domains secure.
After all, as the saying goes, a chain is only as strong as its weakest link, and often domain name registrants become the weakest link by failing to take all the necessary precautions and then falling prey to social engineering tactics (e.g. phishing emails, domain spoofing, etc.) leading to identity theft or impersonation. Once this happens, hackers can easily hijack and take control of a domain name.
Domain Hijacking – Common Scenarios
Before we move on to what can be done to improve domain security, let’s look at some of the most common types of domain hijacking scenarios and then briefly discuss what to do if you experience any of the incidents described below:
Domain Name Transfer
Typically, when someone attacks your domain, they are usually aiming for one of two (or both) outcomes:
Change your domain registration contact information to gain control of any domains registered under your account, or
Modify the DNS settings so that your domain name’s resolution is handled by another server (this is called DNS hijacking and we cover it further below)
If the aim of the domain thieves is to maintain the name, they may update the registration data (WHOIS) linked to the domain name, change payment details, and then attempt to transfer the domain name to a new registrar so as to erase the history of their registration activity.
As mentioned earlier, once a hijacker gains access to your domain’s account and its control panel, they can take complete control of your domain by making account administrator and password changes, redirect the domain to a new server, and wreak havoc in your business.
In worse case scenarios, a hijacker can cause significant loss of revenue and damage to your brand.
This is exactly what happened to ShadesDaddy.com in 2015 when hackers took over their registrar account and transferred the domain to an account in China which sold counterfeit merchandise, causing the company to suffer great loss of traffic, revenue, and damage to their brand.
The hijacking of ShadesDaddy.com illustrates what can happen when malicious users gain control of your domain name.
Domain Takeover
If a hijacker takes over a valuable domain name, they can sell it or extort the owner by holding them up for ransom.
Business Disruption
As was made clear in the hijacking of Perl.com article described earlier, if your domain account email contact details are tied into your domain and your domain is hijacked, all business communications over email are effectively hijacked too.
Domain hijackers can do anything from disabling and interfering with communication channels like your website and email to sending out fake emails, to completely blanketing out all business communications online.
DNS Hijacking
As explained in this article, if a hacker is able to modify the information in the DNS server, they can potentially send someone to an IP address that isn’t necessarily where they thought they were going.
There are many ways to do this, most of which involve taking control of the DNS server. This is called DNS hijacking or DNS poisoning.
With domain hijacking, hackers don’t need to change anything in the existing DNS server. They can simply change the domain information in the domain registration account (where all of the primary DNS information is input) and point to a domain server that they control.
Pharming
Pharming is when a hijacker takes control of your website and points it to a malicious site or posts offensive content on your site. This can cause serious damage to your reputation, as all traffic is directed to content that you have no control over.
Phishing
Domain hijackers can cause even wider damage when taking over your domain by using your website to collect valuable information from users such as credit cards, social security numbers, logins, etc. and engage in serious criminal activities that can impact the lives of many people.
What To Do If Your Domain Is Hijacked
Recovering a hijacked domain may take time and involve a lot of hassle and expense, but it is possible, so if it happens to you, don’t despair…take action!
In the previous section, we mention the hijacking of ShadesDaddy.com. Here is a first-hand account from the domain owner describing what it took to recover their domain.
As Pablo Palatnik, owner of ShadesDaddy.com states in the article, it’s important to understand the role that companies like ICANN and Verisign play in domain names.
We have covered ICANN quite a bit in this guide. If you are the victim of domain hijacking, ICANN recommends contacting their Security Team for guidance. They will then ask about the circumstances relating to the attack.
It’s also important to note, that as mentioned in the above article, Verisign is the only organization with the authority to transfer a domain name in the case of a hijack (with a court order or ICANN compliance notice).
As the article also points out, as soon as you become aware that your domain name may have been attacked, the first step is to alert and inform your domain registrar immediately and push them to take immediate action and start putting ICANN procedures like the Registrar Transfer Dispute Resolution Policy in place to communicate with the registrar that currently has your domain name.
Request that the transfer be revoked right away. Registrars usually apply a 60-day transfer lock to the transfer procedure, so if your domain has been transferred to an internal account with the same registrar, you have a better chance of recovering it.
Don’t wait too long, as the domain thief may attempt to move the domain name several times to cover their tracks and this will only complicate things and make recovering your domain more difficult.
Next, you should change all of your passwords to prevent the hacker from getting into your other accounts.
If you have a registered trademark, the Uniform Domain-Name Dispute-Resolution Policy (UDRP) is a contract that all ICANN-accredited registrars must follow to handle disputes about domain name ownership. It permits quick banning of the domain, preventing its data from being modified or moved to another registrar, and also preventing internal transfers between registrar accounts.
Keep in mind, however, that the UDRP was primarily developed as a way to counter cybersquatting or trademark breaches, so if your domain name is not associated with a trademark, it may not be very helpful.
Since it is crucially important that you be able to demonstrate to your sponsoring registrar that the registration or use of the domain is rightfully yours, ICANN provides a list of documentation you should maintain to create a “paper trail” should a dispute ensue over domain ownership with whoever is listed as the registrant in a hijacked domain name.
Some of the basic documentation you should be able to provide includes things like:
A domain history (copies of registration records that show you or your organization as the registrant, billing records, email receipts, web logs, archives, tax filings, etc.).
Financial transactions linking you to the hijacked domain name (e.g. credit cards or bank statements showing purchase details)
Correspondence from your registrar relating to the hijacked domain name (e.g. domain renewal notices, notices of DNS change, telephone call records, etc.)
Legal documents mentioning the domain name (e.g. a contract for the sale of a business listing the domain name as being included).
Some additional things you can do, according to Pablo Palatnik (who eventually did manage to get his domain name back) is to get an experienced lawyer, try to expedite things with a court order, and start making some noise about what happened to you (e.g. post about it on social media).
Reverse Domain Hijacking
One more thing to keep in mind is that if you own a valuable domain name, you may also become a victim of “reverse domain hijacking” (RDNH).
This is where a trademark owner attempts to obtain your domain name by initiating a domain name dispute and fraudulently claiming that you are cybersquatting (i.e. registering domain names that are identical or similar to trademarks, service marks, company names, or personal names in the hope of reselling them at a profit.)
Where domain name hijacking (which is also known as reverse cybersquatting) is usually associated with cybercrime, reverse domain hijacking is basically acting in “bad faith” to attempt to deprive a registered domain name holder of their domain name.
Now that we have seen just how damaging and serious domain hijacking can be, let’s take a look at what can be done to minimize and prevent the threat of incidents.
Domain Name Security Improvements And Recommendations
ICANN’s report not only points out factors that can result in domain hijacking incidents but it also offers registries and registrars various recommendations for improving domain security and helping to protect and safeguard registrants from having their domains hijacked.
These recommendations cover areas like:
Strengthening identity verification requirements in electronic correspondence
ICANN recommends raising all identify verification requirements to the same level as used when verifying by mail or in person.
Improving records
ICANN recommends investigating additional methods to improve the accuracy and integrity of registrant records.
Registrar-Lock and EPP authInfo implementations and best practices
A registrar-lock is a status code set on a domain name by the registrar to prevent unauthorized, unwanted or accidental changes to the domain name.
When set, the domain registry prohibits certain actions from taking place, such as modifying, transferring, or deleting the domain name, changing domain name contact details, etc.
The EPP authInfo code (also known as an Auth-Code, EPP code, authorization code, transfer code, or Auth-Info Code), is a generated passcode required to transfer a domain name between domain registrars and indicates that the domain name owner has authorized the transfer.
ICANN recommends that the same EPP authInfo code not be used for all domains by a registrar and that registries and registrars provide resellers and registrants with Best Common Practices describing appropriate use and assignment of EPP authInfo codes and risks of misuse when unique EPP codes are not used.
Improved communications
ICANN recommends investigating whether making pending transfer notices between registries and registrars to registrants mandatory instead of optional would reduce incidences of domain name hijacking.
Providing emergency channels and procedures
ICANN recommends that registrars should obtain emergency contact information from registrants and share emergency support staff contact information with other registrars, resellers, and registries to provide 24 x 7 access to registrar technical support staff in an emergency situation.
Additionally, ICANN recommends emergency procedures and policies to be defined by registrars for allowing registrants to obtain immediate intervention and restoration of their domain name registration information and DNS configuration.
Improving public awareness
ICANN recommends providing better education to registrants on areas like:
Threats of domain name hijacking and registrant impersonation and fraud.
Procedures for requesting intervention and obtaining immediate restoration of a domain name and DNS configuration.
Keeping registration information accurate.
Protection mechanisms like Registrar-Lock, EPP authInfo, etc.
Improving accountability
ICANN recommends investing stronger enforcement mechanisms for dealing with registrars that fail to comply with the transfer policy, and holding registrars more accountable when working with resellers.
Domain Name Security Best Practices:Â What You Can Do To Keep Your Domain Name Safe
Now that we have covered all that is being done and proposed by ICANN to improve domain security for registries, registrars, and resellers, let’s turn our attention to what domain name registrants can do to keep their domain names safe.
Choose a Reliable Domain Provider
Ideally, you want to purchase your domains from an accredited registrar or a reputable domain name reseller offering a secure DNS management panel and 24×7 technical support.
Having access to an online support team focused on protection and security is important, as they will be your first point of contact if you experience any issues with your domains and need immediate help or assistance.
Assign Your Domain Ownership To A Business Entity
Always register domains to a business or corporate entity. Avoid registering a domain name under an individual’s name. This ensures business continuity regardless of the individuals who may come and go from the business.
As an example, suppose your business manager registers a domain name under their own name and then leaves the company. Your business risks losing the domain, being disrupted, or if there are any issues involved, going through a lot of hassle to reclaim domain name ownership.
Lock Your Domain Name
Domain locking (Registrar Lock) provides extra protection to domain names by preventing the transfer of your domain to another registrar by unauthorised third parties.
Leaving a domain “unlocked” creates an opportunity for domain hijackers to try and transfer your domain name or redirect your domain’s name server without your permission, so lock your domain name through your domain name management system immediately after securing your domain registration.
Activate Domain Privacy
As mentioned earlier, all a domain hijacker needs to hijack a domain is the domain name and an administrative contact’s email address.
It’s critically important, then, to protect the email account associated with your registered domain. The best way to do this is to consider using private domain registration when registering your domain.
Private domain registration (also referred to as Domain Privacy, Domain Privacy & Protection, WHOIS Privacy, or WHOIS Privacy Protection) provides a simple and inexpensive way to hide your name, phone number, and email address from public viewing within the WHOIS database, ensuring online anonymity.
Domain privacy makes hijacking domains so much harder…Google it and you’ll see!
Note: Some domain registries do not allow domain privacy services.
For example, when registering .com.au domains or any other .au extensions, auDA‘s (the authorized .au name space overseer) notes in section 2.4, clause b) of its Registrant Contact Information Policy that:
“registrants must not do anything which may have the effect of concealing the true identity of the registrant or the registrant contact (eg. by using a private or proxy registration service)…”
Choose A Strong Password
In today’s world of rampant cybercriminal activity, we shouldn’t even be discussing password security anymore. Weak passwords, however, remain one of the top threats to data security, so don’t choose weak passwords for your registrar account. You will only be inviting trouble.
Choose a strong password instead so that guessing it becomes next to impossible. Follow basic password security recommendations: Generate a password that’s at least 8 characters long (the longer, the better), with at least one numeric value, one symbol and randomly selected letters.
Regularly Update Your Passwords
This is another basic but important area of password security. Despite all security advice, many businesses end up sharing passwords internally with team members, who may then share it with other team member. Over a period of time, having the information being shared around multiple times can present a real security threat, especially if people who are no longer with the company have access to it.
So, make sure to regularly change your domain registration account passwords. A good time to do this is when registrars send out requests to verify and update your contact details, as they are required to do per ICANN’s policy.
While still on the subject of password security…
Never Share Your Domain Registrar Login Details
The less people who have access to your domain registration account, the less chances of security breaches coming from inside the organization.
If possible, try to restrict access to your domain registrar login details only to those who absolutely need to know it. And if they are no longer part of the organization, then change the login details immediately.
Register Your Domain Name For 10 Years
Choose the maximum registration period available. Many registrars allow you to secure your registration for up to ten years.
If you plan to be in business for a while, consider registering your domain for the next 10 years.
Turn On Auto-Renew
If you miss your domain name renewal reminder and forget to renew your domain name, you run the risk of having it expire and having someone else register it.
You can avoid losing your domain name by choosing maximum registration periods and turning on auto-renew.
Provide Backup Payment Details
If your domain name account allows more than one payment method to be input, then provide details for a second payment method.
This will minimize the risk of losing your domain name due to a failed domain renewal charge (e.g. an expired credit card).
Provide Backup Contact Information
If your domain name account allows you to provide backup contact information (including a backup contact email address), this helps to make it easier for authorized users to retrieve access to your domain name account if anything happens to the main contact email.
Which brings up another important point…
Use A Different Contact Email Address Than Your Registered Domain’s Email
As the domain hijacking case of Perl.com illustrates, if your registration account’s contact email address is tied to the same registered domain name, your entire organization could be “incommunicado” if your domain is hijacked (i.e. the hijackers will have complete control of your domain AND your email).
For this reason, it’s best to use a different email address than the one associated with the registered domain. Also, having a backup contact email address on the account helps.
Regularly Monitor Your Domain Name Status
One of ICANN’s recommended practices for registrants to protect their domains includes routinely monitoring domain name status and performing timely and accurate maintenance of the domain’s contact and authentication information.
Making proactively monitoring your domain name registration status a part of your regular business reviews will help you detect any issues sooner rather than later.
Additional Domain Security Tips
Here are some other options to explore to keep your domains and online presence secure:
Register Domain Name Variations
Scammers and hackers often look to register domain names similar to other known domains so they can impersonate the brand or trick unsuspecting users into providing confidential details like login details, banking information, etc.
Registering popular variations of your domain name not only protects your brand, it also creates an additional layer of protection against common hacking techniques like phishing or domain name typosquatting (a type of social engineering attack that targets internet users who incorrectly type a URL into their web browser and land on another registered domain name containing a typo, mispelled variant, alternative spelling, singular/plural variant, or a different domain extension. Typosquatting is also known as domain mimicry, URL hijacking, sting sites, or fake URLs).
Use Domain SSL Certificates
Adding an SSL Certificate to your domain prevents hackers from being able to “listen in” to encrypted connections between user’s devices and your website and steal sensitive data such as credit card numbers, bank login details, contact details, email addresses, etc.
Use Multi-Factor Authentication
Multi-factor authentication (MFA) is a security measure that requires at least two or more proofs of identification in order to grant users access.
AÂ 2-step verification method like two-factor authentication (2FA) adds an extra layer of protection by making sure that only you can sign in to your account.
2FA adds another layer of security and protection to online accounts.
Use DNSSEC
Domain Name System Security Extensions (DNSSEC) is an advanced DNS feature that strengthens DNS authentication using cryptographic digital signatures and adds an extra layer of security to domains by attaching digital signature (DS) records to their DNS information to determine the authenticity of the source domain name.
When DNSSEC is enabled, DNS lookups use a digital signature to verify that the source of your site’s DNS is valid. If the digital signature doesn’t match, web browsers won’t display the site.
Although DNSSEC can improve domain security, protect your domains from potential cache poison attacks and DNS spoofing, and is useful if you have valuable data to protect, it is not automatically enabled as implementation often requires significant effort and expense and needs to be specifically enabled by network operators and domain name owners.
DNSSEC can also reduce site performance, make DNS more prone to failure, and some domain extensions (e.g. country code domains) don’t support it. Hence support and adoption of DNSSEC worldwide is currently slow.
Use A VPN
If you have the need to be extremely security-conscious about your site, you can use a Virtual Private Network (VPN) to access your domain name account and stave off hackers on the lookout for unsecure connections where they can siphon valuable data.
A VPN hides your public IP address and adds security and anonymity when connecting to web-based services and sites.
Don’t Let Your Security Guard Down
In addition to all of the above recommendations, it’s important to also use common sense and remain vigilant to scams, malware, and other attempts to trick you into giving up valuable details that could see your domain name account being hacked and hijacked.
Some basic precautions you can take include:
Don’t share logins, passwords, and email addresses. Especially not for administrative accounts.
Use SPAM filters. Yes, spammers have ways of getting around filters, but any suspected spam you can automatically send into a junk mail folder will provide at least a modicum more protection than not using any spam filters at all.
Never open attachments sent from unknown sources. Unfortunately, even family and friends can forward you emails with attachments containing viruses, so it’s important to be extra vigilant. If you are unsure about an attachment, check with the sender to make sure it’s legit.
Don’t click any links inside spam messages. Not even the “Unsubscribe” link. It not only makes you vulnerable to viruses and malware, it also confirms to spammers that your email address is active.
Make Your Domain Name Security A Priority
Hopefully, this guide has helped to increase your awareness of how important it is to keep your domain name safe, secure, and protected. The security of your entire digital presence depends on it.
As mentioned at the beginning of this article, keeping your business secure is a complex undertaking. It requires hardening on many levels, and working with trusted partners and solutions.
At WPMU DEV, our aim is to become more than your all-in-one WordPress platform provider. We want to be the business partner you can trust and rely on to grow your business profitably and securely.
When you register a domain with WPMU DEV either for your own business or on behalf of your clients as a reseller, you get the following security features to help keep your domain safe and protected included at no additional cost:
Registrar Lock
Privacy Protection
HTTPS (if your site is hosted with us, we provide free SSL and force HTTPS).
Longer Registration Periods (up to 10 years)
Contact Info Update Verification (whenever you update your contact information, we check our database and if we don’t have that data, you will receive a verification email before updating the information.)
2FA Options For Members (should your WPMU DEV account password ever become compromised, unauthorized users will still require a 2FA code to be able to login).
24/7 Technical Support. Receive expert support on all things WordPress, hosting, and domains any time, any day.
Registering a new domain through WPMU DEV? This Domain Security Guide provides all the information you need to learn how to keep your domains safe, secure, and protected.
Keeping your online presence safe, secure, and protected from hackers, malicious software, and unforeseen events that can compromise your business is complex. Web security involves many areas, including web hosting security, website security, password security, the security of WordPress itself, and domain name security.
In this article, we cover all you need to know about securing your domain name. You will learn how to keep your domain name(s) safe, adding another layer of protection to the overall security of your business for greater peace of mind.
Domain hijacking or domain theft, is taking wrongful control of a domain name from the rightful name holder.
Domain hijacking is usually associated with cybercrime. It involves the theft of a domain name via unauthorized access to the domain management account, or changing a domain’s name servers by illegally accessing the domain name system (DNS), also known as DNS hijacking.
Domain hijacking also takes place more often than you can imagine.
Verisign is a global provider of domain name registry services and internet infrastructure. They are not only the authorized registry for top-level domains (TLD) like .com, .net, .name, .cc, etc., but every quarter, they also review the state of the domain name industry and provide a brief highlighting important trends in domain name registrations.
According to Verisign’s Domain Name Industry Brief (DNIB), there are currently over 350 million registered domains around the world. Based on this figure and the number of domain transfer disputes and other claims related to domain hijacking handled by GoDaddy’s Domain Compliance and Advanced Support Team (DCAST) team, GoDaddy calculated that malicious cyber-criminals make around 170,000 attempts every year to steal domains from their registered name holder (RNH).
This means that every hour of every day, around 20 attempts are made to steal someone else’s domain name.
According to GoDaddy, criminals attempt to steal domains 170,000 times every year.
Why is Domain Name Security Important?
Devices connect and communicate with each other on the web using unique IP addresses.
As an IP address is just a string of numbers (e.g. 2607:f8b0:4004:815::200e), it’s difficult for the human brain to remember these, so we map domain names to IP addresses to make finding sites easier.
For example, the string of numbers shown above is the IP address for Google’s website. It’s much easier to remember Google.com than to tell someone searching for answers online to “just 2607:f8b0:4004:815::200e it,” wouldn’t you agree?
This example also illustrates just why domain names are so important and necessary to protect. Domains not only represent your brand and your identity online, they are also the primary method the rest of the world has to communicate with your business online.
If someone takes over your domain, they not only control your online brand and identity, they also control all email addresses based on that domain, and can wreak absolute havoc with your website and your business.
As ICANN, the organization responsible for managing domain names worldwide puts it…
“Domain hijacking can have a lasting and material impact on a registrant. The registrant may lose an established online identity and be exposed to extortion by name speculators.
Domain hijacking can disrupt or severely impact the business and operations of a registrant, including (but not limited to) denial and theft of electronic mail services, unauthorized disclosure of information through phishing web sites and traffic inspection (eavesdropping), and damage to the registrant’s reputation and brand through web site defacement.”
Once a hijacker gains access to a domain’s account and its control panel, they can make account administrator and password changes, and redirect the domain to a new server (“DNS hijacking”), effectively gaining complete control of the domain.
If you want to read about the kind of hassles you can expect to deal with if your domain name gets hijacked, check out this insider account of the domain name hijacking of perl.com.
So, what can you do to protect your domain from being hijacked?
To answer this question properly, first let’s look at who is responsible for ensuring the various aspects of domain security.
Next, we’ll look at industry-wide domain name security recommendations and what you can do to keep your domain name(s) safe and secure.
Domain Name Security: Who Is Responsible For What?
Domain name security involves many players. These include:
ICANN (Internet Corporation for Assigned Names and Numbers). This is the global not-for-profit public-benefit corporation responsible for ensuring a stable, secure, and unified global Internet and the authority in charge of overseeing the infrastructure that allows any browser to connect to any domain on the internet anywhere in the world. ICANN also maintains the global database containing all of the world’s IP addresses and domain names, called the Domain Name System (DNS) and often referred to as the phonebook of the Internet, connecting web browsers with all websites.
Domain Registry – Every allowed top-level domain (TLD) – e.g. .com, .net, .store, .site, etc. is supervised by an organization officially appointed by ICANN. Domain registries, then, are the official organization responsible for managing all domains under that TLD.
Domain Registrar – An ICANN-accredited entity that makes the purchase and registration of domain names available to businesses and individuals. Essentially, they are domain name providers who can make adjustments to the domain name’s information in the database maintained by ICANN. A domain registrar can source and sell domains from different domain registries.
Domain Reseller – These are also domain name providers but not ICANN-accredited. Domain resellers are a distribution outlet for domain registrars. They pass on information to domain registrars, who then update ICANN’s global database.
Domain Registrant – These are the entities (companies, businesses, or individuals) who purchase and register domain names. It’s important to note that domain names cannot be owned, only leased.
See the chart below if you need help understanding how the domain name world is organized.
Who’s who in the domain name zoo!
A report compiled by ICANN detailing incidents and threats of domain name hijacking found that domain name hijacking incidents often result from a combination of security failures that can involve all of the above parties.
These failures include:
Flaws in registration and related processes
Failure to comply with the transfer policy
Poor administration of domain names by registrars, resellers, and registrants
How Domains Get Hijacked
In the above-mentioned report, ICANN found that many security incidents leading to domain name hijacking occur when registrars and resellers fail to adhere to its transfer policy and their registrant identity verification processes are insufficient to detect and prevent fraud, misrepresentation, and impersonation of registrants.
ICANN, however, also plays a role in this. Its policy on transfer of registrations between registrars makes transfer contact email addresses an acceptable form of identity.
All a domain hijacker needs to hijack a domain is the domain name and an administrative contact’s email address.
Registrant email addresses and contact information are often accessible via the Whois service. This allows anyone with an email address matching the transfer contact email address to impersonate registrants.
From there, it’s not difficult for malicious users and attackers to apply their ill-gotten social engineering skills to target a domain. They can do this by gathering contact information using Whois services and by registering expired domains used by administrative contacts.
Given the above, it’s no wonder that so many domain hijacking attempts are made every year.
Consider just how simple it can be for a fraudster to obtain the information needed to impersonate an authorized account administrator and contact a domain registrar hoping to gain access to a domain’s control panel:
It can be an “inside job” if someone in the company has access to the owner’s account information.
It can come from security breaches and compromises such as hacking the owner’s device or email account, or from the theft of personal documents containing account information.
It can even be someone calling up the registrar with a made-up story feigning a dire need to gain immediate access to the account as a result of an “emergency.” For example, by pretending to be a family member or an employee of a business that has closed down or saying that the account owner has died and the business needs urgent access to the domain to continue trading.
Other contributing factors to the high incidence of domain hijacking attempts mentioned in ICANN’s report include:
Registrants allowing registration records to become stale
ICANN’s policy requires registrars to request registrants to update their records annually, but registrars have no obligation to take any action other than to notify registrants.
A lack of accurate registration records and Whois information in the transfer process makes a domain name vulnerable to attacks.
Domain resellers can become “invisible” to ICANN
ICANN and registries deal with domain registrars, but have no relationship with domain resellers.
While resellers can operate with the privileges of a registrar when registering domain names, it is the responsibility of the registrar to ensure that policies are enforced by resellers and that records of domain name transactions are accurately maintained.
This “gap” in the business relationship chain leading from registrants to ICANN has been identified as an area with potential opportunities for attackers to exploit.
Dispute mechanisms are not designed to resolve urgent issues
ICANN’s Inter-Registrar Transfer Policy is not designed to prevent incidents requiring immediate and coordinated technical assistance across registrars and has no provisions to resolve the urgent restoration of domain name registration information and DNS configuration.
Registrants also have a part to play
ICANN, registries, registrars, and resellers need to do everything in their power to ensure that domains remain secure and protected.
As we’ll explore later in this guide, however, registrants also have an important part to play in keeping their domains secure.
After all, as the saying goes, a chain is only as strong as its weakest link, and often domain name registrants become the weakest link by failing to take all the necessary precautions and then falling prey to social engineering tactics (e.g. phishing emails, domain spoofing, etc.) leading to identity theft or impersonation. Once this happens, hackers can easily hijack and take control of a domain name.
Domain Hijacking – Common Scenarios
Before we move on to what can be done to improve domain security, let’s look at some of the most common types of domain hijacking scenarios and then briefly discuss what to do if you experience any of the incidents described below:
Domain Name Transfer
Typically, when someone attacks your domain, they are usually aiming for one of two (or both) outcomes:
Change your domain registration contact information to gain control of any domains registered under your account, or
Modify the DNS settings so that your domain name’s resolution is handled by another server (this is called DNS hijacking and we cover it further below)
If the aim of the domain thieves is to maintain the name, they may update the registration data (WHOIS) linked to the domain name, change payment details, and then attempt to transfer the domain name to a new registrar so as to erase the history of their registration activity.
As mentioned earlier, once a hijacker gains access to your domain’s account and its control panel, they can take complete control of your domain by making account administrator and password changes, redirect the domain to a new server, and wreak havoc in your business.
In worse case scenarios, a hijacker can cause significant loss of revenue and damage to your brand.
This is exactly what happened to ShadesDaddy.com in 2015 when hackers took over their registrar account and transferred the domain to an account in China which sold counterfeit merchandise, causing the company to suffer great loss of traffic, revenue, and damage to their brand.
The hijacking of ShadesDaddy.com illustrates what can happen when malicious users gain control of your domain name.
Domain Takeover
If a hijacker takes over a valuable domain name, they can sell it or extort the owner by holding them up for ransom.
Business Disruption
As was made clear in the hijacking of Perl.com article described earlier, if your domain account email contact details are tied into your domain and your domain is hijacked, all business communications over email are effectively hijacked too.
Domain hijackers can do anything from disabling and interfering with communication channels like your website and email to sending out fake emails, to completely blanketing out all business communications online.
DNS Hijacking
As explained in this article, if a hacker is able to modify the information in the DNS server, they can potentially send someone to an IP address that isn’t necessarily where they thought they were going.
There are many ways to do this, most of which involve taking control of the DNS server. This is called DNS hijacking or DNS poisoning.
With domain hijacking, hackers don’t need to change anything in the existing DNS server. They can simply change the domain information in the domain registration account (where all of the primary DNS information is input) and point to a domain server that they control.
Pharming
Pharming is when a hijacker takes control of your website and points it to a malicious site or posts offensive content on your site. This can cause serious damage to your reputation, as all traffic is directed to content that you have no control over.
Phishing
Domain hijackers can cause even wider damage when taking over your domain by using your website to collect valuable information from users such as credit cards, social security numbers, logins, etc. and engage in serious criminal activities that can impact the lives of many people.
What To Do If Your Domain Is Hijacked
Recovering a hijacked domain may take time and involve a lot of hassle and expense, but it is possible, so if it happens to you, don’t despair…take action!
In the previous section, we mention the hijacking of ShadesDaddy.com. Here is a first-hand account from the domain owner describing what it took to recover their domain.
As Pablo Palatnik, owner of ShadesDaddy.com states in the article, it’s important to understand the role that companies like ICANN and Verisign play in domain names.
We have covered ICANN quite a bit in this guide. If you are the victim of domain hijacking, ICANN recommends contacting their Security Team for guidance. They will then ask about the circumstances relating to the attack.
It’s also important to note, that as mentioned in the above article, Verisign is the only organization with the authority to transfer a domain name in the case of a hijack (with a court order or ICANN compliance notice).
As the article also points out, as soon as you become aware that your domain name may have been attacked, the first step is to alert and inform your domain registrar immediately and push them to take immediate action and start putting ICANN procedures like the Registrar Transfer Dispute Resolution Policy in place to communicate with the registrar that currently has your domain name.
Request that the transfer be revoked right away. Registrars usually apply a 60-day transfer lock to the transfer procedure, so if your domain has been transferred to an internal account with the same registrar, you have a better chance of recovering it.
Don’t wait too long, as the domain thief may attempt to move the domain name several times to cover their tracks and this will only complicate things and make recovering your domain more difficult.
Next, you should change all of your passwords to prevent the hacker from getting into your other accounts.
If you have a registered trademark, the Uniform Domain-Name Dispute-Resolution Policy (UDRP) is a contract that all ICANN-accredited registrars must follow to handle disputes about domain name ownership. It permits quick banning of the domain, preventing its data from being modified or moved to another registrar, and also preventing internal transfers between registrar accounts.
Keep in mind, however, that the UDRP was primarily developed as a way to counter cybersquatting or trademark breaches, so if your domain name is not associated with a trademark, it may not be very helpful.
Since it is crucially important that you be able to demonstrate to your sponsoring registrar that the registration or use of the domain is rightfully yours, ICANN provides a list of documentation you should maintain to create a “paper trail” should a dispute ensue over domain ownership with whoever is listed as the registrant in a hijacked domain name.
Some of the basic documentation you should be able to provide includes things like:
A domain history (copies of registration records that show you or your organization as the registrant, billing records, email receipts, web logs, archives, tax filings, etc.).
Financial transactions linking you to the hijacked domain name (e.g. credit cards or bank statements showing purchase details)
Correspondence from your registrar relating to the hijacked domain name (e.g. domain renewal notices, notices of DNS change, telephone call records, etc.)
Legal documents mentioning the domain name (e.g. a contract for the sale of a business listing the domain name as being included).
Some additional things you can do, according to Pablo Palatnik (who eventually did manage to get his domain name back) is to get an experienced lawyer, try to expedite things with a court order, and start making some noise about what happened to you (e.g. post about it on social media).
Reverse Domain Hijacking
One more thing to keep in mind is that if you own a valuable domain name, you may also become a victim of “reverse domain hijacking” (RDNH).
This is where a trademark owner attempts to obtain your domain name by initiating a domain name dispute and fraudulently claiming that you are cybersquatting (i.e. registering domain names that are identical or similar to trademarks, service marks, company names, or personal names in the hope of reselling them at a profit.)
Where domain name hijacking (which is also known as reverse cybersquatting) is usually associated with cybercrime, reverse domain hijacking is basically acting in “bad faith” to attempt to deprive a registered domain name holder of their domain name.
Now that we have seen just how damaging and serious domain hijacking can be, let’s take a look at what can be done to minimize and prevent the threat of incidents.
Domain Name Security Improvements And Recommendations
ICANN’s report not only points out factors that can result in domain hijacking incidents but it also offers registries and registrars various recommendations for improving domain security and helping to protect and safeguard registrants from having their domains hijacked.
These recommendations cover areas like:
Strengthening identity verification requirements in electronic correspondence
ICANN recommends raising all identify verification requirements to the same level as used when verifying by mail or in person.
Improving records
ICANN recommends investigating additional methods to improve the accuracy and integrity of registrant records.
Registrar-Lock and EPP authInfo implementations and best practices
A registrar-lock is a status code set on a domain name by the registrar to prevent unauthorized, unwanted or accidental changes to the domain name.
When set, the domain registry prohibits certain actions from taking place, such as modifying, transferring, or deleting the domain name, changing domain name contact details, etc.
The EPP authInfo code (also known as an Auth-Code, EPP code, authorization code, transfer code, or Auth-Info Code), is a generated passcode required to transfer a domain name between domain registrars and indicates that the domain name owner has authorized the transfer.
ICANN recommends that the same EPP authInfo code not be used for all domains by a registrar and that registries and registrars provide resellers and registrants with Best Common Practices describing appropriate use and assignment of EPP authInfo codes and risks of misuse when unique EPP codes are not used.
Improved communications
ICANN recommends investigating whether making pending transfer notices between registries and registrars to registrants mandatory instead of optional would reduce incidences of domain name hijacking.
Providing emergency channels and procedures
ICANN recommends that registrars should obtain emergency contact information from registrants and share emergency support staff contact information with other registrars, resellers, and registries to provide 24 x 7 access to registrar technical support staff in an emergency situation.
Additionally, ICANN recommends emergency procedures and policies to be defined by registrars for allowing registrants to obtain immediate intervention and restoration of their domain name registration information and DNS configuration.
Improving public awareness
ICANN recommends providing better education to registrants on areas like:
Threats of domain name hijacking and registrant impersonation and fraud.
Procedures for requesting intervention and obtaining immediate restoration of a domain name and DNS configuration.
Keeping registration information accurate.
Protection mechanisms like Registrar-Lock, EPP authInfo, etc.
Improving accountability
ICANN recommends investing stronger enforcement mechanisms for dealing with registrars that fail to comply with the transfer policy, and holding registrars more accountable when working with resellers.
Domain Name Security Best Practices:Â What You Can Do To Keep Your Domain Name Safe
Now that we have covered all that is being done and proposed by ICANN to improve domain security for registries, registrars, and resellers, let’s turn our attention to what domain name registrants can do to keep their domain names safe.
Choose a Reliable Domain Provider
Ideally, you want to purchase your domains from an accredited registrar or a reputable domain name reseller offering a secure DNS management panel and 24×7 technical support.
Having access to an online support team focused on protection and security is important, as they will be your first point of contact if you experience any issues with your domains and need immediate help or assistance.
Assign Your Domain Ownership To A Business Entity
Always register domains to a business or corporate entity. Avoid registering a domain name under an individual’s name. This ensures business continuity regardless of the individuals who may come and go from the business.
As an example, suppose your business manager registers a domain name under their own name and then leaves the company. Your business risks losing the domain, being disrupted, or if there are any issues involved, going through a lot of hassle to reclaim domain name ownership.
Lock Your Domain Name
Domain locking (Registrar Lock) provides extra protection to domain names by preventing the transfer of your domain to another registrar by unauthorised third parties.
Leaving a domain “unlocked” creates an opportunity for domain hijackers to try and transfer your domain name or redirect your domain’s name server without your permission, so lock your domain name through your domain name management system immediately after securing your domain registration.
Activate Domain Privacy
As mentioned earlier, all a domain hijacker needs to hijack a domain is the domain name and an administrative contact’s email address.
It’s critically important, then, to protect the email account associated with your registered domain. The best way to do this is to consider using private domain registration when registering your domain.
Private domain registration (also referred to as Domain Privacy, Domain Privacy & Protection, WHOIS Privacy, or WHOIS Privacy Protection) provides a simple and inexpensive way to hide your name, phone number, and email address from public viewing within the WHOIS database, ensuring online anonymity.
Domain privacy makes hijacking domains so much harder…Google it and you’ll see!
Note: Some domain registries do not allow domain privacy services.
For example, when registering .com.au domains or any other .au extensions, auDA‘s (the authorized .au name space overseer) notes in section 2.4, clause b) of its Registrant Contact Information Policy that:
“registrants must not do anything which may have the effect of concealing the true identity of the registrant or the registrant contact (eg. by using a private or proxy registration service)…”
Choose A Strong Password
In today’s world of rampant cybercriminal activity, we shouldn’t even be discussing password security anymore. Weak passwords, however, remain one of the top threats to data security, so don’t choose weak passwords for your registrar account. You will only be inviting trouble.
Choose a strong password instead so that guessing it becomes next to impossible. Follow basic password security recommendations: Generate a password that’s at least 8 characters long (the longer, the better), with at least one numeric value, one symbol and randomly selected letters.
Regularly Update Your Passwords
This is another basic but important area of password security. Despite all security advice, many businesses end up sharing passwords internally with team members, who may then share it with other team member. Over a period of time, having the information being shared around multiple times can present a real security threat, especially if people who are no longer with the company have access to it.
So, make sure to regularly change your domain registration account passwords. A good time to do this is when registrars send out requests to verify and update your contact details, as they are required to do per ICANN’s policy.
While still on the subject of password security…
Never Share Your Domain Registrar Login Details
The less people who have access to your domain registration account, the less chances of security breaches coming from inside the organization.
If possible, try to restrict access to your domain registrar login details only to those who absolutely need to know it. And if they are no longer part of the organization, then change the login details immediately.
Register Your Domain Name For 10 Years
Choose the maximum registration period available. Many registrars allow you to secure your registration for up to ten years.
If you plan to be in business for a while, consider registering your domain for the next 10 years.
Turn On Auto-Renew
If you miss your domain name renewal reminder and forget to renew your domain name, you run the risk of having it expire and having someone else register it.
You can avoid losing your domain name by choosing maximum registration periods and turning on auto-renew.
Provide Backup Payment Details
If your domain name account allows more than one payment method to be input, then provide details for a second payment method.
This will minimize the risk of losing your domain name due to a failed domain renewal charge (e.g. an expired credit card).
Provide Backup Contact Information
If your domain name account allows you to provide backup contact information (including a backup contact email address), this helps to make it easier for authorized users to retrieve access to your domain name account if anything happens to the main contact email.
Which brings up another important point…
Use A Different Contact Email Address Than Your Registered Domain’s Email
As the domain hijacking case of Perl.com illustrates, if your registration account’s contact email address is tied to the same registered domain name, your entire organization could be “incommunicado” if your domain is hijacked (i.e. the hijackers will have complete control of your domain AND your email).
For this reason, it’s best to use a different email address than the one associated with the registered domain. Also, having a backup contact email address on the account helps.
Regularly Monitor Your Domain Name Status
One of ICANN’s recommended practices for registrants to protect their domains includes routinely monitoring domain name status and performing timely and accurate maintenance of the domain’s contact and authentication information.
Making proactively monitoring your domain name registration status a part of your regular business reviews will help you detect any issues sooner rather than later.
Additional Domain Security Tips
Here are some other options to explore to keep your domains and online presence secure:
Register Domain Name Variations
Scammers and hackers often look to register domain names similar to other known domains so they can impersonate the brand or trick unsuspecting users into providing confidential details like login details, banking information, etc.
Registering popular variations of your domain name not only protects your brand, it also creates an additional layer of protection against common hacking techniques like phishing or domain name typosquatting (a type of social engineering attack that targets internet users who incorrectly type a URL into their web browser and land on another registered domain name containing a typo, mispelled variant, alternative spelling, singular/plural variant, or a different domain extension. Typosquatting is also known as domain mimicry, URL hijacking, sting sites, or fake URLs).
Use Domain SSL Certificates
Adding an SSL Certificate to your domain prevents hackers from being able to “listen in” to encrypted connections between user’s devices and your website and steal sensitive data such as credit card numbers, bank login details, contact details, email addresses, etc.
Use Multi-Factor Authentication
Multi-factor authentication (MFA) is a security measure that requires at least two or more proofs of identification in order to grant users access.
AÂ 2-step verification method like two-factor authentication (2FA) adds an extra layer of protection by making sure that only you can sign in to your account.
2FA adds another layer of security and protection to online accounts.
Use DNSSEC
Domain Name System Security Extensions (DNSSEC) is an advanced DNS feature that strengthens DNS authentication using cryptographic digital signatures and adds an extra layer of security to domains by attaching digital signature (DS) records to their DNS information to determine the authenticity of the source domain name.
When DNSSEC is enabled, DNS lookups use a digital signature to verify that the source of your site’s DNS is valid. If the digital signature doesn’t match, web browsers won’t display the site.
Although DNSSEC can improve domain security, protect your domains from potential cache poison attacks and DNS spoofing, and is useful if you have valuable data to protect, it is not automatically enabled as implementation often requires significant effort and expense and needs to be specifically enabled by network operators and domain name owners.
DNSSEC can also reduce site performance, make DNS more prone to failure, and some domain extensions (e.g. country code domains) don’t support it. Hence support and adoption of DNSSEC worldwide is currently slow.
Use A VPN
If you have the need to be extremely security-conscious about your site, you can use a Virtual Private Network (VPN) to access your domain name account and stave off hackers on the lookout for unsecure connections where they can siphon valuable data.
A VPN hides your public IP address and adds security and anonymity when connecting to web-based services and sites.
Don’t Let Your Security Guard Down
In addition to all of the above recommendations, it’s important to also use common sense and remain vigilant to scams, malware, and other attempts to trick you into giving up valuable details that could see your domain name account being hacked and hijacked.
Some basic precautions you can take include:
Don’t share logins, passwords, and email addresses. Especially not for administrative accounts.
Use SPAM filters. Yes, spammers have ways of getting around filters, but any suspected spam you can automatically send into a junk mail folder will provide at least a modicum more protection than not using any spam filters at all.
Never open attachments sent from unknown sources. Unfortunately, even family and friends can forward you emails with attachments containing viruses, so it’s important to be extra vigilant. If you are unsure about an attachment, check with the sender to make sure it’s legit.
Don’t click any links inside spam messages. Not even the “Unsubscribe” link. It not only makes you vulnerable to viruses and malware, it also confirms to spammers that your email address is active.
Make Your Domain Name Security A Priority
Hopefully, this guide has helped to increase your awareness of how important it is to keep your domain name safe, secure, and protected. The security of your entire digital presence depends on it.
As mentioned at the beginning of this article, keeping your business secure is a complex undertaking. It requires hardening on many levels, and working with trusted partners and solutions.
At WPMU DEV, our aim is to become more than your all-in-one WordPress platform provider. We want to be the business partner you can trust and rely on to grow your business profitably and securely.
When you register a domain with WPMU DEV either for your own business or on behalf of your clients as a reseller, you get the following security features to help keep your domain safe and protected included at no additional cost:
Registrar Lock
Privacy Protection
HTTPS (if your site is hosted with us, we provide free SSL and force HTTPS).
Longer Registration Periods (up to 10 years)
Contact Info Update Verification (whenever you update your contact information, we check our database and if we don’t have that data, you will receive a verification email before updating the information.)
2FA Options For Members (should your WPMU DEV account password ever become compromised, unauthorized users will still require a 2FA code to be able to login).
24/7 Technical Support. Receive expert support on all things WordPress, hosting, and domains any time, any day.
Do you want to create a client portal in WordPress?
A client portal is a dedicated area where clients can login and access exclusive documents, files, support, and more.
In this article, we’ll show you how to easily create a client portal in WordPress.
Why Create a Client Portal in WordPress?
A client portal makes it easier to manage client resources online. This can reduce the number of support requests you receive, allow clients to help themselves, and provide them with a better user experience.
For example, if you run a photography website then you might create a dashboard where clients can upload and download images.
Similarly, if you run a graphic design or web design business, then you might create a customer portal where clients can download all the resources you’ve designed for them.
Without a client portal, the customer would need to contact you directly and wait for a response. This is time-consuming and frustrating for both you and the client.
With that being said, let’s see how to reduce your workload and keep your customers happy by creating a client portal in WordPress.
How to Create a Client Portal in WordPress
Each business will need something different from their client portal, so you need a solution that’s flexible, customizable, and works well with other plugins.
It is the best WordPress membership plugin on the market and allows you to easily create a members-only section for your clients. MemberPress also has powerful display rules so you create exclusive posts, pages, and other content for your clients.
First, you need to install and activate the MemberPress plugin. For more details, see our step by step guide on how to install a WordPress plugin.
Upon activation, go head and visit MemberPress » Settings and enter your license key.
You’ll find this information under your account on the MemberPress website. It’s also in the email you got when you purchased MemberPress.
After entering the key, click on ‘Activate License Key.’
MemberPress supports PayPal and Stripe. If you purchase a MemberPress Pro plan, then you can also accept payments using Authorize.net.
Note: If you plan to add existing clients to your portal without charging a fee, then you can skip this step.
To add a payment method, switch to the ‘Payments’ tab and click on ‘Add Payment Method.’
You can now chose a payment method from the ‘Gateway’ dropdown.
MemberPress will then show all the settings you need to configure before using this payment gateway. For example, in the following image we’re adding PayPal payment to WordPress.
After choosing a gateway, you’ll need to enter some information to configure your account. Once you’ve done that, click on the ‘Update Options’ button to save your changes.
You can add multiple payment gateways to your corporate portal simply by following the same process described above.
After adding one or more payment methods, you’re ready to create a membership plan.
To get started, simply go to the MemberPress » Memberships page and click on the Add New button.
On the next screen, you can type a title for the membership level and set the price. If you’re planning to add clients manually, then you can leave the ‘Price’ field at ‘0.’
However, if you want to make money by selling subscriptions to your client portal, then you can type in a price.
Next, use the ‘Billing Type’ dropdown to create a billing cycle, for example you might charge clients a one-time fee for lifetime access or set up a recurring monthly subscription.
In the following image, we’re charging clients $100 every 6 months.
Next, you need to create access rules. This allows you to create an exclusive, client-only area of your WordPress website.
Simply go to the MemberPress » Rules page and then click on the ‘Add New’ button.
On the next screen, you first need to choose what content you want to restrict.
The ‘Protected Content’ section offers different options. To start, you can restrict access to specific pages and posts, although this may be time-consuming if you have lots of content.
Another option is to restrict access to all child pages of a particular parent page. For example, you might create a ‘Client Portal’ parent page and then restrict access to all its child pages. This can save you lots of time and effort.
Similarly, you can restrict access to all the posts that have a specific category or tag.
Below that, you can specify who can access this content by opening the ‘Access Conditions’ dropdown and choosing ‘Membership.’
In the second dropdown menu, select the membership level you created earlier.
When you’re happy with how the access rule is set up, click on the Save Rule button to store your settings.
You can create more content restriction rules by following the same process described above.
Creating a Client Account Page in MemberPress
Next, you’ll want to create an Account page, which is the page that clients will see then they log into your portal.
First, go to MemberPress » Settings and click on the ‘Pages’ tab.
MemberPress will create an Account page automatically.
To preview the page, click on the ‘View’ button next to ‘MemberPress Account Page.’
The default Account page has a few different tabs where clients can edit their profile, check their subscriptions, and log out of their account.
The Account page is also designed to perfectly integrate with your WordPress theme, as you can see in the following image.
The default Account page should be a good fit for most client portals. However you can edit the page just like you would any other WordPress page.
To make some changes, click on the ‘Edit’ button.
This launches the standard WordPress page editor, so you can do ahead and make your changes. Just be aware that any content you add here will be visible to everyone and not just the client.
When you’re happy with how the account page looks, just scroll to the bottom of the screen and click on ‘Update Options.’
MemberPress will now go ahead and create the Account page.
You can see this page live on your website by adding /account/ to the end of your domain, for example www.example.com/account/.
You can also find this page in your WordPress dashboard by going to Pages » All Pages.
Although MemberPress creates this page automatically, you can also add the Account content to any page or post using the [mepr-account-form] shortcode.
Content protection rules are one way to create exclusive content for your clients. However, sometimes you may want to hide specific content within a page or post, such as the index to your members-only bbPress forum or some bonus documentation you created using a WordPress knowledge base plugin.
In this case, you can wrap the content in shortcode. MemberPress will then hide or show the content inside the shortcode, based on whether the person is logged into your client portal.
To start, you’ll need to know the ID for the client membership level. To get this, simply go to MemberPress » Memberships and look at the value in the ‘ID’ column.
Once you have the ID, go the page or post where you want to hide some content.
You can then create a shortcode block above the content and a block below the content.
In the top block, add the following: [mepr-active membership='162']. Make sure you replace the number with the client membership ID.
Next, add the following in the bottom block: [/mepr-active].
Then, simply update or publish the page and visit your site in incognito mode, or when logged out of your WordPress account.
MemberPress should hide the content inside your shortcode blocks. To see the content, simply log into any client membership account.
Adding Tabs to The Accounts Page in MemberPress
By default, the Account page has Home, Subscriptions, Payments, and Logout tabs.
You may want to add more tabs to help members find content in your client portal. For example, you could create tabs for customer service software such as HelpDesk.com or HelpScout, to help clients contact your support team.
The easiest way to add more tabs to the Account page is by using the MemberPress Nav Tabs add-on.
Simply go to MemberPress »Add-ons and then click on the ‘Install Add-on’ button next to ‘Nav Tabs.’
After that, go to MemberPress »Settings.
Here, click on the ‘Account’ tab.
Next, just scroll to ‘Account Nav Tabs Settings’ and check the ‘Enable Account Nav Tabs’ box.
Once you’ve done that, you’ll see a new editor where you can select either ‘Content’ or ‘URL.’
If you choose ‘Content,’ then you can add images, text, audio, shortcodes, and other content.
This content will appear inside the new tab, as you can see in the following image.
The other option is ‘URL,’ which will take the client to a different page, similar to clicking an item in the navigation menu.
If you do select ‘URL,’ then you can type in a title and the URL that the tab will link to. By default, the link will open in the same tab but you can open it in a new tab by checking the ‘Open URL…’ box.
To add more tabs to the Account page, simply click on ‘Add New Tab’ and repeat the process described above.
After adding all your custom tabs, click on the ‘Update Options’ button to save your changes.
Adding Custom Content for an Individual Client
MemberPress also allows you to show a different message to each client in their Account page. This message is included in the ‘Home’ tab.
By creating a personal greeting, you can make your clients feel more appreciated and valued. You might also include links to resources that the client may find helpful, such as the documentation for a new product they’ve just bought.
To add a custom message, go to MemberPress » Members. You can then hover over any client and click on the ‘Edit’ link when it appears.
After that, scroll to the ‘Custom MemberPress Account Message’ section and add the content that you want to show to this particular client.
This area works like the regular WordPress post editor so you can add images, shortcodes, image galleries, video, audio files, and any other resources that the client may field useful.
Don’t forget to click on the ‘Update User’ button to save your changes.
Adding a Link to Client Area using MemberPress
Next, you need to make it easy for clients to access the portal by adding it to your menu.
Simply go to Appearance » Menus and click to expand the ‘Pages’ section, if it isn’t expanded already.
You can then check the box next to the ‘Account’ page and click on ‘Add to Menu.’
Once you’ve done that, you can change where the Account page appears in the menu using drag and drop.
You can also change the label that’s used for the ‘Account’ page in the menu. The default is ‘Account’ but you may want to use ‘Client Portal’ or similar.
To do this, click to expand the ‘Account’ section and then type a new title into the ‘Navigation Label’ field.
Don’t forget to click on ‘Save Menu’ to store your settings.
Now if you visit your site, you’ll see a link to the Account page in your menu.
Extending Client Portal with MemberPress
By this point, you’ve created a client portal with exclusive, members-only content and even a custom welcome message.
That’s a great start, but let’s look at some other features that you can add to the client portal using MemberPress.
1. File Downloads
Want to allow clients to download files from your site? This might be anything from copies of your invoices, to reports and studies, or the stock images you’ve created for the client.
MemberPress comes with a File Downloads add-on that allows you to offer downloadable content to your clients. After creating the download, you can add it to any page or post using a shortcode.
MemberPress will then show a link that visitors can use to download the file.
You can use content protection to make the file exclusive to your clients, or even create different downloadable files for each client.
The MemberPress course builder is built on top of the WordPress block editor. This means you can add lessons, topics, categories, embed videos, images, and more using the WordPress tools that you’re already familiar with.
By publishing courses to the client portal, you can add more value for your customers and encourage them to renew their membership.
No matter whether it’s a contact form, feedback form, customer testimonial form, or a customer survey, forms are an important way to communicate with your clients.
They can help you get feedback and improve the member experience, while also giving clients a way to ask questions and get support.
Sometimes, clients may need to upload files to your portal, such as a contract that you need to sign or photographs that you plan to publish to your client portfolio.
You can easily create file upload forms using WPForms. You can then embed the form on the Account page, or any members-only page on your website.
4. Selling More Products and Services
As a business owner, you may want to promote other products and services to your clients.
MemberPress works with many of the email marketing services that you may already be using to keep your audience engaged and promote your other products and services. This includes SendinBlue, Constant Contact, Drip, and 1000+ others.
You can also add an online store to your portal using WooCommerce and sell other products to your customers.
If you liked this article, then please subscribe to our YouTube Channel for WordPress video tutorials. You can also find us on Twitter and Facebook.
Do you want to add a services section to your WordPress website?
When potential customers arrive at your site, they want to know what services you offer. A services section can communicate this information in a quick and easy way, so visitors can decide whether they want to learn more about your business.
In this article, we’ll show you how to easily create a services section in WordPress. We’ll also share how to get more leads by adding a quote request form to your services section.
Why Create a Services Section in WordPress?
To get more sales, it’s important to give visitors all the information they need to understand what services you offer.
This can include everything from prices and benefits to detailed technical specifications, depending on the services you sell.
The following image shows an example of a call to action, which appears directly beneath a services section.
That being said, let’s take a look at how to easily create a services section in WordPress and then add it to any page on your website. Simply use the quick links below to jump to the method you want to use.
Method 1. How to Create a Services Section with SeedProd (Recommended)
The best way to create a services section is by using a page builder.
A good page builder plugin will allow you to add as many services as you want, and arrange those services in a nice layout. You can also encourage visitors to learn more about your services by adding CTAs, links, buttons, and more.
SeedProd is the best drag-and-drop page builder for WordPress. It comes with more than 180 professionally-designed templates and ready-made sections that are perfect for promoting your services.
SeedProd also works with many popular third-party tools that you may already be using to get and manage conversions. This includes top email marketing services, WooCommerce, Google Analytics, and more.
First, you need to install and activate the SeedProd plugin. For more details, see our step-by-step guide on how to install a WordPress plugin.
After activating the plugin, SeedProd will ask for your license key.
You can find this information under your account on the SeedProd website. After entering the license key, go ahead and click on ‘Verify Key.’
The next step is creating a new page where you will add the services section. To do this, go to SeedProd » Landing Pages in your WordPress dashboard.
Once you’ve done that, click on the ‘Add New Landing Page’ button.
You can now choose any of SeedProd’s ready-made templates.
To help you find the perfect template, SeedProd’s designs are organized into different campaign types, such as ‘squeeze,’ ‘ead,’ and ‘coming soon.’
You can click the tabs at the top of the screen to filter the templates based on campaign type.
If you prefer to start from scratch, then SeedProd also has a Blank Template, which doesn’t have any default content or design elements.
To take a closer look at a design, simply hover your mouse over the template and then click on the little magnifying glass icon.
When you find a layout that you want to use, click on ‘Choose This Template.’ We’re using the ‘Masterclass Sales Page’ template in all our images, but you can use any template you want.
After choosing a template, type in a name for your custom page. SeedProd will create a URL automatically using the title, but you can change this if you want.
A descriptive URL helps search engines understand what a page is about, so they can deliver that page to people who are searching for content just like yours.
To give your page the best chance of appearing in relevant search results, you may want to add some relevant keywords to the URL. When you’re happy with the information you’ve entered, click on the ‘Save and Start Editing the Page’ button.
This loads the SeedProd drag-and-drop page builder. It shows a live preview of your page to the right, and some settings on the left.
Most SeedProd templates already contain some blocks, which are a core part of any SeedProd layout.
To customize any block, simply click to select it. The left-hand menu will then show all the settings you can use to edit the block, such as changing the font size or replacing a stock image.
If you want to remove a block from the design, then simply click on that block.
Next, go ahead and click on the small trash icon in the menu bar that appears.
To add new blocks to your design, just click on the block in the left-hand menu and drag it onto the editor.
You can then click to select the block and make any changes in the left-hand menu.
You can repeat these steps to create any kind of page, such as a homepage or Google Ad landing page. The possibilities are endless.
SeedProd also comes with ‘Sections.’ These are rows and block templates for common web design elements. For example, SeedProd has sections for frequently asked questions, footers, and customer testimonials.
It also has various sections that are perfect for creating a services section in WordPress. To take a look at the different sections, go ahead and click on the ‘Sections’ tab.
These mini templates are organized into different categories, but since we want to create a services section, we recommend taking a look at the ‘Features’ category.
Here, you’ll find sections that use paragraphs, subheadings, and images in a nice layout.
In the following image, you can see the ‘Features 3’ section. To turn this into a services section, you simply need to add your own text and images.
You may also want to look at the ‘Call To Action’ category. This category has lots of different sections, including a few that you can use to advertise your services.
In the following image, you can see the ‘Call To Action 6’ section, which already has space for three services.
To preview a section, just hover your mouse over it and then click on the magnifying glass icon that appears.
When you find a section that you want to use, simply move your mouse over that section and click on the little ‘+’ icon.
This adds the section to the bottom of your page, but you can move sections and blocks around your design using the drag-and-drop feature.
After adding a section, simply can click on any block inside that section to customize it. To start, you’ll typically want to type in some information about your services.
To do this, just click on any ‘Text,’ ‘Headline,’ or similar section. Then type into the text field that appears to the left of the builder.
You can format the text, similar to how you style text in the standard WordPress post editor.
It’s also a good idea to add links to pages where visitors can learn more about each service.
Another option is to use a ‘Call to Action’ button. Even if the section doesn’t come with buttons, it’s easy to add them.
In the left-hand menu, just click on the ‘Blocks’ icon, which looks like a square of small dots.
You can then drag and drop a ‘Button’ block into your section.
If you do ‘Button’ blocks, then you can customize them in exactly the same way you edit any block. Just click on it, and then make your changes in the left-hand menu.
You can add more blocks by following the same process described above.
For example, you might add photos showing each service in action using an ‘Image’ block.
When you’re happy with how the page looks, it’s time to publish it by clicking on the dropdown arrow next to the ‘Save’ button.
Then, select the ‘Publish’ option.
Your page will now go live on your WordPress website and visitors can see all your services at a glance.
Method 2. Creating a Services Section in WordPress using Block Editor
You can also build a services section using the free Service Box Showcase plugin, and then add it to any page or post using shortcode.
You will need to use one of the plugin’s pre-made service section layouts, so this isn’t the most customizable method.
However, the plugin does let you create a service section using the familiar WordPress content editor tools, so it’s quick and easy.
First, you need to install and activate the free Service Box Showcase plugin. For more details, see our step-by-step guide on how to install a WordPress plugin.
Upon activation, head over to Service Box » Add New Service Box in your WordPress admin panel.
To start, you’ll need to type in a title for your services section. This will only appear in the dashboard and not on your website, so this title is for your reference only.
After that, find the layout that you want to use and click on its ‘Select’ button.
Next, scroll to ‘Add Service Box,’ which has two services by default.
To add more services to the section, go ahead and click on ‘Add New Service Box.’
Once you’ve done that, you can type in a title for each service and add a description.
This is the text that will appear on the front end of your site, so make sure you give visitors all the information they need.
By default, the plugin adds the same icon to each service. It’s a good idea to change these icons to something that’s unique to each service.
To see the different icons that you can use, click on the ‘Service Icon’ field. This opens a popup where you can scroll through the different pictures and click the one you want to use.
It’s also a good idea to add a link to a page where visitors can learn more about each service, or even a page that has a contact form.
To do this, simply type the link into the ‘Add Your Service Or Read More Link Here’ field.
After adding all this information, you can change how your service section looks using the ‘Service Box Settings.’
Most of these settings are fairly straightforward. For example, you can change the font size and style. You can also change the link color, plus the color of the title, description, and more.
If you don’t want to use any icons in the services section, then you can remove them by clicking on the ‘Display Icon’ switch.
There are lots of different settings and what looks good may vary depending on your WordPress theme. With that being said, you can always come back to the ‘Service Box Settings’ and make some changes if you’re unhappy with how the services section looks on your website.
When you’re happy with how the services box is set up, simply click on the ‘Publish’ button at the top of the page to save your changes.
You can now add the services section to your WordPress blog using a shortcode. Simply scroll to ‘ServiceBox Shortcode’ and copy the code.
Once you’ve pasted the shortcode, just click ‘Update’ or ‘Publish’ to push changes live. Then, if you visit your site you’ll see the services section in action.
To make these changes, simply go to Service Box » All Service Box. You can then hover your mouse over the service box and click on the ‘Edit’ link when it appears.
Now, make your changes using the ‘Service Box Settings’ and other sections.
When you’re happy with the changes you’ve made, don’t forget to click on ‘Update.’
Now, if you visit the page or post where you added the services box, you’ll see your changes on the site.
BONUS: Creating Request a Quote Form For your Services
A services section gives visitors an overview of your company and what you offer, so they can decide whether they want to learn more.
Once you’ve caught the visitor’s attention, the next step is turning them into leads and customers. You can do this by adding a ‘Quote Request Form’ to your site.
This is similar to a contact form, but it has an extra area where visitors can type in some information about themselves or what they’re looking for.
This can help you sell more services. For example, you might recommend a particular service, create a unique package for that customer, or send them a personalized email based on the information they’ve entered.
The easiest way to create a quote request form is by using WPForms. It is the best WordPress forms plugin and allows you to add any type of form to your website using a simple drag-and-drop editor.
WPForms even has a ready-made ‘Request a Quote Form’ that has everything you need to turn visitors into leads.
First, you need to install and activate the WPForms plugin. For more details, see our step-by-step guide on how to install a WordPress plugin.
Note: There is a free version of the WPForms plugin, but we will be using the Pro version because it comes with the ‘Request a Quote’ form template.
Upon activation, head over to WPForms » Settings and enter your license key.
You can find the license key under your account on the WPForms website. It’s also in the email you got when you purchased WPForms.
After entering the license key, click on the ‘Verify Key’ button. After a few moments, you will see a message confirming that you’ve entered the right license key.
Once you’ve done that, go to WPForms » Add New.
Here, type in a name for your form. This is just for your reference so you can go ahead and use any title you want.
Next, type ‘request a quote’ into the search field. This will bring up the ‘Request a Quote Form’ in the results.
You can now go ahead and click on the ‘Use Template’ button.
This will load the WPForms editor, with the form on the right and all of the different settings on the left.
The ‘Request a Quote Form’ template has fields where the visitor can enter their information, such as their name, email address, and phone number.
There’s also a section where they can type in their specific request.
The default form should work well for most websites, but it’s easy to customize the form if you need to.
To edit a field, simply click to select it. The left-hand menu will then show all the settings you can use to customize this field.
For example, you can change the text that appears above any field by changing the text in the ‘Label’ field.
You can also add more fields by selecting the ‘Add Fields’ tab.
Then, simply drag and drop any field block onto the form.
You can also change the order that the fields appear in your form using drag and drop.
When you’re happy with how the form looks, go ahead and click on the ‘Save’ button.
You can now add this form to any WordPress post or page using the WordPress content editor.
Simply open the page where you want to add the form and then click on the ‘+’ button.
Next, type ‘WPForms’ and click on the block to add it to your page.
Finally, open the dropdown menu and select the quote request form.
WPForms will show a preview of the form on the screen. If you’re happy with how the form looks, then you can go ahead and save or publish the page.
The quote request form will now be live for your visitors to use.
If you liked this article, then please subscribe to our YouTube Channel for WordPress video tutorials. You can also find us on Twitter and Facebook.