WooCommerce’s default search quietly loses sales every time a shopper misspells a product or hits a dead end on a large catalog. Sokol Smart WooCommerce Search replaces it with a full-screen live search, a dedicated index built for speed, and “did you mean?” corrections that catch the searches you’d otherwise lose.
Every media-heavy WooCommerce store hits the same wall, that of turning assets into products, one listing at a time. WooMedia Matrix Pro bulk-converts your whole library at once. Here’s a quick introduction, plus a launch discount for WP Mayor readers.
Discover the seamless integration of Shopify and WordPress with the ShopWP Layout Builder. This comprehensive guide introduces the innovative drag-and-drop tool that effortlessly showcases Shopify products on WordPress. Dive into its features, pricing, and step-by-step setup to elevate your website design and stand out in the digital world.
Discover the importance of specialized WooCommerce hosting and dive deep into WP Engine’s managed WooCommerce hosting features. From high-performing live cart functionalities to Stripe Connect integration and advanced caching, WP Engine offers a comprehensive solution for eCommerce stores. Learn about its unique features, the benefits of managed hosting, and get an inside look at the user-friendly dashboard. Whether you’re starting a new store or looking to optimize an existing one, WP Engine provides the tools and support needed for a successful online business.
Master WooCommerce shortcodes to customize your e-commerce site effectively. Understand their types, usage, and benefits. Turn complexity into simplicity.
Do you want to offer installment payments on your eCommerce store?
Offering an installment plan encourages customers to purchase more products or services. It makes it easier for them to buy expensive items and helps boost sales on your WooCommerce store.
In this article, we will show you how to set up installment payments in WooCommerce using different plugins.
Why Set Up Installment Payments in WooCommerce?
Installment payments allow customers to break up the total amount of a product or service into smaller portions. Instead of paying the price in full, users can pay a certain amount upfront and then pay the remaining amount over a period of time.
As a WooCommerce store owner, you can select the timeframe you’d like to offer to customers for repayments. Usually, this depends on the product and niche you’re in, but you can offer anything between 6 to 24 months.
Setting up installment payments in WooCommerce helps provide alternative payment methods to customers. It encourages your visitors to purchase more valuable and expensive items.
You can also reduce cart abandonment by offering an installment payment option. Customers might not purchase products if they don’t have sufficient funds and would exit your site without checking out. With an option to pay in installments, you can motivate them to buy the product and boost sales.
That said, let’s see which plugins are the best for WooCommerce installment payments.
Affirm Payments is a WooCommerce extension that lets you add tailored buy now pay later programs to your eCommerce store. Affirm is a payment service that helps customers pay at their own pace.
The plugin is beginner-friendly to use. Once you install it, you’ll see the Affirm payment option in WooCommerce. Customers can then select a payment plan that works for them.
Affirm offers 4 interest-free payment features, where customers can split the initial cost into 4 installments with no interest. This makes it easier to sell high-ticket items, and customers won’t have any impact on their credit scores.
Besides that, Affirm Payments also allows customers to choose their payment terms. The best part is that it shows the exact amount that needs to be paid every month with the annual percentage rate (APR).
Who Should Use It: Affirm Payments plugin is a great solution for anyone looking to add just a buy now pay later payment option in WooCommerce. The provider helps create installment plans for customers and also offers 4 interest-free installments every 2 weeks.
Pros:
Easily add Affirm as a payment option in WooCommerce
Offer ‘Pay in 4’ plans with no interest (0% APR)
Allow customers to choose their installment plan
Showcase all payment plans in a single view
Cons:
Limited customization options from within the WordPress dashboard
High-interest rate (up to 30%) for some items
Sometimes Affirm may require a credit check before transaction approval
Pricing: Affrim Payments is a free WooCommerce extension.
Klarna Payments for WooCommerce is a free WordPress plugin that adds Klarna payment options to your online store. Klarna is a Swedish fintech company that offers online payment solutions for website owners.
Using the plugin, you can offer customers to pay the full amount at checkout, first try the product and then pay later, or slice the total amount into installments.
It provides customers the flexibility of choosing when they want to pay in the installment plan. There is also an option to provide 4 interest-free payments, so customers can save costs and pay for a product in smaller portions.
The setup process is very easy. First, you’ll need to sign up for a Klarna account. Once that’s done, simply use the plugin to add Klarna as a payment option in WooCommerce. Klarna will then approve your store, and you can start offering installment plants to customers.
The best part about using Klarna is that it easily integrates with WP Simple Pay. You can use it to offer buy now, pay later payment plans in WordPress.
WP Simple Pay comes with a built-in Klarna (Buy Now, Pay Later) Form template. This way, you let customers choose the payback period for a product.
On the downside, Klarna will work with merchant accounts and is only available in selected countries. For instance, it’s available in Sweden, Norway, Finland, Denmark, Germany, Austria, the Netherlands, Belgium, Switzerland, France, Italy, Poland, Spain, Portugal, Great Britain, Hungary, Czech Republic, Slovakia, the USA, and Australia.
Why Should You Use It: If you’re looking for a plugin that offers flexible installment plans for your online store, then Klarna Payments for WooCommerce is perfect. It’s easy to use and also integrates with WP Simple Pay, so you can create payment forms without editing code.
Pros:
A free plugin that lets you add installment plans
Beginner-friendly to use
Offer 4 interest-free installment plans
Let customers choose when they want to pay (up to 24 months)
Easily integrates with WP Simple Pay
Cons:
Only available in limited countries
Not many customization options
Pricing: Klarna Payments for WooCommerce is 100% free to use.
Jifiti Buy Now Pay Later is the next WooCommerce installment payments plugin on our list. It adds a Jifiti payment option to your online store and offers a white-labeled buy now pay later platform for WooCommerce.
Jifiti is a platform that connects lenders, merchants, and customers. With a white-label program, you can use your custom branding while offering installment plans. The service lets you add zero-interest split payments, pay in 3 or 4 installments, and more.
In the background, Jifiti will connect you with leading banks and lenders like MasterCard, Credit Agricole, and Citizens Pay. This way, customers can break large payments into smaller amounts and pay them over a period of time.
What makes this plugin different is that if financing is not approved by one of the lenders, it will automatically pass your customer’s financing application to the next lender in the network. As a result, you’ll see more financing and a boost in sales.
Who Should Use It: The Jifiti Buy Now Pay Later plugin is excellent for users who want to add a white-label installment payment program to their WooCommerce store. You can work with a lender or a bank to add a buy now pay later option on your site and then customize its appearance.
Pros:
Create branded installment payment plans for your store
Offer interest-free installment plans
Work with leading banks and lenders for financing options
Automatically pass the customer’s financing application to the next lender
Cons:
Setting up white labels can be time-consuming
Customers would have to wait for their financing to be approved
Pricing: Jifiti Buy Now Pay Later is a free WooCommerce plugin.
WooCommerce Deposits is a premium plugin that lets you set up installment plans on your online store. The plugin offers flexible payment options and allows you to offer custom schedules based on days, weeks, or months.
You can create multiple payment plans for your WooCommerce store. It also lets you choose variable percentages and intervals for each payment. For instance, you can decide what percentage a customer should pay initially and then over time.
The plugin is straightforward to use and offers a clean interface. You can easily create and manage all your installment payment schedules from the WordPress dashboard.
Who Should Use It: From our testing, WooCommerce Deposits is a user-friendly plugin that’s perfect for creating custom payment schedules. If you’re looking to set up multiple installment plans for your WooCommerce store, then this plugin is for you.
Pros:
Easily create custom payment schedules
Have full control over payment amount and intervals
Very easy to use and setup
Add a description to each payment schedule to guide customers
Cons:
Limited customization options for changing appearance
There is no free version
Pricing: WooCommerce Deposits is a paid extension and will cost you $18.25 per month.
Splitit is the next WooCommerce installment payments plugin on our list. It lets you add installment payments to your online store with ease.
In our experience, what’s different about this plugin is that it allows customers to use their existing debit or credit card to split the total amount into smaller portions. Customers don’t have to get a loan or wait for approval to purchase a product.
As long as a customer has available credit on their card that’s equal to the price of the purchase, they can easily use it to set up installments.
Splitit supports different card network providers, including Visa, MasterCard, American Express, Discover Global Network, and more. The plugin is also easy to use. Simply connect your merchant account and configure the settings in your WordPress dashboard.
Besides that, Splitit also offers a white label buy now pay later feature, supports high-value orders (up to $50,000), allows installment plans up to 24 months, lets you set up interest-free payment plans, and more.
Who Should Use It: If you’re looking for a way to allow customers to use their own credit cards for installment payments, then Splitit is the best solution. Plus, it works with popular payment network partners and also lets you create white-label buy now pay later plans.
Pros:
Allows customers to use debit or credit cards for installment plans
Offers customization options inside the WordPress dashboard
No application or credit checks are needed for customers
Create an interest or fee-free repayment schedule
Cons:
Works with limited payment providers
It doesn’t improve the user’s credit score
Pricing: Splitit is a free WordPress plugin that you can use.
The plugin lets your customers have the flexibility to reserve a product or service and break the total amount into 2 installments. The first installment is at the time of purchase and the second installment is the remaining balance, which customers can pay at a later time.
You can set the deposit amount for all the products in your store. There is an option to choose a fixed amount or a percentage value of the total amount.
The plugin also lets you set up rules and charge different deposit amounts based on the products a user adds to the cart.
Who Should Use It: The plugin is perfect for online stores that require an initial deposit or down payment to book or reserve a product or service. They can then collect the remaining payment on delivery or set it up for an even later time.
Pros:
Simple and clean plugin to use
Easily collect deposits for products and services
Create rules to define the deposit value
Easily manage remaining balances for your orders
Cons:
You can only set up 2 installments
Limited integration options
No free version
Pricing: YITH WooCommerce Deposits / Down Payments will cost you $129.99 per year.
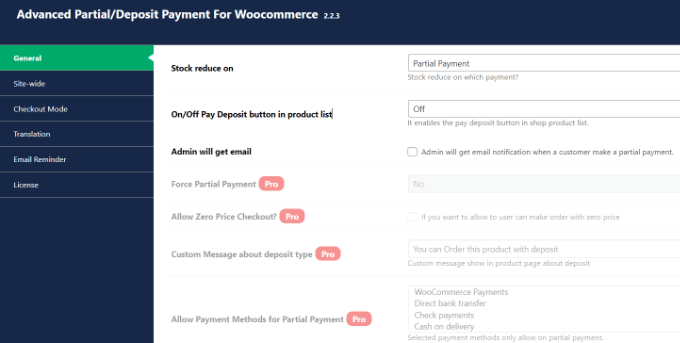
The best part is that it works with all the payment methods that are supported by WooCommerce. You can simply choose the deposit amount or percentage customers will have to pay at the time of purchase.
Besides that, you’ll also see a history of all the partial payments on your WooCommerce store from the dashboard.
While the free plugin is great for collecting deposits, you can unlock more features in its premium version. For instance, you can select the payment term, offer a zero deposit option, set up payment reminders for customers, and more.
Who Should Use It: Deposit & Partial Payments for WooCommerce is a great plugin for anyone looking to set up down payments on their online store for free. You can also create a payment plan and set up installments in WooCommerce. It is also a great alternative to YITH WooCommerce Deposits / Down Payments.
Pros:
Add a deposit or down payment option for free
Get multilingual support
Easily integrate with WooCommerce-supported payment methods
Set up fixed or percentage deposits
Cons:
The free version of the plugin offers limited features
Pricing: Deposit & Partial Payments for WooCommerce is a free WordPress plugin. However, it also offers a premium version with prices starting from $29 per year.
The best part, WP Simple Pay supports buy now, pay later payment plans. You can select different methods, including installment payments. Simply choose the billing time period to accept installments.
It supports 13 payment methods in 135+ currencies from over 45 countries. You can easily add credit/debit cards, ACH debits, Klarna, Afterpay, Apply Pay, Google Pay, and other payment methods in WooCommerce.
WP Simple Pay comes with pre-built form templates. You can simply select the Installment Plan Form template and enter your details.
Next, you can customize the installment plan form according to your requirements.
WP Simple Pay lets you choose the billing period. For instance, there are options to break the actual amount into smaller portions, and you can select the billing period based on days, weeks, months, or years.
Besides that, you can also enable recurring payment options, create customized receipts, set up purchase restrictions, automatically calculate taxes, and more.
Why Should You Use It: WP Simple Pay is best for setting up installment plans and accepting credit card payments without setting up a shopping cart. It’s super easy to use, and you can add a purchase button anywhere on your online store without editing code.
Pros:
Very easy to set up and use
Add a Stripe purchase button without editing code
No need to set up a shopping cart to collect online payments
Offer pre-built payment form templates, including installment plan form
Supports 13 payment methods
Easily integrates with buy now, pay later providers like Klarna
Cons:
The free version offers the installment plan form but has limited features
3% credit card fee per transaction when using the free version
Pricing: WP Simple Pay offers premium plans starting from $44.55 per year. There is also a free version of WP Simple Pay you can use to get started and add installment plans to your WooCommerce store.
Which is the Best WooCommerce Installment Payments Plugin?
After reviewing different plugins, we believe that Affirm Payments is the best WooCommerce installment payments plugin.
It lets you create custom installment plans for customers and also offers a 4-interest-free installment plan feature. Customers can even choose their own repayment plan and break the total amount into smaller portions.
The best part is that you can use Affirm Payments for free.
On the other hand, if you’re looking for a free WooCommerce plugin that lets you add a buy now pay later option, then you can also check out Klarna Payments for WooCommerce.
FAQs about WooCommerce Installment Payments
Here are some common questions users have about setting up WooCommerce installment payments.
1. What is the WooCommerce plugin to pay in installments?
Affirm Payments is the best WooCommerce plugin for setting up pay in installments. It offers multiple payment methods, allows you to add a buy now pay later option, built-in templates, and more.
2. What are the payment options in WooCommerce?
WooCommerce offers multiple payment options. You can allow customers to pay through their credit cards, Stripe, PayPal, Klarna, Apply Pay, and more.
3. How do I add pay later to WooCommerce?
You can use a plugin like WP Simple Pay to add an installment plan and pay later in WooCommerce. Other plugins like Affirm and Klarna Payments in WooCommerce are also great for setting up split payments.
If you liked this article, then please subscribe to our YouTube Channel for WordPress video tutorials. You can also find us on Twitter and Facebook.
Unearth the potential of your WordPress site with Dollie. It’s not just a site, it’s a goldmine! Offering a comprehensive suite of tools, Dollie empowers you to create, manage, and monetize your WaaS platform. Step into the future of web services and watch your empire grow.
Crisp has plenty of functionality to help you add multichannel customer support to your business. As such, implementing Crisp into your business needs lots of smaller processes to create the whole. Our post will run through implementing Crisp for your WordPress website!
Choosing between Shopify and WooCommerce for your eCommerce store in 2023? Dive into our detailed comparison covering costs, ease of use, payment options, and integrations. Discover which platform aligns best with your business needs and budget. Start your online venture with the right tools!
Are you looking for a way to integrate Zoom meetings and webinars in WordPress?
Integrating WordPress with Zoom allows you to automatically enroll customers, visitors, and new members into Zoom video calls and webinars. This can improve user engagement and help build a community around your brand.
In this article, we will show you how to easily integrate Zoom meetings and webinars in WordPress, step by step.
Why Integrate Zoom Meetings and Webinars With WordPress?
Integrating Zoom with WordPress lets you easily automate your meeting and webinar registration process. This can save you a lot of time that you can spend on other business tasks.
Zoom is one of the most popular meeting, webinar, and video conference call software in the world, used by over 300 million people every day.
It’s a must-have tool for businesses with remote teams or WordPress website owners who need to get in touch with customers and clients virtually.
For instance, if you have an online store, then you can use Zoom for live product demos, customer support, online training, and even host webinars with your customers to promote upcoming products on your site.
That being said, let’s take a look at how you can easily integrate Zoom meetings and webinars in WordPress. Here’s a quick overview of the topics we will cover in this guide:
Install and Activate the Uncanny Automator Plugin for WordPress
The easiest way to connect Zoom with WordPress is by using Uncanny Automator.
It’s the best WordPress automation plugin that helps you create automated workflows in WordPress without writing any code. The tool lets you easily connect your WordPress site with external apps like Zoom, Slack, and Asana.
It’s like Zapier for WordPress websites but without the high costs.
To connect Zoom with WordPress, you will first have to visit the Uncanny Automator website.
From here, click the ‘Get Uncanny Automator Now’ button to continue.
This will take you to the ‘Pricing’ page, where you can select a plan of your choice.
Keep in mind that Uncanny Automator also has a free version, but it has limited features. That is why we are using the premium plan for this tutorial.
Upon purchase, you must install and activate the Uncanny Automator plugin on your WordPress website. For detailed instructions, you may want to see our beginner’s guide on how to install a WordPress plugin.
Once you have done that, visit the Automator » Settings page from the WordPress admin sidebar to enter the license key for your pro plan. You will find this information in your account on the Uncanny Automator website.
After that, don’t forget to click the ‘Activate license’ button.
Now that Uncanny Automator is installed and activated, let’s set up your Zoom account.
There is a free version of Zoom, but you will need a paid account to set up the integration. First, head to the Zoom website and sign up for the plan that best suits your needs.
If you want to integrate webinars on your website, then you will also have to buy the Zoom Webinars addon.
Once you have a premium account, you need to go to the Zoom App Marketplace and sign in to your account. Here, you will create an app that sends data between Zoom and WordPress.
To do this, click the ‘Develop’ menu item and select the ‘Build App’ option from the dropdown menu in the top right corner of the screen.
This will bring you to the ‘Choose your app type’ page, where you must select the type of app you want to build.
From here, you have to find the ‘Server-to-Server OAuth’ app type and click the ‘Create’ button under it.
Next, you can name your app in the popup. The name is to help you remember the purpose of the app and won’t be visible to your visitors.
Simply enter your app name and click the ‘Create’ button to start the process.
This will take you to the ‘Connect Zoom with WordPress’ screen, where you will see the app credentials listed.
From here, you must copy the ‘Account ID’, ‘Client ID’, and the ‘Client Secret’ credentials and paste them into a text editor for now.
These credentials will be used to connect Zoom with your WordPress website. Next, click the ‘Continue’ button.
You’ll now be taken to the next step, where you have to provide basic information for your app, including the app name, company name, short description, developer name, and email address.
Once you are done, just click the ‘Continue’ button to move to the next step.
After that, you’ll be taken to the ‘Feature’ screen, where you don’t have to configure any settings, so you can click ‘Continue’ on this screen too.
This will direct you to the ‘Scopes’ screen, where you have to select at least one scope for your app to be able to activate it.
These scopes provide a way to limit the amount of access granted to an app. To set a scope, click the ‘+ Add Scopes’ button.
This will open a prompt on the screen where you can select scopes for Zoom meetings and webinars that will be hosted on your website using this app.
For example, if you want the app to be able to view live streaming token information or all user meetings information, then simply check the boxes next to these options.
You can also configure the scopes for Zoom webinars here by simply switching to the ‘Webinar’ option from the left column. After that, click the ‘Done’ button to move forward.
Next, click the ‘Continue’ button to move to the next step.
On the ‘Activation’ page, you will now see a message informing you that your app is ready.
From here, simply click the ‘Activate your app’ button.
Create a New Zoom Meeting
Now, you can create a new Zoom meeting that you will connect to your WordPress site.
To do this, visit your Zoom account to click the ‘Schedule’ link, and then fill in your meeting details.
You can even set a recurring Zoom meeting for your users by checking the ‘Recurring meeting’ box in the ‘Timezone’ section.
Once you are done, don’t forget to click the ‘Save’ button to store your settings.
Create a New Zoom Webinar
To create a new Zoom webinar, click the ‘Webinars’ menu option in the ‘Personal’ tab inside your Zoom account.
After that, just click the ‘Schedule a Webinar’ button.
On the next page, you can enter all of your webinar information.
After that, you need to make sure the ‘Required’ box is checked in the Registration section.
After that, simply click the ‘Save’ button at the bottom of the page.
Connect Zoom Meetings and Webinars With WordPress
Once Uncanny Automator is activated and Zoom is set up, you need to connect both of these apps to each other.
For this, head over to the Automator » App Integrations page from the WordPress dashboard.
Next, click the ‘Zoom Meetings’ tab in the left column and then add the ‘Account ID’, ‘Client ID’, and the ‘Client Secret’ credentials that you copied earlier into the fields.
Finally, click the ‘Connect Zoom Meetings Account’ button.
If you want to integrate Zoom Webinars, too, then just click the ‘Zoom Webinars’ menu option.
Then, paste the same ‘Account ID’, ‘Client ID’, and ‘Client Secret’ credentials that you used above.
Once you are done, go ahead and click the ‘Connect Zoom Webinars Account’ button.
Now that we have set up Zoom and integrated it with WordPress, let’s look at some of the cool things that you can do with this Uncanny Automator integration.
Register Users for a Zoom Meeting After Form Completion in WordPress
This integration will automatically register users for a Zoom meeting when they fill out a form on your website. This can be used to onboard new clients, schedule coaching calls, and more.
If you don’t have an active WordPress form on your website, then you need to create one now.
Uncanny Automator works with all major forms solutions, including WPForms, Formidable Forms, and more.
For this tutorial, we will be using WPForms because it’s the best contact form plugin for WordPress, used by over 6 million websites. There’s also a webinar form template in the form templates pack addon that makes form creation easy.
Now, you are ready to connect your WordPress form with Zoom.
To do this, you will be creating what’s called a ‘recipe’. In Uncanny Automator, recipes are the automations that link different plugins and apps together.
To get started, navigate to the Automator » Add new page from the WordPress admin sidebar and click the ‘Everyone’ option as the recipe type.
The Everyone recipes can be triggered by any user, while logged-in recipes can only be activated by users logged in to your website.
After that, click the ‘Confirm’ button.
Next, you have to provide a name for your recipe. This will help you remember the recipes you create without the name being visible to your users.
Keep in mind that each recipe has two different parts: the trigger and the action. The trigger is the event that will start the recipe, and the action is the task that runs after the trigger takes place.
For your first trigger, you need to select ‘WPForms’ in the ‘Trigger’ meta box.
After that, you have to choose a specific trigger related to WPForms.
For example, if you want your users to be added to a Zoom meeting once they submit a contact form, then you can select the ‘A form is submitted’ option.
If you have multiple forms on your WordPress blog, then you will also have to select the form where the submission will trigger the action.
To do this, simply select a form of your choice from the ‘Form’ dropdown menu.
Once you are done, don’t forget to click the ‘Save’ button to store your settings.
Next, you will need to add an action for your automation.
To do that, scroll down to the ‘Actions’ sections and click the ‘Add action’ button under the meta box.
This will open a list of all the integrations available in the Uncanny Automator. From here, you need to pick the ‘Zoom Meetings’ option.
This will open the ‘Zoom Meetings’ action settings on the screen.
From here, you must choose the action that Zoom will perform upon form submission.
If you want to add a user to a Zoom meeting after they fill out a specific form on your website, then you need to select the ‘Add the user to a meeting’ option.
Then, you can choose the Zoom meeting you want users to register for in the ‘Meeting’ box.
Once you are done, don’t forget to click the ‘Save’ button to store your settings.
Now, it’s time for you to finally publish your Uncanny Automator recipe. To do this, all you need to do is toggle the switch in the ‘Recipe’ box to ‘Live’.
Now, when your users fill out the form, they will automatically be registered for your Zoom meeting.
Register Users for a Zoom Webinar After Form Completion in WordPress
Another popular integration is registering users for a webinar when they fill out a form on your website.
To do this, you will follow the same steps as above. However, you will select ‘Zoom Webinars’ instead of ‘Zoom Meetings’ in the actions section.
First, follow the same initial ‘Triggers’ section as above. This means that you will have to choose WPForms as the integration for the trigger.
After that, you can select the ‘A form is submitted’ option as the trigger.
Next, scroll down to the ‘Actions’ section and click the ‘Add action’ button to expand the menu.
Then, simply select the ‘Zoom Webinars’ option as the integration.
This will open up the actions settings for the Zoom webinar.
From here, you can select the ‘Add the user to a webinar’ option from the dropdown menu. This will automatically add a user to your Zoom webinar after they fill out a specific form on your website.
Next, you will also have to choose a Zoom webinar from the dropdown list.
Once you are done, don’t forget to click the ‘Save’ button to store your settings.
After that, you must make your recipe live so that new users will automatically be enrolled in your webinar.
To do this, simply click the toggle in the ‘Recipe’ box so it says ‘Live’.
Register Customers for a Zoom Webinar After They Make a Purchase in WordPress
Another way to connect WordPress with Zoom is to enroll new customers in a product webinar after they make a purchase in your WooCommerce store.
Keep in mind that the WooCommerce plugin and store must be set up before you start creating a recipe with Uncanny Automator.
First, you need to visit the Automator » Add new screen from the WordPress dashboard and click the ‘Everyone’ option.
After that, click the ‘Confirm’ button to move forward.
Next, you have to provide a name for your recipe. This name won’t be displayed to your customers on the front and is only for your identification.
Once you have done that, choose WooCommerce as the integration in the ‘Trigger’ meta box.
This will open the list of WooCommerce triggers in the dropdown menu. From here, you can select any trigger that suits your needs.
For example, if you want customers to be added to your webinar after they buy a product, then you can select the first option.
After that, select the ‘completes’ option in the ‘Trigger condition’ box to start the automation when a customer completes a purchase.
Then, just click the ‘Save’ button to store your settings.
Now, you can choose a specific product in your store or have the automation run when a customer purchases any product.
Simply select the ‘Any product’ option if you want all of your products to be included in the automation, and then click the ‘Save’ button.
Next, scroll down to the ‘Actions’ section and click the ‘Add action’ button to expand the menu.
Then, choose the ‘Zoom Webinars’ integration from the list.
This will open the Zoom webinar action settings on the screen, where you can select the ‘Add the user to a webinar’ option.
This will automatically register new customers for your webinar once they make a purchase.
After that, select the webinar of your choice from the dropdown list in the ‘Webinar’ box.
If you have multiple webinars running, then make sure to choose the webinar that’s associated with your WooCommerce products.
The last thing you need to do is make your recipe live.
To do this, simply click the toggle in the ‘Recipe’ box so it says ‘Live’.
Now, when your customers purchase a product, they will automatically be registered for your product webinar.
Register Members for a Zoom Meeting After Sign Up in WordPress
When running a membership site, registering new members for a Zoom call can be a great way to welcome them into your community.
If you liked this article, then please subscribe to our YouTube Channel for WordPress video tutorials. You can also find us on Twitter and Facebook.