Tag: wordpress

  • Air WP Sync Plugin Review: Easy Airtable WordPress Integration

    Air WP Sync lets you import data from an Airtable base as actual WordPress posts, pages, or custom post types. Learn more in our hands-on Air WP Sync review.

    The post “Air WP Sync Plugin Review: Easy Airtable WordPress Integration” first appeared on WP Mayor.

    Go to source

  • The Complete Guide on How to Update PHP in WordPress

    WordPress runs on PHP, a programming language used to process the data needed to display your website to the world. Although PHP is rarely seen by the everyday user, it remains crucial to the life of your WordPress site. Keeping your PHP version updated ensures your site is running securely and performing optimally. In this post, we’ll explain why it’s important to update PHP in WordPress, and show you different ways to do it.

    What is PHP in WordPress?

    PHP is an open-source, server-side scripting and programming language that is the backbone of WordPress. Unlike static HTML sites, WordPress sites generate their pages dynamically by pulling data from the server using PHP. The PHP code is used by the server to process what is needed to deliver an HTML page to your website’s visitors. The majority of WordPress core, theme, and plugin files are created with PHP.

    How PHP works

    Why Should You Update WordPress PHP?

    PHP Version 8.2

    There are two primary reasons why you should always update PHP in WordPress – speed and security. That being said, there are some other benefits as well like compatibility and new features to enjoy. Here are some key reasons to update PHP in WordPress.

    Performance and Speed

    Each time a web page is loaded in your browser, PHP has to process what the server needs, locate it in the database, and then send it back in HTML format so your browser can display it. Loading just one page can require a lot of PHP requests that slow down your page load speed. Since PHP continues to improve with each update, you will also see faster processing speeds and more efficient memory usage. That’s why running your site on newer versions will give you more speed and better performance.

    Security

    Failure to update PHP in WordPress is a serious security risk. Older versions are no longer supported and have reached End of Life (EOL), which means that the PHP version will never be updated or checked for vulnerabilities. Running your site on these unsupported versions leaves you at risk of potential security breaches. To keep your site safe and secure, you should use a PHP version that is actively supported. At the time of this post, here is where things stand:

    • Any version below 8.0 is unsupported (EOL) and open to security risks.
    • Version 8.0 is not actively supported but is receiving security fixes for now.
    • Versions 8.1 and 8.2 are actively supported and are recommended to use.

    PHP supported versions

    In short, update to the latest version of PHP as soon as possible. To see the current PHP versions available, check out the PHP supported versions page.

    New Features

    new features with PHP update

    Every new version of PHP brings new features that allow you to make more powerful and dynamic websites.

    Compatibility and Support

    Making sure your PHP is updated will also ensure that your site is compatible with the latest version of PHP. This also keeps your site compatible with all themes or plugins that are optimized for the latest version.

    It is also important to note that your site may not be compatible with the latest version of PHP. You could be running an older version of WordPress or have a theme or plugin running on older PHP versions. So you will want to make sure and test your website after updating it to make sure everything is still working properly. If not, you may have some dated plugins or other issues to address.

    How to Check Your PHP Version

    Before we check the PHP version (and update it), it is important to know which PHP version you should be using. Ideally, you will always want to use the latest version of PHP available. However, you must also make sure that your WordPress version is up-to-date and compatible with the latest version of PHP. WordPress has a PHP compatibility chart you can use.

    Now that you know which PHP version you should be using, we can check which PHP version you are currently running on your site. Here are two simple ways to do that.

    Check PHP Version Using WordPress’ Site Health Tool

    One way to determine which version of PHP you are running is to take a look at Site Health in the WordPress dashboard. There are two sections for your site – status and info. On the status page, WordPress runs a series of tests to determine if your site needs updates to its core files, and plugins, and recommends improvements. During those tests, if you need to update PHP in WordPress, it will be displayed there.

    WordPress site health

    Check PHP Version Using the Command Line

    The last way to check which version of PHP is installed is to run a query in the command line. This can be done on Mac, Windows, and Linux. For this example, we’ll use the Terminal application on Max OSX. Before getting started with this method, you’ll need to have SSH access. If you need help on this, read our post explaining How to Connect Your Website Via SSH.

    Once you have successfully established an SSH connection, open your console program and type in the following command:

    php -v
    

    The output will reveal the PHP version number, build date, and copyright information that looks something like this:

    $ php -v
    PHP 7.4.25 (cli) (built: Oct 22 2021 12:33:59) ( NTS )
    Copyright (c) The PHP Group
    Zend Engine v3.4.0, Copyright (c) Zend Technologies
    	with Zend OPcache v7.4.25, Copyright (c), by Zend Technologies
    

    Steps to Take Before You Update Your Website’s PHP

    Before updating PHP, there are steps you should take to ensure that the process is completed successfully. Let’s walk through the steps so you’ll know the best process to follow.

    Step 1: Backup Your Site

    This is probably the most crucial step to take before updating PHP in WordPress. You see, when you update any type of software, there’s always a chance an error can occur. If you don’t have a recent backup, you stand to lose any content you’ve recently added. Take a look at our post on the best WordPress backup plugins if you need a good backup solution.

    Updraft Plus

    Step 2: Check Your Server

    The second step is to make sure your server supports the latest version of PHP. You can usually find this information in your hosting provider’s documentation. If not, speak with a customer service representative at your host. If your host doesn’t offer support for the latest version, you can formally request that they take steps to support it. At the time of this writing, most web hosts support version 8.0, with a growing number of hosts supporting 8.1. It’s worth noting that all of Divi’s hosting partners currently support the latest version.

    Divi hosting partners

    Step 3: Update WordPress, Plugins, and Themes

    The third step is to update all of your third-party plugins, themes, and WordPress core files before proceeding with a PHP update. If you don’t, you could cause conflicts between the latest version of PHP and any outdated software. Most developers release regular updates to their software to include compatibility with major releases of both WordPress and PHP.

    Step 4: Test Thoroughly Before Upgrading PHP in WordPress

    Lastly, use local development software such as MAMP to test your site with newer versions of PHP. This will help identify any plugins that don’t support that version, and any bugs you may run into before updating your live site. For information on how to use Mamp, check out our ultimate guide.

    Update PHP WordPress in Mamp Pro

    How to Update PHP in WordPress

    There are several ways to update PHP in WordPress. It can be done through your hosting provider, using cPanel, SSH with terminal commands, or simply by requesting it through your web host. Let’s explore the different ways to update PHP in WordPress individually.

    Hosting Site Tools

    Updating PHP in WordPress is a fairly easy step within most hosting providers. While all hosting providers are different, most of them offer a way for the customer to update the PHP version. For all other providers not listed in our post, you can visit these tutorials to view your specific hosting provider’s process to update PHP in WordPress. For this post, we’ll concentrate on updating PHP in WordPress with our hosting partners – SiteGround, Flywheel, Pressable, and Cloudways.

    Updating PHP in SiteGround

    SiteGround offers an easy way to update PHP in WordPress. First, log in to your SiteGround dashboard. Next, navigate to Devs > PHP Manager. Click the pencil icon to edit the assigned version of PHP.

    Update WordPress PHP in SiteGround

    When the modal appears, choose Change PHP version manually. Under the dropdown menu, select the version of PHP you wish to update to.

    Change PHP manually SiteGround

    Updating PHP in Flywheel

    For Flywheel, the process is a bit different. To update PHP in WordPress, you’ll need to connect with a customer service representative. This may sound like a daunting process, but rest assured that it’s fast and easy. You can request a PHP upgrade in a few simple steps. First, log in to your Flywheel account. Next, click the Get Help button in the lower right corner of your screen.

    Update PHP WordPress in Flywheel

    The final step is to click the Chat Now button. From there, all you have to do is ask for Flywheel to perform the update.

    Chat with Flywheel

    As a bonus, they’ll ensure that there aren’t any conflicts after the update. If any issues are found, they’ll troubleshoot them and fix any issues that arise.

    Updating PHP in Pressable

    To update PHP in Pressable, start by logging in to your account at my.pressable.com. Click on the site you wish to update PHP on.

    choose Pressable site

    Next, under overview, select your desired PHP version from the dropdown menu. Pressable will automatically save your changes once you make a selection from the menu.

    select PHP version

    Updating PHP in Cloudways

    To update PHP in Cloudways, start by logging into your account. Next, select servers in the navigation menu. Next, click on the server you wish to update.

    Update PHP in Cloudways

    Click on settings & packages on the menu on the left side of the page. Next, click on the packages tab. Finally, click on the pencil icon next to the current PHP version.

    Cloudways PHP settings

    Choose your desired version of PHP from the dropdown menu, then click the save button.

    Choose PHP version

    A warning box will appear asking you to confirm that all installed software is compatible with your selected PHP version. Click ok.

    Confrim PHP changes Cloudways

    Updating PHP Using cPanel

    Another way to update your WordPress site’s PHP is to use cPanel. While every hosting provider is different, the steps are generally the same. First, log into your hosting provider’s website. Next, navigate to cPanel. Scroll down until you see the Software section. Next, click on Select PHP Version. From the dropdown menu, select your desired version of PHP. Click on it to set it as current.

    select PHP version

    Contacting Your Hosting Provider

    If none of the other ways are accessible to you, there is still one more way to update PHP in WordPress. You can reach out to your hosting provider to ask that they update PHP for you. Most hosts can handle this request and can take care of it for you. As previously mentioned, hosts such as Flywheel offer access to chat with a representative who can take care of the update in a matter of minutes.

    What to Do If Something Breaks

    On the off chance that you encounter a problem, there are fixes if your site goes down or breaks during a PHP update. The most important thing you should do before updating is to ensure you are using a staging site, and create a backup right before beginning the process. This ensures that if you do have issues, you can safely roll back to your backup without skipping a beat.

    Steps To Take to Fix Your Website

    When your WordPress site isn’t functioning properly, it can be very frustrating. Thankfully, there are a few steps you can take to correct the issue you’re facing since the update. If you have access to the back end of your site, follow this quick guide to get your site back up and running.

    Step 1: Disable All Plugins

    If your problem stems from a plugin going rogue on you, disabling them can fix it. Start by disabling all of your plugins, then reactivate them one by one. If a plugin is a problem, the perpetrator will identify itself during this process. However, if this step doesn’t fix the problem, move along to step 2.

    Step 2: Change Your Theme

    Activate a WordPress default theme. A lot of times when your site is having issues, your theme can be the culprit. Third-party themes have a lot of extra functionalities in them that default themes don’t have. It’s best to temporarily swap to a more bare-bones theme to see if your site comes back up. If it does, you know the problem lies in the theme.

    Step 3: View Error Logs

    If you are still having trouble with your site, take a look at your site’s error logs to view any potential problems. Using the WordPress default Site Health tool is a great place to start. Navigate to Tools > Site Health. Here you’ll find two tabs – status and info. You can scroll through both tabs to get a better understanding of what’s going on with your website. Critical issues will be listed on the status page, along with suggestions on how to correct the problem.

    Talk To Your Hosting Provider

    If those steps haven’t solved the issue, reach out to your host. Most reputable hosting providers offer support for their customers. They will likely get to work by troubleshooting your site and helping you solve the problem.

    If none of these steps work for you, you should take steps to downgrade your PHP version. You can reverse the update process listed above to safely revert to the PHP version you were using previously. If your hosting provider doesn’t support the latest version, you should seriously consider switching hosting providers. Divi partners with several highly recommended hosting providers that all support the latest version of PHP. We vet each hosting partner thoroughly before considering them, so rest assured that you’re making a wise choice if you choose to use them.

    Updating PHP in WordPress FAQ

    If you still have questions regarding updating PHP in WordPress, these should help.

    What Happens If My Site Disappears or Breaks?

    Although unlikely, it is possible your site can break during a PHP update in WordPress. When this happens, there are steps you can take to fix it. Using Recovery Mode through WordPress is an excellent way to bring your site back after an error.

    What If I Don’t Have the Permission to Update PHP in WordPress?

    If you find yourself in a situation where you are unable to update PHP on your own, your only recourse is to reach out to your hosting provider. You can request that they update PHP to the latest version. If they can’t support the latest version, or deny your request, it’s time to start shopping for a new hosting provider. As previously mentioned, running an outdated version of PHP leaves your site vulnerable to malware and other types of cybercriminal activity.

    Can I Update PHP in WordPress If I Have an Apache/Nginx/Other Kind of Server?

    Absolutely. Almost all servers are compatible with PHP. This includes Apache, Nginx, IIS, and Google Web Server (GWS).

    Can I Use the Command Line to Update PHP in WordPress?

    Yes. But this is definitely not recommended unless you are positive that you know what you are doing. The Command Line is a powerful tool that has the potential to seriously mess things up if you are inexperienced. It would be better to contact your hosting provider to make changes for you.

    Updating PHP is Crucial to WordPress Websites

    When using WordPress to build your website, it’s imperative that you keep all software up to date. This is especially true for PHP since it is the backbone of WordPress. By following the steps outlined in this post, you’ll keep your site safe, secure, and running optimally.

    What method do you use to update PHP on your website? Let us know by sounding off in the comment section below.

    The post The Complete Guide on How to Update PHP in WordPress appeared first on Elegant Themes Blog.

    Go to source

  • This Month in WordPress: January News Roundup

    It’s a new year, and the WordPress ecosystem is as busy as ever. With new releases and essential tool updates lined up, it’s easy to see why the community is buzzing. 

    WordPress January News Roundup

    In January, we expected WordPress to reveal its game plan and overall direction for the rest of the year. And we were positively surprised: along with Gutenberg and WooCommerce updates, we now have the timeline for the upcoming major release, too. 

    WordPress 6.2 Release Timeline

    The WordPress 6.2 release team has announced the final schedule for the WordPress 6.2 update. The first beta will release on February 7, 2023, with the final version planned to launch on March 28, 2023. There will be four beta releases and three release candidates during the release period overall, so there’ll be plenty of time to tweak and test everything.

    If you want a sneak peek at the new features in the upcoming release, you can try the beta version in a test environment once it’s released. This way, you’ll get a feel for WordPress 6.2 and know how to align your site accordingly once the update is live. 

    Gutenberg Updates

    January 2023 saw two new releases of the Gutenberg plugin – Gutenberg 14.9, released on January 4, 2023, and Gutenberg 15.0, released on January 18, 2023.

    Here are some of our highlights for the new Gutenberg features:

    Apply Globally Button 

    Introduced in Gutenberg 14.9, this feature lets users apply any block style customization to global styles. It’s a great time saver for when you want to do bulk updates to your site, whether for a new web design or a seasonal sale.

    The Apply globally button on the post title block settings panel.

    Paste Styles Option 

    Gutenberg 15.0 introduced a new paste style option in the block toolbar’s drop-down menu. This feature lets users copy a block and paste its style into another one. This is especially useful when you don’t want to touch the contents of a particular block but want to update its style. 

    The paste styles option on the post title block toolbar drop-down menu.

    Sticky Position Support for Blocks

    The new position block support has a sticky option to make the block stick at the top of the page when a visitor scrolls down. It’s a great way to ensure the right content gets the prime real estate on your web pages. 

    The sticky position option on the group block settings panel.

    Typography Support in the Page List Block 

    The page list block now has typography support that lets users change the font size, family, and line height. You no longer need to sacrifice your branding or page design with the wrong fonts. 

    Although many Gutenberg features are already available in the WordPress core, we still recommend checking out the latest Gutenberg version. It will give you a glimpse of what will arrive with the next major WordPress core update.

    WooCommerce 7.3 and the Newly Introduced Product Block

    On January 12, 2023, WooCommerce released version 7.3. It contains 162 commits for WooCommerce Core and 115 for WooCommerce Blocks.

    The highlight of this update is the new product block that will replace many product-displaying blocks. It’s based on Gutenberg’s query loop block and lets users define the product listing criteria. It’s a great way to highlight your best-sellers or sale items and clear old inventory before a new product line launch. 

    The WooCommerce products block on the editor with the block settings panel displayed.

    This new product block is still undergoing beta testing – the WooCommerce team welcomes any feedback to improve the block. 

    Letter From WordPress Executive Director and Big Goals for 2023

    Looking for a read on the bigger picture? 

    Josepha Haden Chomposy, the executive director of the WordPress project, published the Letter from WordPress Executive Director and Big Picture Goals posts following the 2022 State of the Word presentation by Matt Mulenweg.

    In our opinion, the major highlight of these posts is the roadmap for the Gutenberg project. In 2023, the WordPress project expects to end Gutenberg phase two and start exploring phase three. This means we may see collaborative work features coming this year.

    In addition to the goals for the content management system, the WordPress project also has community goals to reactivate dormant WordPress communities and provide holistic contributor onboarding.

    WordPress Vulnerability News

    Not all WordPress news in January is all about updates. There have been two major WordPress vulnerability issues this month:

    • SQL injection vulnerabilities on Paid Membership Pro, Easy Digital Downloads, and Survey Maker plugins. At the time of discovery in December 2022, this vulnerability could’ve affected over 150,000 sites.
    • Multiple critical vulnerabilities on the LearnPress plugin, including SQL injection and local file inclusion. These vulnerabilities were fixed on December 20, 2022. However, only 31.5% of LearnPress installations already use the latest version, leaving thousands of sites still vulnerable to attacks.

    If you use any of these affected plugins, ensure you have updated them to the latest version to keep your site safe.

    Wrap-Up

    It’s safe to say that 2023 is off to a great start for the WordPress community. On top of new updates, we are also excited to test the beta version of WordPress 6.2, the next major release, in the coming weeks.

    One important reminder is to keep our sites updated to avoid any vulnerabilities. Check your WordPress or hPanel dashboard regularly, as they will show you when updates are available. Keep your website safe and cyberattacks at bay.

    The post This Month in WordPress: January News Roundup appeared first on Hostinger Blog.

    Go to source

  • How to Fix the Missing Temporary Folder WordPress Error

    Are you encountering the missing temporary folder WordPress error on your site? This particular error prevents you from uploading any files to your WordPress website which means you can’t add new functionalities to your site nor can you update any of the software installed on your website. Luckily, the fix for this particular error is straightforward and in this post we will teach you exactly how to do it.

    The post How to Fix the Missing Temporary Folder WordPress Error appeared first on Themeisle Blog.

    Go to source

  • Multi-Currency For WooCommerce: Get Started Now!

    By default, WooCommerce shows all the prices of online shops in American dollars (USD). It can be confusing for people outside of the US. Therefore, WooCommerce website owners need to show their prices in the native currency of their users.  If you’re selling products or services globally, you need an efficient way to handle multiple currencies.

    The post “Multi-Currency For WooCommerce: Get Started Now!” first appeared on WP Mayor.

    Go to source

  • 6 Best WordPress Hosting Services

    There are many hosting services that support WordPress, and the best one for you will depend on your specific needs. Some popular options include:

    1. Bluehost

    Known for their excellent customer support and easy WordPress integration.

    2. SiteGround

    Offers managed WordPress hosting with automatic updates and daily backups.

    3. A2 Hosting

    Offers high-performance hosting with a focus on speed and security.

    4. DreamHost

    Offers a range of plans, including a managed WordPress option.

    5. WP Engine

    A managed hosting platform specifically designed for WordPress sites, with features such as automatic updates and daily backups.

    6. InMotion Hosting

    Offers a range of plans, including a managed WordPress option with automatic updates, backups and excellent customer support.

    It’s always a good idea to research and compare different hosting providers to find the one that best meets your needs and budget.

  • How to Use the WordPress Query Loop Block

    The WordPress editor is growing into a full-fledged site builder. Thanks to the full site editing and the new theme blocks like the Query Loop Block, you can display lists of dynamic content for any post type anywhere in WordPress with ease.

    In this article, we’ll dive deeper into the WordPress Query Loop Block so you can better understand what it is and how to use it.

    What is the WordPress Query Loop Block?

    The Query Loop Block is one of the most advanced WordPress theme blocks available in the new Site Editor. It was added to WordPress Core in version 5.8 and is a a more complex version of the Latest Posts Block. It allows anyone to visually build a block that pulls and displays post content dynamically to a page or template. The Query Loop Block isn’t limited to displaying blog posts either. You can use it to pull content from any custom post type you may have. You can even use it with WooCommerce Blocks to display products.

    What are “Queries” and “Loops”?

    In WordPress terminology, a “Loop” is a way of displaying similar information on repeat. A loop of blog posts, therefore, is a series of blog posts with common attributes such as blog title, featured image, author name, publish date, and a short description. The loop pulls this data from posts (or any post type) and places them in a loop. The loop then displays posts to site visitors.

    The query aspect of a “Query Loop” means that a user can query, or command, certain information to pull into the loop. So a Query Loop Block can pull and display all posts or posts of specific categories—to name just a couple of options. This allows someone to show posts in “Category A” and no posts from Category B or C.

    Query Loop Blocks can display:

    • Blog Posts
    • Website Pages
    • WooCommerce Products
    • Other Custom Post Types

    Any post types are fair game for display in a dynamic loop.

    Query Loop Nested Blocks

    There are two immediate “Nested Blocks” that belong to the Query Loop Block:

    • Post Template Block – Holds further nested blocks that display post metadata (Title, Featured Image, Author, etc.)
    • Pagination Block – Allows posts to overflow into pages for more to be displayed

    We won’t cover these nested blocks in this article but you can click on any of their hyperlinks above to get all the information about how each works within a Query Loop Block.

    How to Add the Query Loop Block to an Index WordPress Template

    In this example, we are using the “Twenty Twenty-two” Default WordPress Theme. This was the first default theme to include editing through the Site Editor (previously called “Full Site Editor”).

    We’ll be walking through how to add a WordPress Query Loop Block to a Template in the Site Editor. To get there, first, hover over “Appearances” and then click “Editor”.

    Edit WordPress Block Theme Template - Step 1

    Then, click on the icon in the top left to pull down the dropdown menu. In that menu, click “Templates”.

    Edit WordPress Block Theme Template - Steps 2-3

    Now, from the list of presented templates, find the template you wish to edit. One of the most natural templates for this block is the “Index” template since it is the template that indexes or displays website posts.

    Edit WordPress Block Theme Template - Step 4

    You are now on Twenty Twenty-two’s Index Template. You’ll notice that it already comes with a Query Loop Block configured. But, if you are using a different Block Theme then it may not come with it.

    To add a new Query Loop Block, click the “(+)” icon. Scroll down to the “Theme” blocks or type “Query Loop” into the search bar. Drag the Query Loop block into the Site Editor.

    Create Query Loop Block - Steps 1-2

    WordPress has predefined “Patterns” that can give you a headstart in designing your Query Loop. You can choose a specific pattern if you know that there’s one that fits your needs, or you can start blank. We’re going to click “Start blank”.

    Create Query Loop Block - Step 3

    There are four default variations to apply to a Query Loop. For this example, click the “Title & Date” variation.

    Create Query Loop Block - Step 4

    This will create the Query Loop with the “Title and Date” variation.

    Create Query Loop Block - Step 5 - Result

    Notice nested blocks appear inside WordPress’ Query Loop Block. This is because those blocks provide necessary features for the Query Loop. Since we chose the “Title & Date” variation, those nested blocks need to be included to show “Title” and “Date” information. A different variation would have loaded a different arrangement of nested blocks.

    Create Query Loop Block - List Review Result

    Now that a Query Loop Block is on a template, we’ll explore the Toolbar and Settings for this advanced Theme Block.

    Query Loop Block Toolbar and Settings

    Each block within the Site Editor and Block Editor has its own Toolbar options and a Sidebar of More Settings.

    Query Loop Block Toolbar

    To find the Toolbar for the Query Loop Block it is easiest to go to the List View and select the block—making sure a nested block is not selected.

    The first unique Toolbar option for the Query Loop Block is the “Display Settings”. Clicking on that will show three options:

    • Items Per Page – Control # of posts displayed at a time in the loop
    • Offset – Skips starting point of posts by a set amount
    • Max Page to Show – Limits # of pages shown, even if the query has more results

    Query Loop Toolbar - Display Settings

    Next on the Toolbar is the “Replace” button. This gives the option to strip the Query Loop Block’s pattern and replace it with a different pattern.

    Query Loop Toolbar - Replace Pattern

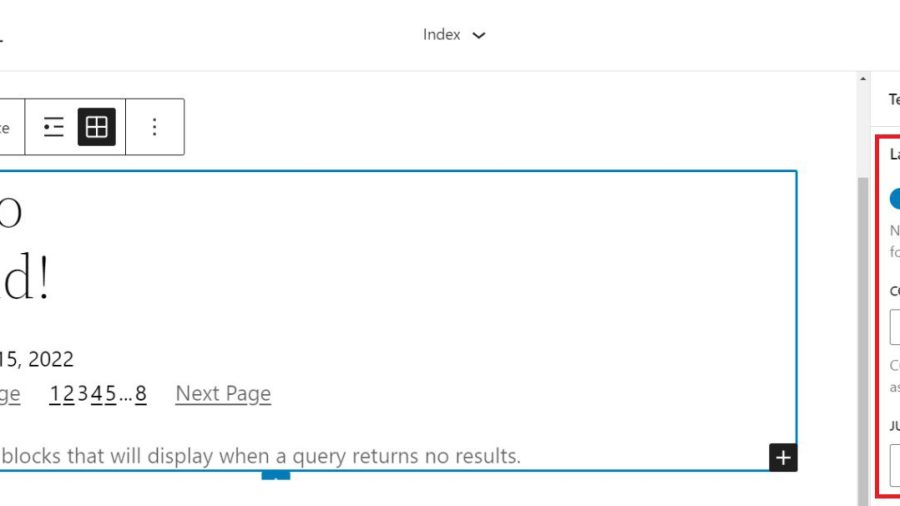
    The last unique Toolbar option for the Query Loop Block is the toggle between List View and Grid View. List View displays the post loop “as a list” with posts stacked. Grid View displays the post loop as a grid with more of a table layout for the posts to fill.

    Query Loop Toolbar - List vs. Grid View Toggle

    Query Loop Block Settings Sidebar

    The Query Loop Block has additional configurations in the “More Settings” sidebar. To reveal the sidebar, either click the “Show More Settings” option nested in the Toolbar or by clicking the “Gear” icon in the top right while the Query Loop Block is selected.

    Query Loop Toolbar - More Settings

    The first visible sidebar setting gives site owners the ability to create a New Post for the Query Loop from this editing page. After that, there is the Layout Toggle which affects how Nested Blocks use layout width compared to the Query Loop Block—more on that later. The Settings Toggle allows for selecting a custom or an inherited query for the block—more on that below as well.

    Query Loop Sidebar Settings - New Post, Layout, Query Settings

    Layout Options

    The “Layout” settings for nested blocks allow a designer to toggle additional settings on (blue). These settings allow one to choose if those blocks use content and width percentages. It also reveals an option for left, center, or right content justification. With it untoggled (grey), nested items are set to full width by default.

    Query Loop Sidebar Settings - Layout Nested Content Width

    Query Settings

    When the query “Settings” is untoggled (grey), then you can select exactly what to query. The first option is “Posts” which can be pages, posts, or custom post types. Next, users can choose between ascending or descending order for either date published or alphabetically. Lastly, there is an option to include or exclude sticky posts in the query.

    Query Loop Sidebar Settings - Setting Untoggled

    Toggling “Settings” (blue) sets the Query Loop Block to inherit the query from the template used template.

    Query Loop Sidebar Settings - Inherit Query Settings

    Query Filters

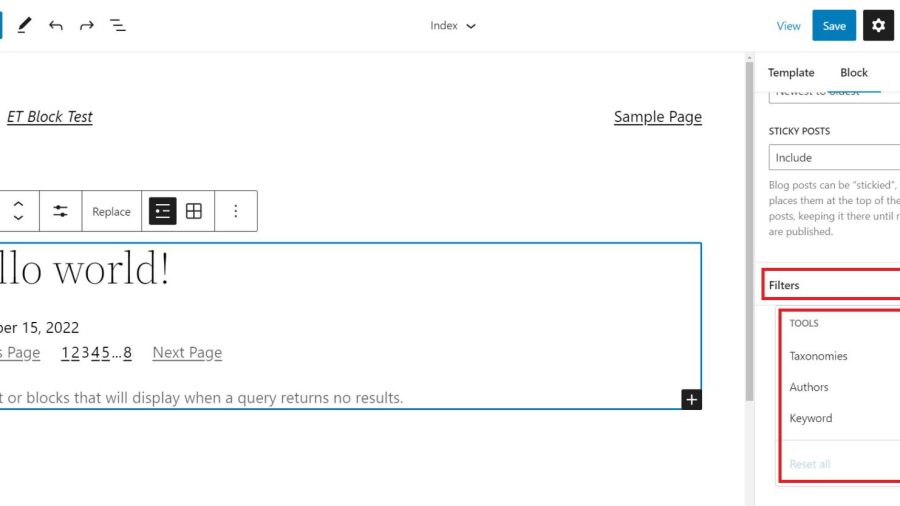
    Next, with query “Filters” gives users the option to further customize the query by filtering posts by:

    • Post Categories – Comma-separated list of categories
    • Post Tag – Comma-separated list of tags
    • Post Author – Dropdown list of authors
    • Post Keyword – Enter a list of keywords to filter by

    Query Loop Sidebar Settings - Query Filters

    Color Options and Advanced Settings

    Lastly, we have Color settings and Advanced settings. The color options allow designers to choose colors for:

    • Text Color
    • Background Color
    • Link Color

    Advanced settings include the ability to add a CSS class to the WordPress Query Loop Block and/or assign an HTML element to the block.

    Query Loop Sidebar Settings - Color and Advanced Settings

    Each nested block within the Query Loop Block has its own Toolbar options and sidebar Settings. Visit the list of nestable blocks above to learn more about each and the settings that they have.

    Tips and Best Practices for Using the Query Loop Block in WordPress

    Query Loops are powerful blocks. Follow these tips and best practices to get the most out of them.

    Set Global Styles for Query Loops and Nested Blocks

    Global Styles can be set on a block-type-by-block-type basis. This lets designers create global default styles that apply to all instances of a block throughout the website. This is a huge time saver.

    Currently, on the 2022 Theme, the Query Loop Block allows you to add Global Styles for text color, background, and link colors. To get to the global styles editor, click on the “Global Styles” icon (half-filled in circle), select “Blocks”, and find the Query Loop Block.

    You can also assign separate global styles to each of the nested theme blocks (like Post Template, Post Title, etc.) within a Query Loop as well.

    Use Multiple Query Loop Blocks on a Single Page to Create a Featured Blog Section

    In creating a Blog Page template, you may want to create a featured post that stands out because it is the most recent post published on your site. Below is a simple version of the concept.

    Featured Post Result

    There will need to be two Query Loop Blocks on our “Index” template. The top Query Loop Block will have a “List View” display and will only show one single post. Make sure that it has no Pagination Block nested in this first Query Loop.

    With the second/bottom Query Loop Block, set it to “Grid View”. It should display multiple posts in columns and set the “Offset” to 1. An offset of 1 will skip the first post of the query. This is desired since the query loop above contains the featured post.

    Use Consistent Design for Query Loops Displaying the Same Post Types

    Query Loops used for “blog articles” should look similar. If you use Query Loop Blocks for other post types, consider a slightly different style for those so your site visitors can differentiate what are “Blog Posts” and what are other types of content. This will make for a clear website UX.

    Using Divi’s Blog Module: A Query Loop Block Alternative with More Design Options

    If you use Divi, the Blog Module functions much like the native WordPress Query Loop Block. And adding Divi’s Blog Module to a page or template is simple, giving you all the options you need to customize the parameters, layout, and design of the dynamic post content.

    divi-blog-module

    The content displayed within the Blog Module is completely flexible as well, allowing you to select a certain post type, post type categories, and the number of posts to include. Individual Module Elements can be added or removed such as featured images, titles, meta-text, body text, read more links, pagination, and so on.

    Each of these Module Elements can be completely styled using Divi’s extensive design options. Learn more about using Divi’s Blog Module on Templates.

    Frequently Asked Query Loop Questions

    Answering some of the most asked questions about WordPress’ Query Loop Block.

    What’s the Difference Between the Query Loop Block and the Latest Posts Block?

    The Query Loop Block is similar to the Latest Posts Block in that it has the capability of displaying a list of the latest posts on your blog dynamically. However, the Query Loop Block is much more advanced, allowing you to build your “list” of posts, pages, or other post types from scratch by integrating other nested blocks. For example, if you have a custom post type for recipes, you can use the Query Loop Block to create an entire page of recipes customized to your liking.

    Does the Query Loop Block Require Coding Knowledge?

    No, the WordPress Query Loop block does not require coding knowledge because the functionality is already built-in. This block enables you to display a loop of posts on your WordPress site using customizable block settings on the front end.

    Where Can I Use the Query Loop Block?

    The WordPress Query Loop Block loops through published posts and pages to display them. It will automatically update as new pages/posts meet the query parameters. This makes this block useful in many places such as post or archive templates, or on static pages where you want to display things like recent posts dynamically.

    Have you used the Query Loop Block on your WordPress site? What discoveries have you made? Let us know in the comments below.

    Featured Image by Dmitry Kostrov / shutterstock.com

    The post How to Use the WordPress Query Loop Block appeared first on Elegant Themes Blog.

    Go to source

  • How to Use the WordPress Stack Block

    Thanks to the introduction of Gutenberg blocks in version 5.8, WordPress makes it easy to organize your content and create awesome patterns. With the help of the WordPress Stack Block, you can add any type of block you choose, then display it vertically to create beautifully stunning layouts with ease.

    What is the Stack Block in WordPress?

    The WordPress Stack Block is a useful block that allows you to stack multiple blocks in a vertical column. Similar to the row block, it allows you to group multiple blocks together, making it easier to keep your blocks nice and tidy. It’s a versatile block because you can add any block you wish within it such as headings, images, buttons, and more.

    How to Add the Stack Block to your Template

    Adding the Stack Block to your page using the WordPress Editor is a simple process. Start by clicking the block inserter icon near the top left of the site editor screen.

    click block inserter

    Next, you can either search for the Stack Block or type /stack into the page editor directly. Then, simply click the block to add it.

    add Stack Block

    Stack Block Settings and Options

    There are two settings groups within the WordPress Stack Block – toolbar and additional settings. Let’s go over each group to give you a better understanding of how to use it.

    Toolbar Settings

    As with every block in WordPress, there are a few standard toolbar settings for the Stack Block. They can be observed by viewing the screenshot below:

    Stack Block toolbar settings

    1. Transform to
    2. Drag
    3. Move arrows
    4. Justification
    5. Alignment
    6. More options

    The first setting in the Stack Block is Transform To. With this option, you can turn the Stack Block into a quote, unwrap (ungroup) it, convert it to columns, or convert it into a cover block.

    transform settings

    The next two settings – drag and move – allow you to either drag your block into a different position on the page, or use the move arrows to move it up and down.

    The Justification option in the toolbar settings controls the justification of the blocks within the stack. They can either be aligned to the left, center or right.

    justification settings

    Next is the Align option. This option doesn’t necessarily control alignment, but rather the width of the stack. You can set it to None, which will allow the stack and all interior blocks to occupy a maximum of 650px. Wide width will allot 1000px for the stack, and Full width will stretch the Stack Block and all interior blocks across the full width of the page.

    Stack Block alignment settings

    The last toolbar settings group is more options. Within it, you can copy, duplicate, insert, move, lock, group, remove, or create a reusable block.

    Stack Block more settings

    The Stack Block Settings

    There are quite a few additional settings specific to the Stack Block. First, there is the Layout setting. Under the Layout options, you can control the justification and orientation of the stack, as well as control whether the blocks within the stack should be allowed to wrap to multiple lines. Justification options include left center, and right. For orientation, you can choose whether to orient them horizontally or vertically.

    Note that if you choose the horizontal orientation, the Stack Block will automatically be converted to a row block.

    Stack Block layout settings

    Next is the Color settings. When selecting a text color on the stack, it will control the color of the text on every block inserted into it. Alternatively, when choosing a background color, it will only apply a background color to the stack itself, rather than its contents. Finally, link color settings control any links added within the Stack Block.

    color settings

    Within the Typography settings, you can set the font size, appearance, line height, letter spacing, text decoration, and letter case for any block inserted into the Stack, which contains the text.

    typography settings

    Next are the Dimension settings. Here you can control the padding around the Stack. You can either set padding as a whole, or individually for the top, left, bottom, and right. Additionally, you can control the block spacing for all blocks contained within the stack.

    dimension settings

    The Border options allow you to add a border and/or a border radius to the Stack.

    border settings

    Tips and Best Practices for Using the WordPress Stack Block Effectively

    Even though the block is fairly simple to use, there are a few best practices that you should follow.

    When adding blocks to the Stack, a great way to stay organized and view your blocks is to use the WordPress List View. List view enables you to view each block within the stack, and allows you to easily drag them around to move them. To access the list view, simply click the list view icon to reveal all of the blocks in your stack.

    list view

    Also, make sure to keep the orientation option set to vertical. Swapping to a horizontal view in the layout settings will convert your Stack to a row. As previously mentioned, rows display blocks horizontally rather than vertically.

    Lastly, when setting colors for your stack, keep in mind that if you set a text color on the Stack Block itself, it will apply to other child blocks containing text as well. If you don’t want to apply a color to all blocks within the stack, be sure to apply color settings to individual blocks within the stack.

    WordPress Stack Block FAQs

    The WordPress Stack Block is a versatile block that can be utilized in pages, posts, and templates. So you will likely have a few questions. Hopefully, these will help.

    What’s the Difference Between a Row Block and a Stack Block?

    While Row Blocks and Stack Blocks allow you to group a series of blocks together, the difference is in orientation. You should use a row block when you want to display blocks horizontally. A great example of when to use a row block is when building a header. Typically, you want to have your site logo, as well as navigation links displayed horizontally. The Block works in much the same way. It can house a group of blocks. However, a Stack Block displays the block vertically. A great way to use the block is to build a sidebar with your post categories.

    Can I Use the Stack Block in a Template?

    Yes! Stack Blocks are a great way to display a group of blocks vertically, and help to keep blocks organized. This is especially useful when creating a template using full site editing in WordPress. For example, when creating a blog post template, it’s a good idea to use the block to house your post title, post meta, post content, and other post-related blocks.

    Wrapping Things Up

    Building a website in WordPress starts with adding structural elements like rows and columns. The Stack Block is a convenient way to add a row of content that is aligned vertically instead of horizontally. The block can be easily configured to help you design a page in WordPress using the built-in settings in the toolbar and sidebar block settings. Though this block is native to WordPress, page builders like Divi have more robust design options for optimizing the structure of your page using modules.

    For more, check out our other WordPress Block tutorials as well as our complete guide to WooCommerce Blocks.

    Have you experienced using the Stack Block on your website? Let us how in the comments below.

    The post How to Use the WordPress Stack Block appeared first on Elegant Themes Blog.

    Go to source

  • WooCommerce Permalinks: Tips & Tricks

    Learn the tips and tricks for setting up and optimizing WooCommerce permalinks for better SEO performance. From choosing the right structure to troubleshooting common issues, get the most out of your WooCommerce URLs.

    The post “WooCommerce Permalinks: Tips & Tricks” first appeared on WP Mayor.

    Go to source