Tag: wordpress

  • Introducing: New Timeline Block

    We’re thrilled to announce Stackable’s newest addition to its lineup of custom WordPress blocks: the Timeline block. This new update v3.11.0 also comes with some performance updates that should bring memory and loading improvements!

    The Timeline Block

    Timelines are a great visual tool to convey sequences, histories, and progressions. Whether you’re detailing the history of your company, highlighting project milestones, showcasing a sequence of events or even steps to a process, timelines make it easy for readers to follow along.

    Stackable’s Timeline block is the perfect tool if you want to make timelines, roadmaps, or a step-by-step guide on your website. Its versatility makes it easy for you to create any type of timeline layout that you might need for your content.

    The anatomy of the Timeline block is simple – the Timeline is the parent block and it has an inner column that by default includes the Text block.

    You can add any block inside the Inner Column; whether it is a Heading block, an Image, or the Icon Box block, you name it!

    You can even build a post timeline showcasing your latest posts using Stackable’s dynamic content feature.

    The date that is added to the block is just a placeholder; you can type in any text you want here. It could be any date you want, it could be step numbers, or you could also just leave them blank.

    How the Timeline blocks work is that you will have to add multiple “Timeline blocks” to create an actual timeline. When grouped together, their vertical lines automatically connect together like in the video below:

    Additionally, the Timeline block’s line that connects the points has an accent color that highlights downwards as the user scrolls the page.

    Finally, Stackable’s Timeline block is also responsive. The Timeline block adapts to the screen you’re viewing it from, whether it’s from a tablet or a mobile device.

    The Timeline Block’s Design Options

    The main design controls will be found when you select the entire Timeline block. In the Inspector, go to Style > Timeline. In this panel, you can find the following controls:

    • Accent Anchor Position – This determines the starting point from which the timeline’s accent begins to fill
    • Dot Size – Adjusts the dimensions of the dot that marks each individual point or event on the timeline
    • Dot Border Radius – This rounds the dot’s edges. A larger radius will result in more rounded dots, while a smaller radius will produce sharper, more defined corners (e.g. if the value is set at 0, the dot will appear as a square)
    • Line Thickness – adjusts the width of the timeline itself
    • Horizontal Offset – This option lets you shift the timeline content closer or farther from the center
    • Timeline Accent Color – Determines the color of the accentuated parts of the timeline. You can also opt to use a gradient.
    • Timeline Background Color – Sets the base color of the timeline

    The Style Tab also includes Typography settings, Background settings, and Borders & Shadows options.

    To tweak the block’s layout, you can navigate to the Layout tab > Layout panel. Here, you’ll find two Timeline block-specific options:

    • Content Position – allows you to choose if the content appears on the left or right side of the timeline
    • Timeline Gap – which you can use to modify the spacing between the content and the timeline itself.

    The Layout tab also has the usual block size and spacing controls such as the maximum content width, paddings, and margins.

    How to Create a Timeline with Stackable

    Creating an eye-catching, informative timeline on your website is now just a few steps away with the Stackable Timeline Block. Here’s how you can craft your unique timeline:

    1. Add the Timeline block

    To create your timeline, start by adding your first Timeline block. You can find the Timeline block in the Inserter, the plus (+) button on the toolbar of the WordPress block editor.

    One Timeline block represents a “point”—this could be an event, a step, or even a post from your WordPress blog. For this tutorial, we’ll create a simple timeline showcasing a sample company’s milestones.

    2. Customizing the Timeline block

    Tailor the Timeline Block to resonate with your brand or the theme of your website. Adjust colors, fonts, spacings, and more to make it uniquely yours.

    3. Add Your Content

    You can use any block to populate the Timeline block. In the video below, we’re simply using the Text block and changing the placeholder date to a year.

    We also turned on the background settings for the inner column of the Timeline block and added an image, with a gray overlay to lessen its opacity; keeping the text readable.

    4. Repeat

    To build a whole timeline, you will have to add the Timeline block again. However, note that simply adding a new Timeline Block won’t inherit the styles from your initially designed block. To maintain consistency, you might want to copy and paste the styles from your first block or just duplicate the first block you designed.

    In our example below, we just duplicated the initial Timeline block and changed the content for the following ones.

    Other Updates

    Other than the Timeline block, this release also includes a lot of performance improvements in the backend and frontend of your website. Expect Stackable to use less server memory across the board.

    Here are some other bug fixes and improvements that comes with Stackable v3.11.0:

    • New: Various performance optimizations, lesser memory usage and better script loading
    • New: Page now scrolls to the opened Accordion if it’s not in the viewport
    • New: Added a tip when incorrectly using a Google Map in a lightbox
    • New: Added some new getting started videos
    • Change: Removed settings wizard
    • Fixed: Normal or centered block widths are not visible in the editor in WP 6.3
    • Fixed: Blocks were not being loaded in the Customizer for classic themes
    • Fixed: Blocks can encounter an error when dragging inside or from a pattern or template
    • Fixed: Global colors and typography not showing in the editor if Content Editing Mode is enabled
    • Fixed: Custom Fields admin menu UI
    • Fixed: Picking an icon from the icon picker inside the editor area doesn’t work
    • Fixed: Block link now correctly occupies the entire container block if it has a background
    • Fixed: Removed ReactDom.render console error messages
    • Fixed: Native spacing tabs appear in WP < 6.3
    • Fixed: Design Library block cannot be selected
    • Fixed: Columns content max width unit resets after saving
    • Fixed: Icon gap responsive settings resets after saving
    • Fixed: Carousel now uses passive listeners to improve scrolling performance
    • Fixed: Sometimes inactive tabs can still get mouse focus

    Conclusion

    In this article, we’ve delved deep into the features of Stackable’s all-new Timeline Block, as well as the performance updates that will give you a better user experience. We invite you to experience these new features and improvements firsthand. Update your Stackable to the latest version today and elevate your website’s content to new heights!

    Let us know what you think of this release in the comments down below 🥳

    Go to source

  • How to Use AI in WordPress (10 Useful Ways)

    If you’re not using AI with your WordPress site, you’re missing out on many new opportunities. From improving SEO to enhancing user experience, AI can transform your WordPress website into an even better version of what it is now. There are many promising AI plugins for WordPress coming on the scene to help you do just that. But how do you get started? In this post, we’ll cover some of the best ways you can use AI with WordPress and how to do it.

    How to Use AI in WordPress (10 Ways)

    With the enormous popularity of AI tools, it is not surprising that there are some specifically targeted to building websites. AI can be a helpful web design assistant. It can create written content, generate art and images, enhance existing content, and more, for you website. However, for those building a site on WordPress, it is important to know what AI tools are available for WordPress and how to use them.

    With that in mind, here are ten of the most effective ways to combine the power of AI with your WordPress sites:

    1. Generate Text Content with AI in WordPress

    One of the best contextual AI tools for web design is Divi AI. Unlike other AI writers like Jasper and ChatGPT, Divi AI brings the power of AI text generation inside your WordPress website.

    Divi AI has unique insight into each Divi module and page element, which helps it generate contextually-relevant content.

    Divi AI Banner

    Imagine the possibilities: auto-generating content with one click, receiving highly relevant and on-brand results that match your page perfectly.

    Divi AI is designed to learn from your site, analyzing existing page content and high-level website details to create consistent, relevant, and contextual content.

    Divi AI for WordPress AI Text Generation

    With it, you can maintain your unique brand voice and writing style. It’s like having a professional copy editor at your side, ready to assist you in creating on-brand written content and stunning visuals.

    But how can it do this? Well, as we briefly mentioned above, it does this by understanding existing content on your site. Here’s the preloaded data that is tokenized for each AI request:

    1. Website Title
    2. Website Tagline
    3. Current Page Title
    4. All Page Modules and Content on the Current Page
    5. Current Divi Module You’re Working With

    Between these pieces of context, Divi AI knows what you are trying to do at the moment. Instead of loading Jasper up with desperate “Knowledge Assets” or ChatGPT with “Custom Instructions,” Divi is malleable and always looking at your current page.

    Divi AI Generated Content that is perfect to use

    Watch as Divi makes website creation and marketing easier than ever before with single-click content generation

    Because of that, you can have confidence that Divi AI is up to your content generation tasks. Divi AI is now your most valuable assistant, no matter what page, website, or client project you are working on.

    2. Generate Incredible Images with AI in WordPress

    Divi AI is more than just a text content producer. It can also handle images in both obvious and unexpected ways.

    Divi AI is the easiest way to create images that work with your pre-existing page designs. Either create an image from scratch or iterate from a reference image that gives you more control over the final output.

    Generate images using a reference image inside Divi AI

    Yes, Divi AI can change summer into winter!

    Editing images can also be as simple as changing the style of your original image.

    Divi AI Change Styles of Image

    With Divi AI, you can free up valuable time while still creating exceptional results. You can start by purchasing a Divi membership + the Divi AI service.

    3. Drastically Improve WordPress SEO

    Artificial intelligence can potentially change how you approach your SEO strategy entirely. It analyzes your content, suggests improvements, and even predicts how well it will perform in search engine rankings. This is not about keyword stuffing or meta tags; it’s about creating content that is genuinely valuable to your audience and optimized for search engines.

    One tool that stands out in this regard is Rank Math’s Content AI. It’s a WordPress plugin that uses AI to help you optimize your content for SEO. It’s always had an SEO Score based on important yet generic SEO metrics. But it also now has Content AI, which uses AI to analyze a keyword and SERP and compare your content with it.

    Rank Math Content AI vs SEO Score


    It provides dynamic suggestions based on your focus keyword’s language and target country. Rank Math’s Content AI tells you exactly how many words to write, what headings to use, how many links to insert, and how much media to embed. It even suggests related keywords (semantic keywords) and which questions to answer for your content.

    Rank Math - Semantic Keywords via WP AI

    With Rank Math’s Content AI, you can take the guesswork out of SEO and create content that ranks. You can install the Rank Math SEO plugin and purchase the Content AI credits separately. Rank Math is a premier WordPress SEO plugin that we can’t stop recommending. Its AI capabilities make it all the more worthwhile to use.

    4. Add Custom Chatbots to WordPress

    The beauty of AI is its ability to interact with your website visitors in real-time, providing them with immediate, personalized responses. Custom chatbots powered by AI can significantly enhance the user experience on your WordPress site, making it more interactive and engaging. They can answer questions, guide users to possible next steps, and even help with sales and support while learning from each interaction to improve future responses.

    One of the most user-friendly and efficient chatbot plugins for WordPress is Chatbase. It also works with other CMSs, but the Chatbase plugin for WordPress makes it even easier to use.

    This tool allows you to build chatbots that can interact with visitors, answer their questions, and guide them to the right resources. It’s like having a virtual assistant that works 24/7, without any breaks. It does this by storing whatever content you want to master and using it as a source of truth for all conversations. Chatbase handles multiple file types, plain text, and content from specific URLs and includes a way to pre-train answers to certain questions.

    Chatbase WordPress AI Chatbot Training Data Types

    Chatbase bot training is very easy to use—especially if you already have the content you want to train it with. It almost effortlessly creates an interactive and engaging user experience on your WordPress site. Even getting it trained on live customer conversations is easy. You can look up any conversation and tell Chatbase how it should have responded.

    Update Chat Responses from Live Chat History

    If you want to mix AI chat support and human support better, you could look at a different tool like ChatBot by ChatBot.com, which also has a WordPress plugin. Chatbase is best for autonomous AI chatbots, whereas ChatBot.com is excellent for mixing humans with AI.

    5. Enrich Web Forms with AI

    Forms are the backbone of any website, collecting information, generating leads, and facilitating user interactions. But managing and optimizing forms can be a tedious task. Enter AI – your new form management partner. AI can streamline form-related tasks, predict user input, and dynamically adjust form fields based on individual preferences, making form interactions more personalized and efficient.

    One such tool that brings the power of AI to your WordPress forms is Formidable Forms.


    It integrates with OpenAI to show generative AI responses to users based on form field inputs. If you have an idea about getting AI to output some content when a user uses a form, this is an excellent feature with Formidable Forms to try.

    Gravity Forms via the OpenAI Addon by Gravity Wiz has the same functionality but for those who use and love Gravity Forms. But it can also use AI to populate hidden fields for internal use. See how Gravity Wiz uses AI to analyze the sentiment of form entries in a feedback form.

    6. Translation for Multilingual WordPress Sites

    Today, language should never be a hurdle for websites. Your site should be a global village, accessible to users from every nook and cranny, regardless of their language or location. If you want to interact with more people, you should.

    But let’s face it, managing translations for a multilingual site can be a tall order. What if there was a way to simplify it and make your site global without the hassle of manual translations?

    Weglot is an AI-powered translation plugin that makes your WordPress site multilingual.

    Weglot AI Translation for WordPress

    But Weglot doesn’t just translate your content; it ensures that Google indexes each translated post/page easily. Given that higher-priced tiers give you more AI-generated translations, pairing Weglot with the translation capabilities of Divi AI could help you pay less. Use Weglot to handle your site structure for different language pages, and you can supplement Divi AI translations since it has unlimited AI generation.

    Divi AI Translate Webpage - Steps 6-9

    However you go about it, AI + WordPress ensures that language is no longer a barrier but a bridge connecting your site to the world.

    7. Optimize Images

    Visual content is the lifeblood of any website. It captures attention, conveys emotions, and enhances the overall aesthetic appeal. But managing and optimizing images can be a complex task. What if there was a way to simplify it to ensure your photos are visually stunning and optimized for performance?

    For AI Image Compression, you’re welcome to give ShortPixel a try. ShortPixel is an AI-powered plugin that optimizes your images without compromising their quality.

    ShortPixel AI Image Optimization for WordPress

    It uses advanced compression algorithms to reduce file sizes while maintaining the visual quality of your images. ShortPixel AI also automatically resizes and scales images for end users’ device resolutions via its image CDN. That means images are loaded only as big as they need to be, drastically speeding up WordPress sites with the power of AI!

    But that’s not all. ShortPixel goes beyond just compression. It offers features like lazy loading, which defers offscreen images until needed, and incorrect image size detection, which helps you quickly locate images slowing down your site. Plus, it works in the background, optimizing your photos even when you’ve closed the plugin.

    8. Write Custom Coded Solutions for WordPress

    Customization is the key to standing out in the digital landscape. Your WordPress site should be unique, reflecting your brand’s identity and meeting your needs. But writing custom code can be a bit time-consuming. What if there was a way to simplify it, to create custom solutions without getting lost in lines of code?

    Meet CodeWP, a service that uses AI to write custom code snippets for your WordPress site.

    Codewp - Homepage May 2023

    CodeWP doesn’t just generate code—it creates solutions tailored to your needs. Whether you want to add a new feature or enhance an existing one, CodeWP has got you covered.

    To harness the power of CodeWP, prompt it in plain English with what kind of WordPress code the AI should create. It’ll create code snippets that you can add to your website. With CodeWP, custom coding is more obtainable and quicker to get. That should bring your vision to life faster than you knew it was possible.

    9. Generate Alt Tags for Images

    Images are more than just visual elements on your website; they’re integral to your site’s SEO. Alt tags help search engines understand the content of your images. But manually writing alt tags can be a tedious task. What if there was a way to automate it, ensuring every image on your site has an accurate and SEO-friendly alt tag?

    Enter AltText.ai, an AI-powered plugin that automates generating alt tags.

    AltText.ai Homepage - August 2023

    It doesn’t just generate alt tags—it creates accurate descriptions based on an AI-driven analysis of your images. This ensures your alt tags are not only SEO-friendly but also contextually accurate. AltText.ai supports over 130 languages and integrates seamlessly with WordPress, CMS, Shopify, and more. With a simple click of a button in the media library, AltText.ai will generate your images’ alt text. Even better, it can be set to do the same thing on file upload, saving a tremendous amount of time throughout running your website.

    Update Alt Text with alttext.ai WP plugin

    To leverage the power of AltText.ai, integrate it into your WordPress site. Let it analyze your images, generate accurate alt tags, and enhance your site’s SEO. With AltText.ai, alt tag generation is no longer a chore but a seamless process that improves your site’s SEO and accessibility.

    10. Block WordPress Comment Spam

    Engaging with your audience through comments is a great way to build a community around your WordPress site. But managing spam comments can be a tedious task. What if there was a way to block spam comments, ensuring your comment section is a space for genuine engagement and discussion?

    Say hello to Akismet, an AI-powered plugin that weeds out spam comments. With a simple setup process, the Akismet API will scour every comment posted to your site.

    Akismet comment settings

    Akismet doesn’t just block spam—it uses advanced AI algorithms to analyze comment patterns and identify real spam. This ensures your comment section is junk-free, allowing you to engage with your actual visitors.

    To experience the power of Akismet, integrate it into your WordPress site. Let it weed out spam comments, ensuring your comment section is a space for genuine conversation. With Akismet, managing comments is no longer a dreaded task but an enjoyable process that builds your site’s community and engagement.

    AI + WordPress = Endless Productivity

    Several of these ways to use AI with WordPress are very easy to implement. They all afford you either time savings or advanced features that are untenable without AI. Once you add a few of these to your site, you’ll be trying to find new ways of incorporating AI into your tech stacks.

    Divi AI is the perfect website assistant and stands to only get better with time and deeper integration into Divi’s visual builder. Invest in yourself and your team by picking it. Divi AI is sharable across all team members in your Divi Teams account. And all of this comes at one low monthly (or an even lower yearly) rate.

    However you choose to implement WordPress AI, you will enjoy its new possibilities.

    WordPress AI FAQ

    What AI tools can be integrated with WordPress for enhanced functionality?

    There are numerous AI tools that can be integrated with WordPress to enhance its functionality. Some popular ones include Divi AI for content creation, Rank Math for SEO optimization, and Akismet for spam comment management.

    How does AI help in optimizing SEO for WordPress?

    AI helps in optimizing SEO for WordPress by analyzing your content and providing real-time suggestions for optimization. Tools like Rank Math use AI algorithms to ensure your content is search engine friendly and ranks higher in search results.

    How can AI improve the user experience on a WordPress site?

    AI can significantly improve the user experience on a WordPress site by providing personalized content, facilitating real-time interactions through chatbots, and ensuring the site is optimized for performance and accessibility.

    What are some scalable growth strategies using AI on WordPress?

    Some scalable growth strategies using AI on WordPress include optimizing SEO to attract more organic traffic, using chatbots to improve customer service and engagement, and leveraging AI-powered plugins to streamline content creation and website management.

    How can AI streamline content creation on WordPress?

    AI can streamline content creation on WordPress by generating relevant and engaging copy for your pages. Divi AI, for example, can analyze your content and automatically generate text and images that match your page perfectly.

    What are the benefits of using AI with WordPress?

    The benefits of using AI with WordPress are numerous. It can enhance the functionality of your site, improve the user experience, optimize SEO, streamline content creation, automate website management, facilitate personalized user interactions, assist in data-driven decision-making, and contribute to sustainable digital transformation.


    Featured Image by FGC / shutterstock.com

    The post How to Use AI in WordPress (10 Useful Ways) appeared first on Elegant Themes Blog.

    Go to source

  • 26 Best WordPress Minimalist Themes: Design Inspirations for a Simple Website

    When designing a website, simplicity is paramount. Clean, well-organized layouts help direct attention to essential elements like calls-to-action, navigation, and top-selling products. And the best way to apply minimalist design principles to your website is by using a minimalist theme. Websites hosted on a WordPress server have plenty of minimal theme options on the platform’s […]

    Read More…

    The post 26 Best WordPress Minimalist Themes: Design Inspirations for a Simple Website appeared first on Hostinger Tutorials.

    Go to source

  • Hostinger Is Coming to WordCamp US 2023

    Let’s end the summer with a bang and meet at WordCamp US. This flagship WordCamp for the North American region will take place in National Harbor, Maryland, from the 24th to 26th of August.

    WordCamp is an offline conference with various WordPress-related activities like presentations, workshops, and contributing sessions welcoming all expertise levels.

    On top of that, there are networking events where WordPress contributors and enthusiasts can connect and exchange knowledge.

    Connecting With the Community

    This is the second year Hostinger is sponsoring WordCamp US, and this time we support the event as a Super Admin.

    We continue our stride in actively participating in WordCamps because many of our clients are WordPress users.

    “We’re excited to meet and connect with our clients in person. WordCamp is a perfect opportunity to hear their feedback directly, so we can continue to deliver the best managed WordPress hosting experience,” says Domantas Gudeliauskas, WordPress Marketing Manager at Hostinger.

    We believe that only by immersing ourselves in the vibrant WordPress community that we can gain invaluable insights into our customers’ needs and pain points. Also, WordCamps offer a unique opportunity to engage with industry experts, developers, and tech enthusiasts in general, fostering collaboration and knowledge sharing.

    “By being present at WordCamps, we not only contribute to the growth of our own company, but also push the web hosting industry towards improvement and innovation,” Marco Chiesi, our Head of WordPress, explains.

    “Our ultimate goal is to democratize hosting and empower individuals and businesses of all sizes to thrive online. By actively participating in these events, we align ourselves with the community’s values and aspirations – working together to make the web more accessible, secure, and inclusive for everyone,” he continues.

    Where You Can Find Us

    So you’re attending WordCamp US 2023? Don’t hesitate to come to our booth and chat about WordPress and beyond. If you’re curious about our super-handy WordPress AI Assistant or intuitive control panel, you’re very welcome to try them here as well.

    We’ll be located right next to WP Rocket and Nexcess in the sponsors’ booth area. Also, we will bring some of our eco-friendly merch, so don’t hesitate to stop by and collect them!

    Our Contribution to WordPress

    Sponsoring is not our only contribution to WordCamps and WordPress in general – we’re also active in the Make WordPress project.

    We have some sponsored contributors involved in the Five for the Future initiative. A few of our team members will also attend the WordPress Community Summit, which will occur just a couple of days before WordCamp US.

    Hostinger team with Matt Mullenweg and Josepha Haden Chomphosy at Hostinger's booth in WCEU 2023

    The Community Summit is an in-person gathering of the open-source WordPress project. There, participants will have focused time for cross-project discussion, aiming to advance the project.

    Also, we have one of our crew volunteering in WordCamp US. Emma Young, our Head of Content, will volunteer as an MC. This will be Emma’s third time volunteering in flagship WordCamps – the previous ones were WordCamp Asia 2023 and Europe 2023.

    As we are actively involved in the WordPress community, WordCamps won’t feel complete without joining Contributor’s Day. This is the time when contributors from all over the world sit and work together, offline, on the WordPress project. Think of it like a mix of a hackathon and a networking event.

    “My first ever was full-on, and I was able to accomplish a lot. The more recent was more onboarding others and making it easier for them,” says Emma, reminiscing her recent Contributor Day experiences.

    “This time around, I’ve signed up for a few teams – I hope to help with not only onboarding on Docs but I would love to talk with other teams and see how we can all help each other.”

    Leonardus Nugraha, our WordPress Content Specialist, and 6.3 Release Lead for Docs, also looks forward to bringing impactful contributions to this open-source community.

    “I think I will mostly work on Documentation – the team with which I have been involved for over a year. But most importantly, I’m really looking forward to meeting fellow WordPress enthusiasts, talking about recent developments in the ecosystem, and discussing how we, as WordPressers, should respond to the ever-increasing presence of AI.”

    When it comes to brainstorming during WordCamps, the sky is the limit – so off we go!

    The post Hostinger Is Coming to WordCamp US 2023 appeared first on Hostinger Blog.

    Go to source

  • WordPress Kicks Off Admin Design Overhaul with Discussion on Initial Mockups

    The monumental task of overhauling WordPress’ aging admin design is coming into focus, as contributors kicked off explorations of some initial mockups this week. Gutenberg’s Phase 3 is focused on Collaboration and this admin revamp is part of that road map.

    As a starting point, Automattic-sponsored product designer Saxon Fletcher published some images and videos with a design that appears to have grown out of the editor’s interface to make it a more natural part of the admin. As part of the impetus for this project, he called out plugin developers that have introduced their own admin interfaces in the interim while waiting for WordPress to prioritize this project:

    “The added risk here is that plugin authors are side stepping outdated UI by introducing their own which can further fragment the WordPress experience,” he said.

    Fletcher emphasized that these mockups are “broad strokes and the first of many iterations.” The structural concepts Fletcher introduced include three main areas:

    • A Sidebar for navigation
    • A Page area for the main content, management, and settings
    • A Frame representing the front-end of the site, which can be in an edit or read-only state
    Frame mockup – video source: Admin Design Kickoff

    “The frame can be used for previewing any type of content, including your entire site, templates, patterns etc,” Fletcher said. “Plugins can decide as to whether they benefit from having the frame in view while a task is being worked on, or hidden away. If a plugin doesn’t make use of the main content area, the frame will be in its expanded state.”

    The admin bar may also be getting a makeover as part of this project, although Fletcher did not elaborate on how it might change. The admin bar doesn’t appear in any of the mockups.

    “With the introduction of the frame, which represents the front-end of your site, we have an opportunity to re-think what transitioning between the front and back of your site looks like,” he said.

    The initial mockups explore the idea of implementing a drill down navigation UI that can also be used to house basic content, but Fletcher acknowledged the challenges of navigating up/down the submenus more challenging. Design contributors are exploring workarounds for this, including introducing breadcrumbs or highlighting recently visited sections.

    Drill down menus mockup – video source: Admin Design Kickoff

    This concept for drill down navigation has received the most critical feedback in the comments of the post, as developers are concerned it will make navigation too complicated.

    “Not a fan of hiding all the Admin Menus behind a maze of Breadcrumbs, also there are many complex UIs that will not convert well this idea for the menu system, the current benefit with our current menu system is that is very fast to change from one plugin to another or another area of WordPress with very few clicks,” designer Adam Pickering commented. “This proposal for the new admin menu makes that whole UX a lot more time consuming and frustrating for the user. Even if a proposal comes along where you put the previous menu item above the current position of where you are it won’t fix the issue as noted.”

    Others are also concerned that the drill-down menu requires too many clicks and maybe even a popup menu on hover/long touch on mobile that pops out more options. Developer Anthony Hortin commented on how similar it is to the Customizer’s navigation:

    As others have mentioned, this “drill down navigation pattern” would be incredibly frustrating to use, not only for new users, but experienced users as well. Not being able to see what options are under each menu forces the user to constantly click on each menu item, exit, click on the next menu item, exit, and so forth, until they find the screen they’re looking for. Even as someone who’s been using WordPress for 17+ years, I quite often have to hover over menus to remind myself where to find things.

    This is also seen in the Customizer, which has had this style of navigation for years. When working on a new client’s site, it’s frustrating as hell trying to find options within the Customizer if they have a theme that you’re not familiar with. I would hate to see the whole Dashboard go in the same direction.

    Participants in the discussion were also critical of the Frame concept for the admin, as most admin tasks don’t lend themselves to frontend previews.

    “I’m most skeptical of the ‘surfaces’ approach and moving to a ‘front end first’ approach to things,” developer Jon Brown said. “Aside from theme edits, almost nothing I do in wp-admin requires or would benefit from a front-end view. If I’m managing orders on a WC site, I certainly don’t need/want to see the front end. If I’m editing plugin settings, again no front end. I get it makes sense for authoring new content, but that’s about it.”

    As part of the Collaboration phase, Fletcher also proposed that the admin become more customizable for different use cases, so its navigation and system variables would make performing certain tasks more efficient for blogs, e-commerce, portfolios, and multisite, for example. He also hinted at the ability for the community to share their configurations.

    “We’d like to see WordPress become a fun platform to build multiuser products on top of, more so than it already is,” he said.

    WordPress developers will have a major transition ahead to make their extensions compatible with the new admin. Some individuals and teams are better positioned than others to make that step forward. Fletcher’s proposal recognizes that backwards compatibility will be an important consideration for not breaking settings pages for plugins that don’t get updated.

    “Perhaps the trickiest part of this whole initiative is rolling admin changes out in a way that is iterative, doesn’t break existing workflows and encourages gradual adoption,” Fletcher said. “The site editor has given us a space to experiment, including being able to browse your site’s pages in the latest 6.3 release, and that may extend to other core admin pages like site settings, but at some point we’ll need to ‘break out’ of the editor to prevent too much duplication. We also need to support plugin pages that may never update, and do it in a way that feels seamless.”

    The discussion continues and the developer community is invited to weigh in on the initial concepts and structural elements proposed in the post.

    Go to source

  • How to Create a Website With Gutenberg in 6 Steps + Useful Tips to Improve Your Workflow

    Building a website is now easier than ever, thanks to a wide array of user-friendly website-building tools. Among these, Gutenberg stands out as a powerful and flexible solution to build a stunning block-based WordPress website. Whether you’re a beginner building your first business website or a seasoned web agency, Gutenberg empowers you to unleash your […]

    Read More…

    The post How to Create a Website With Gutenberg in 6 Steps + Useful Tips to Improve Your Workflow appeared first on Hostinger Tutorials.

    Go to source

  • What Is WordPress, How It Works, and How to Start Using It – A Beginner’s Guide

    WordPress is the leading website creation tool worldwide, powering over half of the web’s content. This open-source content management system (CMS) is versatile and easy to use, making it an ideal choice for users of all skill levels. However, with numerous website-building platforms available, newcomers might need help deciding whether to use WordPress or other […]

    Read More…

    The post What Is WordPress, How It Works, and How to Start Using It – A Beginner’s Guide appeared first on Hostinger Tutorials.

    Go to source

  • Best 7 WordPress Auction Plugins and How to Create an Auction Website

    If you sell valuable collectibles or are passionate about online bidding, an auction site can help you achieve both goals. Building a bidding platform simplifies the auctioning process to make money online. You can do so using WordPress, a popular content management system (CMS). Easily add auction functionality to your website with WordPress plugins, eliminating […]

    Read More…

    The post Best 7 WordPress Auction Plugins and How to Create an Auction Website appeared first on Hostinger Tutorials.

    Go to source

  • WordPress 6.3 Update: A Detailed Overview

    WordPress 6.3 “Lionel” is finally released as the second major update of the year. 

    This release merges 10 Gutenberg versions into WordPress core, bringing features like synced patterns and style revision. These new features enhance the block editor’s workflow and expand its customization possibilities.

    Furthermore, WordPress 6.3 brings performance improvements and developers-focused updates, including a new database query caching implementation and the introduction of the command palette API. 

    Let’s dive into what WordPress 6.3 has to offer.

    Site Editor Updates

    WordPress contributors aim to finalize the Site Editor in this version by rolling out all necessary features for block-based customization. No wonder WordPress 6.3 is packed with updates for the editor. Let’s have a detailed look at them.

    Synced and Unsynced Patterns

    Reusable blocks are blocks or groups of blocks that can be saved and reused on other pages or posts. Any changes made to a reusable block in one place will apply globally on the website.

    Meanwhile, block patterns are a premade group of blocks. You can add a block pattern to your content and customize it without affecting the same pattern elsewhere. 

    Previously, there was no method to create a block pattern on the Site Editor, as it requires a pattern management plugin or custom PHP files. 

    WordPress 6.3 combines the reusable block with the pattern system, opening up new customization possibilities. There are two types of patterns: synced patterns, which function like reusable blocks, and unsynced patterns, which work like regular block patterns.

    The new pattern system should be a breakthrough in block pattern workflow. In WordPress 6.3, users can create patterns on the Site Editor, just like creating a reusable block. 

    Here’s how to create a synced or unsynced pattern:

    1. Customize a block or group of blocks and select Create pattern/reusable block from the block toolbar menu.
    The create pattern reusable block option in the block toolbar menu
    1. The pattern creation pop-up will appear. You can name the pattern.
    The interface to create a pattern, containing the text field for the pattern name and a toggle switch for synced or unsynced options
    1. The Synced toggle option determines whether the pattern will be synced or unsynced. Enable it if you want the pattern to behave like a reusable block, or leave it disabled to create a regular block pattern.
    2. Click Create to finish the process.

    The editor saves synced and unsynced patterns in different locations. You can find synced patterns in the Synced patterns tab on the block inserter panel.

    The synced patterns tab on the block inserter panel

    On the other hand, you’ll find unsynced patterns in the My patterns category on the block inserter panel.

    The patterns tab on the block inserter panel with the my patterns category highlighted

    Updated Navigation Sidebar

    The navigation sidebar on the Site Editor will appear on the left side of the screen when you click the WordPress or site logo at the top-left corner. 

    In WordPress 6.3, the navigation sidebar offers more options. It allows better workflow as you can navigate and manage more components in the Site Editor.

    Here are the new menus on the navigation sidebar:

    • Navigation. Use this menu to see and rearrange links available on your navigation block. This way, you don’t have to use the editor canvas to select the navigation block and open to block settings panel.
    • Styles. Choose and preview your theme’s style variations from this menu. It also includes buttons to open the style book and the global styles panel.
    • Pages. The pages menu lists all available pages on your website, including drafts. If you click on any of them, you can edit them via the Site Editor. 
    • Templates. This menu functions just like in the previous version – it displays all available templates and lets you create a new one.
    • Patterns. This replaces the previous Template Parts menu. It now contains template parts and both synced and unsynced patterns. 

    Quick Switch to Template Editing

    When editing a page on the Site Editor, you can easily switch to editing the template in a few clicks. This feature is convenient, as sometimes, when you’re editing a page, you may notice a layout-related change you must make.

    You will find the Template drop-down section on the page settings panel and see the template used. Click the Edit template button to edit it. 

    The Site Editor interface when editing a page with the template section highlighted

    Note that this feature is only available when using the Site Editor. You won’t find the option if you edit a page using the page editor.

    Command Palette

    The command palette offers a faster way to navigate between templates, open specific panels, or create a new post or page. It is a convenient tool to search for the panel you wish to open or the task you want to complete.

    The command palette is located at the top of the Site Editor or accessed via the CTRL+K keyboard shortcut.

    The Command Palette pop-up interface, showing the available commands including add new post, open styles revisions, and open styles

    For instance, you wish to swiftly navigate from editing the home template to a page. Simply input the page name into the command palette and click on it. This will directly transport you to that page.

    Style Revision

    WordPress revision has always been a great collaboration feature. But in most cases, it’s useful for content editing only. Fortunately, the style revision adds the rollback feature to the design aspect of the website.

    You will see the new Revisions icon on the global styles panel. Click it and select Revision history to see when style changes have been made, complete with the time stamps and users who made the changes.

    The global styles revisions interface, showing the available versions on the side panel

    If you select any of the recorded style histories, you can preview it on the editor canvas. The Apply button at the bottom of the panel lets you revert to any of the selected styles.

    Reducing Distractions in the Site Editor

    The distraction-free mode is now available in the Site Editor. It’s a well-known feature to keep you focused while editing your content. Initially available on the page and post editor, it hides the sidebar, top panel, and block toolbar to reduce distraction and make the interface cleaner.

    If you still need the panels, you can reduce distractions by enabling the top toolbar feature. It moves the block toolbar to the top panel of the editor.

    Previously, enabling this feature will add another layer on the top panel to accommodate the toolbar. However, in WordPress 6.3, the block toolbar will be embedded in the top panel so that it won’t take more space on your editor canvas.

    The Site Editor interface with the top toolbar enabled, with the highlighted block toolbar on the top panel

    New Blocks

    WordPress always improves its customizability by introducing new native blocks to help you add engaging content. In WordPress 6.3, we have these new blocks:

    Details

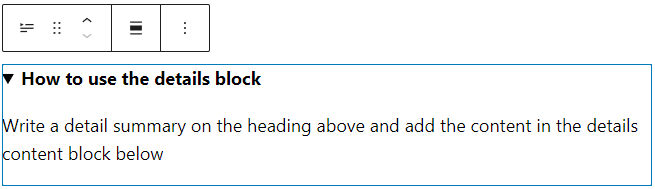
    This block comprises a header at the top and a collapsible nested block portion beneath it. It’s highly beneficial for efficiently showcasing lengthy material such as code snippets, product details, and spoiler information.

    When you add the details block, you will have two spaces – the detail title and the hidden block content. 

    The title only accepts text, but you can still customize the design. On the other hand, the collapsible section allows you to add various blocks, including image, code, or list blocks.

    A details block on the editor

    Footnotes

    If you have any part of the text that requires a footnote, such as a citation or further information, you can now add a footnote in WordPress 6.3.

    Select the text you want to annotate and click More on the block toolbar. Select Footnote, and its block will appear at the end of your content. Then, you can add the citation or information on the footnote block.

    The footnote options on the block toolbar

    Note that this is the only way to add the footnote block. You can’t currently add one via the block inserter panel.

    Block Improvements

    Improving the block editing experience is not limited to adding new blocks. WordPress 6.3 also adds plenty of block enhancements.

    Featured Image Aspect Ratio

    The post featured image block now has an aspect ratio control as part of its design tools. Whether you add this block to a post or a template, you have eight options, including portrait and landscape orientation:

    • Original aspect ratio
    • Square (1:1)
    • 16:9
    • 4:3
    • 3:2
    • 9:16
    • 3:4
    • 2:3
    The Site Editor interface with a featured image block selected and the aspect ratio options on the block settings panel displayed

    Post Modified Date Variation

    The post date block now offers various ways to display the last modified date. You can configure the block from the settings panel and enable the Display last modified date toggle option.

    The post modified date on the editor, showing the block settings panel with the highlighted display last modified date toggle option

    The post date block placeholder will show Post Modified Date when enabled. 

    You can also add two post date blocks on a template – one that displays the original display post and another that displays the last modified date. This way, you can tell your reader that although the post was originally published a while ago, it was updated recently.

    Cover Block Enhancements

    Some users put several texts on the cover block. To streamline the workflow, WordPress 6.3 introduces text design tools to change the color and typography of all text on the cover block. This way, users don’t have to manually change individual text block one by one.

    Another improvement is the seamless transformation of the cover block into a media & text block and vice versa. When you transform the block, all design customization is transferred, eliminating the need for redesigning.

    Dimensions Control

    The dimensions control receives a UI revamp in WordPress 6.3. Instead of using text to describe the sides for the settings – top, bottom, left, and right – it now uses small icons to control the dimensions.

    The updated dimensions control for padding and margin

    Performance Improvements and Updates for Developers

    Moving on from new user-facing features, we will look into the back-end improvements. All major WordPress updates bring performance enhancements and updates tailored for developers, and WordPress 6.3 is no exception.

    Dropped Support for PHP 5

    As only 3.8% of all monitored installations use PHP 5.6, the WordPress core team dropped the support for PHP 5 and raised the minimum supported version to 7.0.0. For the record, the team usually uses a 5% baseline to determine the minimum PHP version.

    That said, websites that run on PHP and WordPress 6.2 will continue receiving security updates.

    If you still use PHP version 5.6 or lower, we recommend updating to version 7.4 for better performance and security. Read our tutorials on how to easily change the PHP version via hPanel.

    Command Palette API

    The WordPress core team introduced the command palette API for this release, which allows developers to add or remove commands.

    There are two types of commands for the API – static and dynamic. In addition, you can add contextual properties to the commands.

    Static Commands

    The static command is the simplest type to add to the command palette list. It uses the wp.data.dispatch( wp.commands.store ).registerCommand action or the wp.commands.useCommand React hook.

    Here’s an example of a static command registered using the wp.commands.useCommand hook:

    wp.commands.useCommand( {
    	name: 'myplugin/my-command-name',
    	label: __( 'Add new post' ),
    	icon: plus,
    	callback: ({ close }) => {
    		document.location.href = 'post-new.php';
    		close();
    	},
    } );

    Dynamic Commands

    Dynamic commands only appear on the Command Palette list depending on the search term input from the users. As such, dynamics commands use command loaders to register, including useCommandLoader and usePageSearchCommandLoader.

    For example, here’s a snippet to register a command for a page search. It consists of two parts – the first is for retrieving the pages based on the search term, and the second is for creating the command.

    function usePageSearchCommandLoader( { search } ) {
    	// Retrieving the pages for the "search" term
    	const { records, isLoading } = useSelect(
    		( select ) => {
    			const { getEntityRecords } = select( coreStore );
    			const query = {
    				search: !! search ? search : undefined,
    				per_page: 10,
    				orderby: search ? 'relevance' : 'date',
    			};
    			return {
    				records: getEntityRecords( 'postType', 'page', query ),
    				isLoading: ! select( coreStore ).hasFinishedResolution(
    					'getEntityRecords',
    					[ 'postType', 'page', query ]
    				),
    			};
    		},
    		[ search ]
    	);
    
    	// Creating the command
    	const commands = useMemo( () => {
    		return ( records ?? [] ).slice( 0, 10 ).map( ( record ) => {
    			return {
    				name: record.title?.rendered + ' ' + record.id,
    				label: record.title?.rendered
    					? record.title?.rendered
    					: __( '(no title)' ),
    				icon: icons[ postType ],
    				callback: ( { close } ) => {
    					const args = {
    						postType,
    						postId: record.id,
    						...extraArgs,
    					};
    					document.location = addQueryArgs( 'site-editor.php', args );
    					close();
    				},
    			};
    		} );
    	}, [ records, history ] );
    
    	return {
    		commands,
    		isLoading,
    	};
    }
    
    useCommandLoader( {
    	name: 'myplugin/page-search',
    	hook: usePageSearchCommandLoader,
    } );

    Contextual Commands

    Contextual commands have a higher priority and they always appear on the command palette list in a given context. For example, you can set a static command with the Site Editor context property, and it will always be visible when you’re in the Site Editor.

    In WordPress 6.3, there are only two contexts available:

    • site-editor. Makes the commands available when users browse the Site Editor with an open navigation sidebar.
    • site-editor-edit. Makes the commands available when users edit any content on the Site Editor.

    To make a command contextual, simply add the context property when registering the command. For example, here’s the same static command example we had before, but with the site-editor context applied:

    wp.commands.useCommand( {
    	name: 'myplugin/my-command-name',
    	label: __( 'Add new post' ),
    	icon: plus,
    	callback: ({ close }) => {
    		document.location.href = 'post-new.php';
    		close();
    	},
    	context: ‘site-editor’,
    } );

    Caching Improvements

    The WordPress Performance team made some enhancements to the core WordPress caching system. The notable ones are improvements in WP_User_Query caching and cache group changes.

    WP_User_Query Caching

    WP_User_Query was the remaining class lacking database caching capabilities. Thankfully, the WordPress performance team has implemented the update in WordPress 6.3.

    The implementation for WP_User_Query is similar to the other query classes – when a user sends a query, the cache stores the results from the database, and the same queries will get data from the cache. This update will reduce the overall database query load, improving the site’s performance.

    For the record, WordPress already implements query caching in other classes like WP_Comment_Query, WP_Site_Query, WP_Network_Query, and WP_Term_Query.

    New Groups in Cache API

    Since WordPress 6.3 implements query caching for WP_User_Query, the Performance must change the cache storing approach. As a result, the WordPress team introduced six new cache groups specific to the queries. Here are the new cache groups:

    • post-queries
    • term-queries
    • comment-queries
    • network-queries (global cache group)
    • site-queries (global cache group)
    • user-queries (global cache group)

    This update also provides greater control over cache objects, enabling you to specify expiration times for any cache group. You can also clear a specific cache group using the wp_cache_flush_group() function.

    Update Your Website to WordPress 6.3 Now

    Now that you know the nitty-gritty of WordPress 6.3, it’s time to prepare your website for the update.  

    Create a backup and use a staging environment to test WordPress 6.3 with a copy of your site. This will ensure that no compatibility issues that may affect your live site. If you find any critical error, be sure to troubleshoot it in the staging site.

    Suggested Reading

    Learn how to set up a WordPress staging environment and deploy the update to the live site.

    Once you’re sure your website runs smoothly with the new version, implement the update to your live site.

    The post WordPress 6.3 Update: A Detailed Overview appeared first on Hostinger Blog.

    Go to source

  • How to Accept Bitcoin Payments on Your WordPress Store

    With digital currency growing in popularity, accepting bitcoin payments on your WordPress store can be quite beneficial for your business. With global acceptance and cutting-edge technology, bitcoin is not only a great way to attract new customers but also reduce business costs.

    Accepting bitcoin payments on WordPress is an easy and straightforward process thanks to the many services that allow for a user-friendly experience that can get you started in no time.  

    In this article, we will discuss the many benefits of accepting Bitcoin payments, the things you will be needing, and one of the top WordPress plugins that allow you to accept BTC.

    Benefits of Accepting Bitcoin Payments

    There are many benefits to accepting Bitcoin payments on your WordPress store. Here are a few of the most important ones:

    • Increased customer base: Bitcoin is a global currency with an increasing user base, so accepting it on your eStore can boost sales as you get to tap into a wider customer base.
    • Lower transaction fees: The transaction fees involved with bitcoin is typically much lower than credit card fees. Plus you save up on bank fees for cross-border transactions, and currency conversion. This can save you money and you can pass those savings on to your customers or use it to grow your business.
    • Faster payments: Bitcoin payments are processed much faster than credit card payments. Fiat transactions typically take 5-7 days to settle and even longer if they are cross-border, while BTC payments can be settled in as little as 10 minutes. This can help you improve your customer satisfaction and reduce your payment processing time.
    • Secure payments: Blockchain is one of the most secure ways to transact in the current fintech ecosystem. And it is no surprise that many fiat institutions are looking to implement this technology into their systems. With bitcoin, no personal information is collected and all transactions can be validated on the blockchain.
    • No chargebacks: Bitcoin transactions are irreversible, which means that you are less likely to be charged back by fraudulent customers.

    Things You Need to Accept Bitcoin Payments

    In order to accept Bitcoin payments on your WordPress store, you will essentially need only two things:

    Bitcoin Wallet

    A Bitcoin wallet is an application that allows you to store, send and receive Bitcoin. Similar to a fiat bank account, a bitcoin wallet is your personal/business account you use to transact using BTC.

    There are numerous options available in the market today. Some of the top wallets include:

    • Trezor [Hardware]
    • Electrum [Desktop]
    • MyCelium [Mobile]

    Security-wise, choosing a hardware wallet is the way to go, but you would need to purchase these wallets as they come with dedicated hardware.  

    Since you are the sole owner of your wallet, its security is solely your responsibility. So do make sure that you follow some safety practices to keep your bitcoin safe.

    Bitcoin Payment Processor

    Bitcoin payment processor is a third-party service that allows you to accept Bitcoin payments on your website. There are multiple options in the market that you can choose from each offering varied features and services to fit the needs of your business.

    As an eCommerce merchant, it is vital to choose the right payment gateway for your business and when it comes to choosing the best bitcoin payment plugin there are a few functionalities that you must look for:

    • Direct-to-wallet: The payments should come directly to your bitcoin wallet, giving you complete control of the funds that you receive.
    • No KYC/AML: If you value privacy, choose a service that does not ask you to undergo ID checks.
    • Low Fees
    • Easy integration: Ideally, a dedicated WordPress plugin that can easily integrate with your online store.
    • Secure and Safeguarded transaction
    • Excellent customer support

    Accept Bitcoin Payments using Blockonomics

    Blockonomics, one of the leading bitcoin payment gateway has made quite a name for its decentralized nature and easy integration, and it pretty much checks all the boxes mentioned above. They provide a dedicated WordPress plugin that can be integrated with your eStore in a matter of minutes.

    One savvy feature that stands out with this plugin is that the entire checkout experience happens within your website and there are redirects to external pages, making the checkout more secure.

    Blockonomics charges a flat rate of 1% per transaction with the first 20 transactions free. This makes it an affordable option for businesses and individuals who are looking to accept bitcoin payments without incurring high transaction fees.

    Conclusion

    Accepting Bitcoin payments on your WordPress store can be a great way to attract new customers and increase your sales. With the growing popularity of cryptocurrency, you are not only future-proofing your business but also partaking in the decentralized finance revolution.

    You enjoy low transaction fees, secure and faster payments, global acceptance, and complete control of your funds with bitcoin. And the best part is that you can get started in a matter of minutes, all you need is a bitcoin wallet and payment plugin.

    Blocknomics WordPress plugin is a great option if you are looking for a secure, fast, and affordable way to accept Bitcoin payments. The installation takes minutes and you have a 24X7 dedicated support channel to assist in any way possible.

    Go to source