Tag: wordpress

  • How to Fix Upload Max File Size Error in WordPress

    There are several ways to fix the “upload max file size” error in WordPress:

    1. Modify the .htaccess file: Add the following code to your .htaccess file to increase the max file size:

    php_value upload_max_filesize 64M

    2. Edit the PHP.ini file: Find the “upload_max_filesize” value and increase it to the desired file size.

    3. Use a plugin: There are several WordPress plugins available that allow you to increase the max file size, such as Increase Upload Max Filesize.

    4. Contact your hosting provider: If you are unable to access the .htaccess or PHP.ini file, you can contact your hosting provider and ask them to increase the max file size for you.

    5. Check your theme and plugin’s setting: Some theme and plugin also have the option to set the maximum upload file size, you might want to check it.

    It’s important to note that increasing the max file size may have an impact on your server’s performance, so be sure to use a reasonable value that works for your website.

  • How to Use the WordPress Site Logo Block

    One of the most essential parts of running a WordPress site is branding, and nothing stands out more than a logo. Your logo defines your brand, so you need to use it properly. In this post, we’ll tell you how you can implement a logo into your website using the WordPress site logo block. We’ll also cover the block settings available and give you some helpful tips for using a logo effectively.

    What is the WordPress Site Logo Block?

    The site logo block in WordPress is one of many site blocks available in the WordPress editor with the rise of full site editing. The block gives you the ability to add your site’s logo to a page template or main header in WordPress.

    Wordpress site logo block preview

    The site logo block is also dynamic because it can pull your site logo from your website’s data as dynamic content. So changing your site logo via the site logo block or on the backend will automatically update all iterations of the site logo block throughout your site. Furthermore, when using the site logo block on a template, you have easier control over your global logo design.

    It’s important to note that the Site Icon, the smaller image seen in your dashboard and browser tabs, etc., is distinct from the Site Logo. However, the site logo can also serve as the site icon if you choose by updating the block settings tab which we’ll get into further below.

    How to Add the Site Logo Block to your WordPress Header

    For this example, we will show you how to add or customize the site logo on your WordPress header in a template using the Twenty Twenty-Two theme. Here’s how to do it.

    From the WordPress Dashboard, navigate to Appearance  >  Editor.

    go to WordPress editor

    There should already be a site logo inside the header area of the page template on the left of the Site Title. You can also open the list view to find it as well.

    site logo in list view

    If you want to add the Site Logo block to the template, you can click on the +  block inserter icon.

    click block inserter

    Then search for “Site Logo” and click on it and/or drag it to your desired location to add the block to your page.

    If you haven’t set your logo, you can upload it after clicking the upload sign on the Site Logo Block.

    upload logo

    Once you change your site logo via the site logo block, all other copies of the site logo will display the same image. This is the dynamic functionality of the block in action.

    Site Logo Block Settings and Options

    The Site Logo Block comes with additional settings and options that make it easy to customize for your website. Here is a brief overview of the settings available.

    Toolbar Settings

    If you hover over the block, you’ll see a formatting menu that includes the following options:

    1. Transforming the block into another type of element
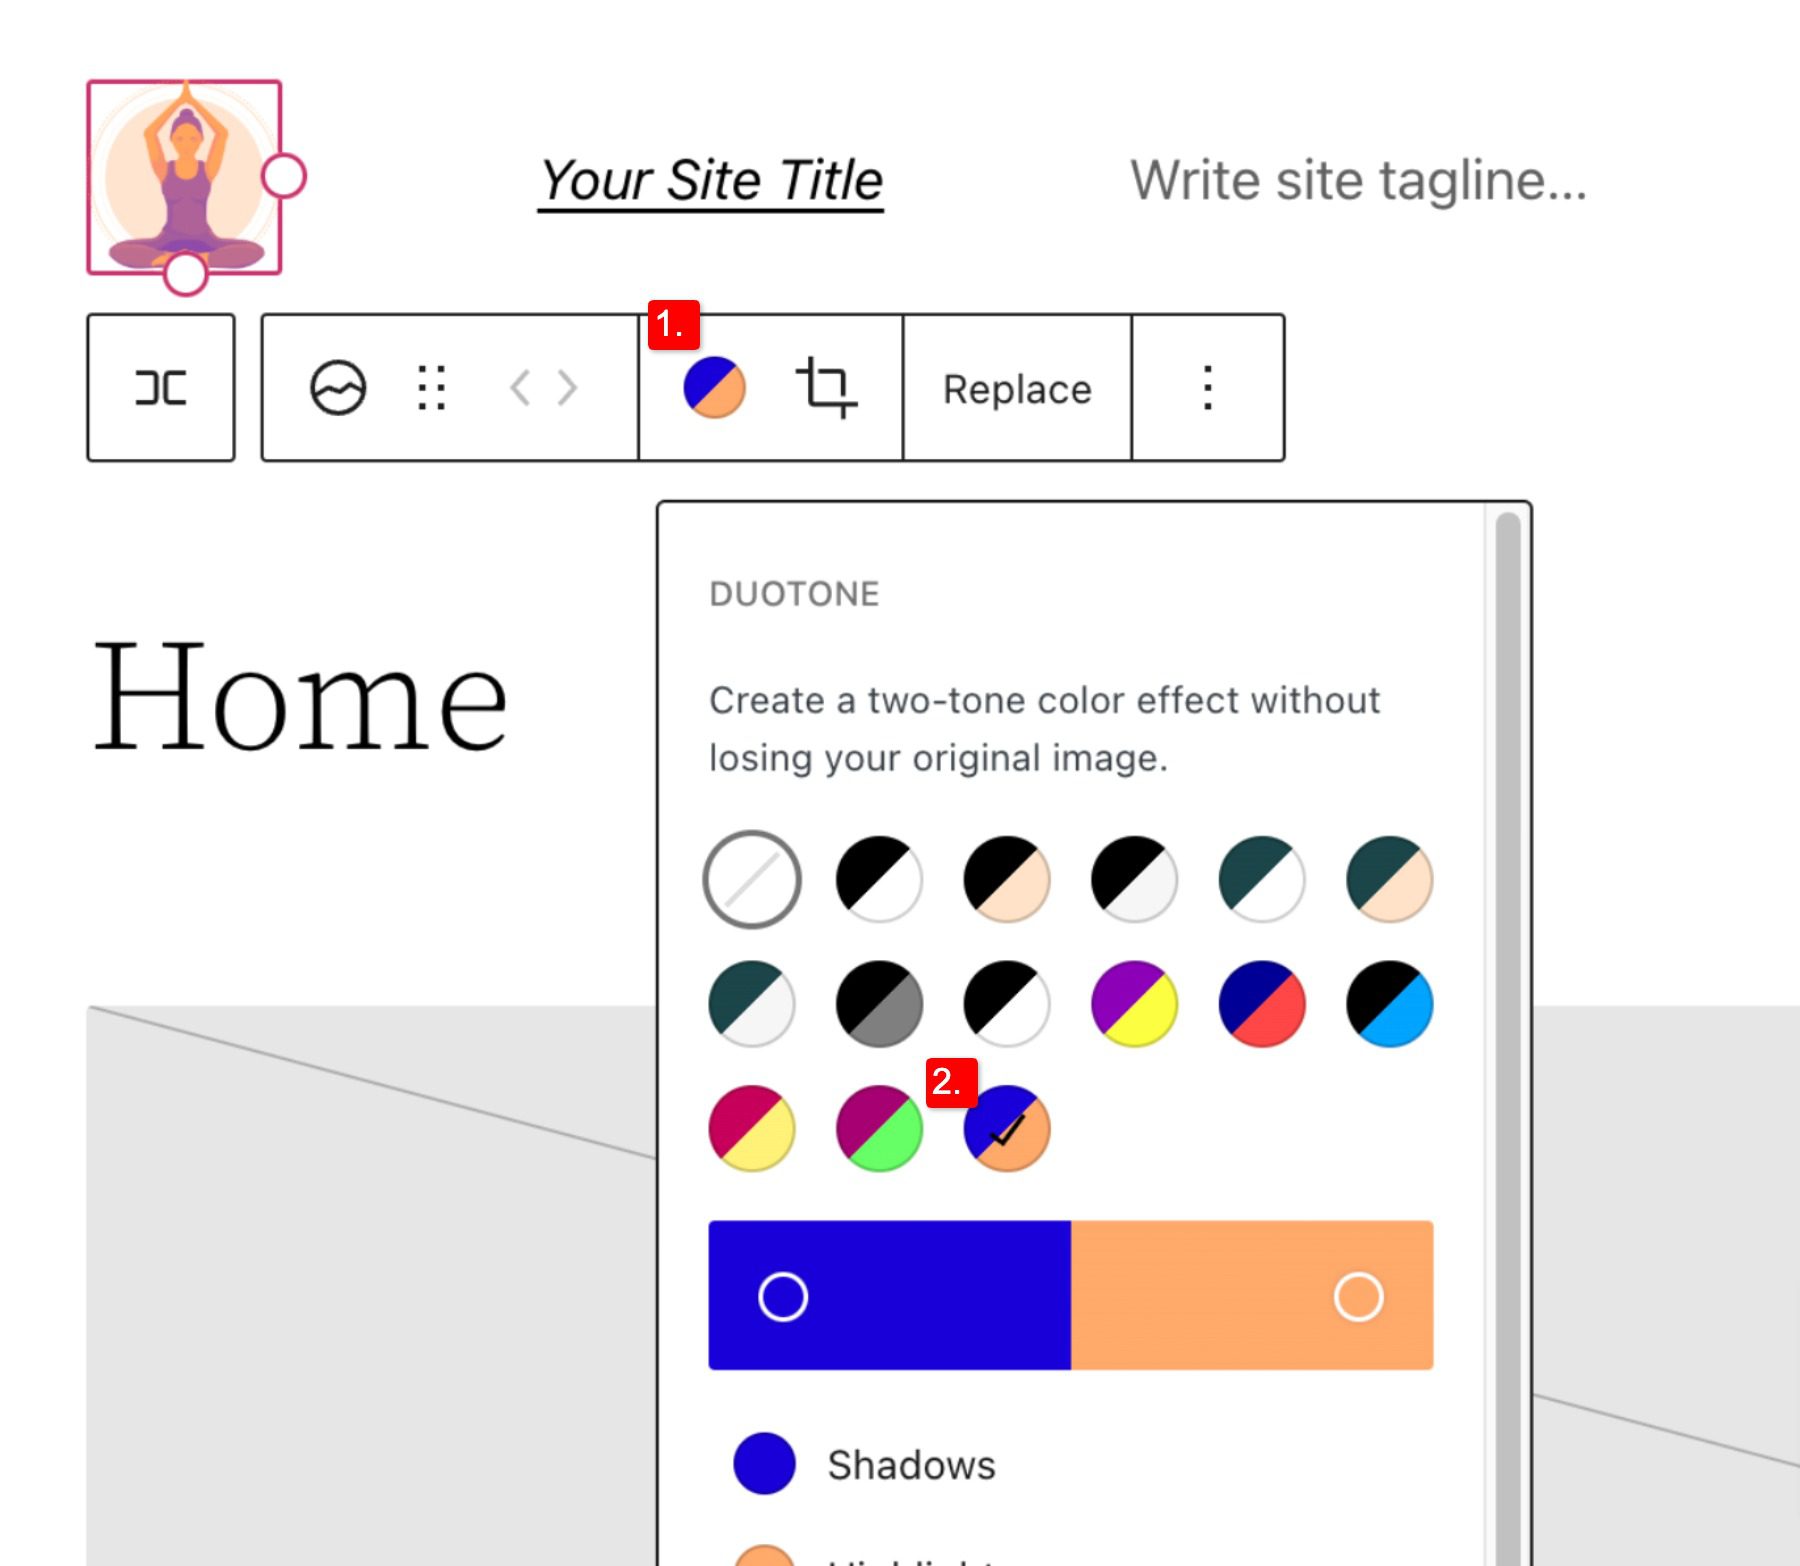
    2. Adjusting the shadow, highlights, or tone of your logo
    3. Changing the zoom, aspect ratio, and rotation of your logo
    4. Replacing your logo and image
    5. Shows more advanced options such as copy, duplicate, move, lock, group, add to reusable blocks, or remove the block.

    Logo setting options

    As you may have noticed these tools can help you adjust the look of your logo so that you can get the placement and design to match your website’s style.

    To change the color of the logo image click the duotone tool and select your desired color scheme.

    To set your colors, select the dots within the color bars:

    Duotone continued

    Site Logo Block Settings

    If you open the additional options or block settings toggle in the sidebar, you can find more block settings you can customize.

    Advanced settings

    From here you can change your logo to:

    1. Appear rounded instead of the default square or rectangle setting
    2. Adjust the image width to create a larger logo (it’s important to choose the best size for your logo)
    3. Link image to home,  if enabled will navigate users back to your home page when your logo is clicked
    4. Open in a new tab, if enabled will open your home page in a new tab
    5. Use as site icon, if enabled will use your logo as the site icon or favicon

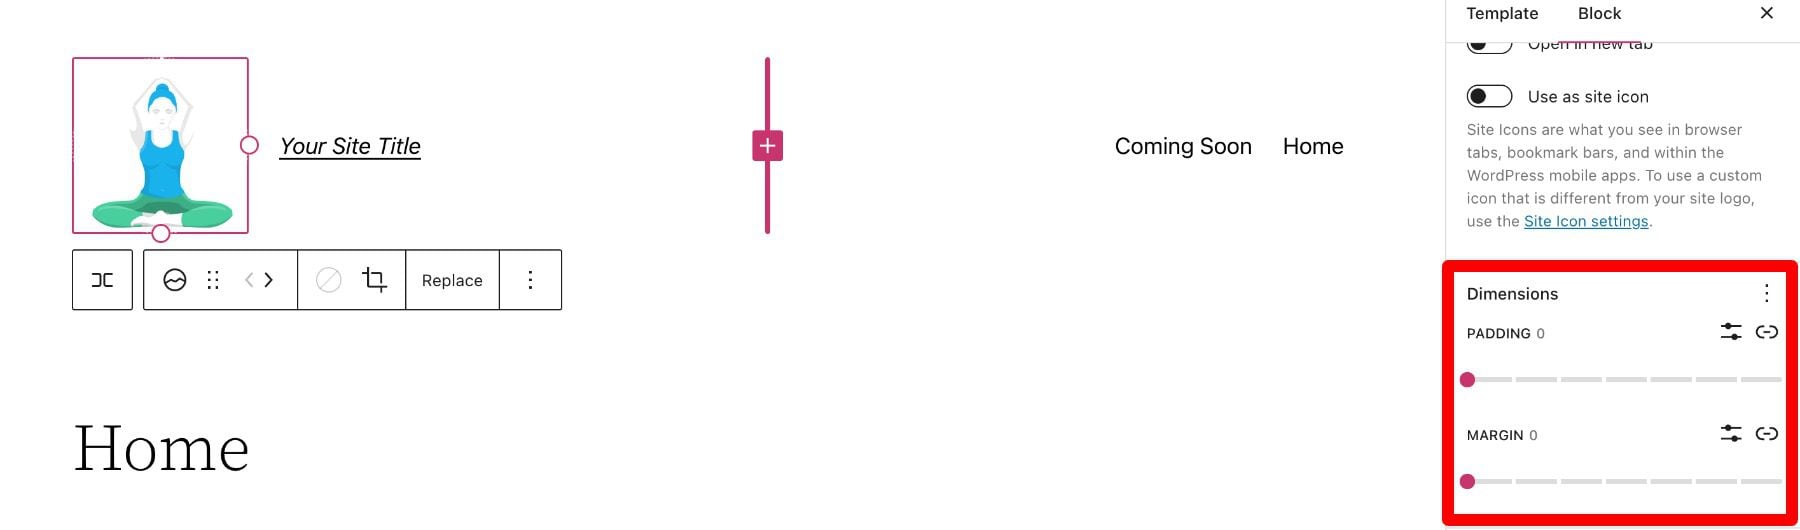
    Below the settings section, you can find the dimensions tab where you can adjust the padding and margin of your logo.

    Dimensions

    That covers everything you need to know about the settings available for your logo block, so you can customize your logo’s style to match perfectly to the rest of your site’s aesthetic. Now, let’s delve into some tips for how to use this block effectively.

    Tips and Best Practices for Using the Site Logo Block Effectively

    Using the site logo block is pretty straightforward to use, but it’s still important to keep some things in mind.

    Optimize the Logo Image Before Uploading

    Just like with any image uploaded via WordPress, it’s important to optimize your logo before you upload it to your site logo block. This will improve your load speeds and be beneficial for image SEO as well. Your logo should be a PNG, and the file shouldn’t be too big, we recommend using a web tool like TinyPNG, to help compress your image without losing quality in the process.

    Match Your Website’s Style

    Assuming your website already has a design and scheme, your logo mustn’t contrast too much with the style already in place on the rest of your site. So take a look at the colors and layout of your website and see if you can work your logo in as seamlessly as possible.

    Prominently Display Your Logo

    Making sure you use your logo properly after creating it is an essential step in effectively branding your website. In most cases, your logo should be displayed on your WordPress header area/template so that it can be seen on all the pages of your site. Also, it’s best practice to make your logo link back to your homepage to help with user flow and to constantly draw the user’s eye to your logo.

    Frequently Asked Questions About the Site Logo Block

    After you complete the difficult task of creating your logo, using the logo block in WordPress is relatively hassle-free. Still, as with anything, some questions need answering. Here are some answers to frequently asked questions about the logo block.

    How Do I Change The Site Logo?

    To replace the site logo, click on the site logo block and then click on Replace in the toolbar settings. There you can add one from your media library, upload a new one, or reset the site logo to the default.

    When Should I Use the Site Logo Block?

    Your logo is the symbol that represents your website and, therefore, should be prominent on nearly every page of your site. This is why we recommend putting your logo in the header area, where it can be used for both navigation (Home button) and branding purposes.

    What’s the Difference Between a Logo and a Site Icon?

    A site icon is used as a browser and app icon for your site; you may see it next to the tab in your browser. The logo for your site isn’t necessarily used as the site icon but can be activated in the logo block’s advanced settings.

    Using Divi to Add a Site Logo to Your Global Header in WordPress

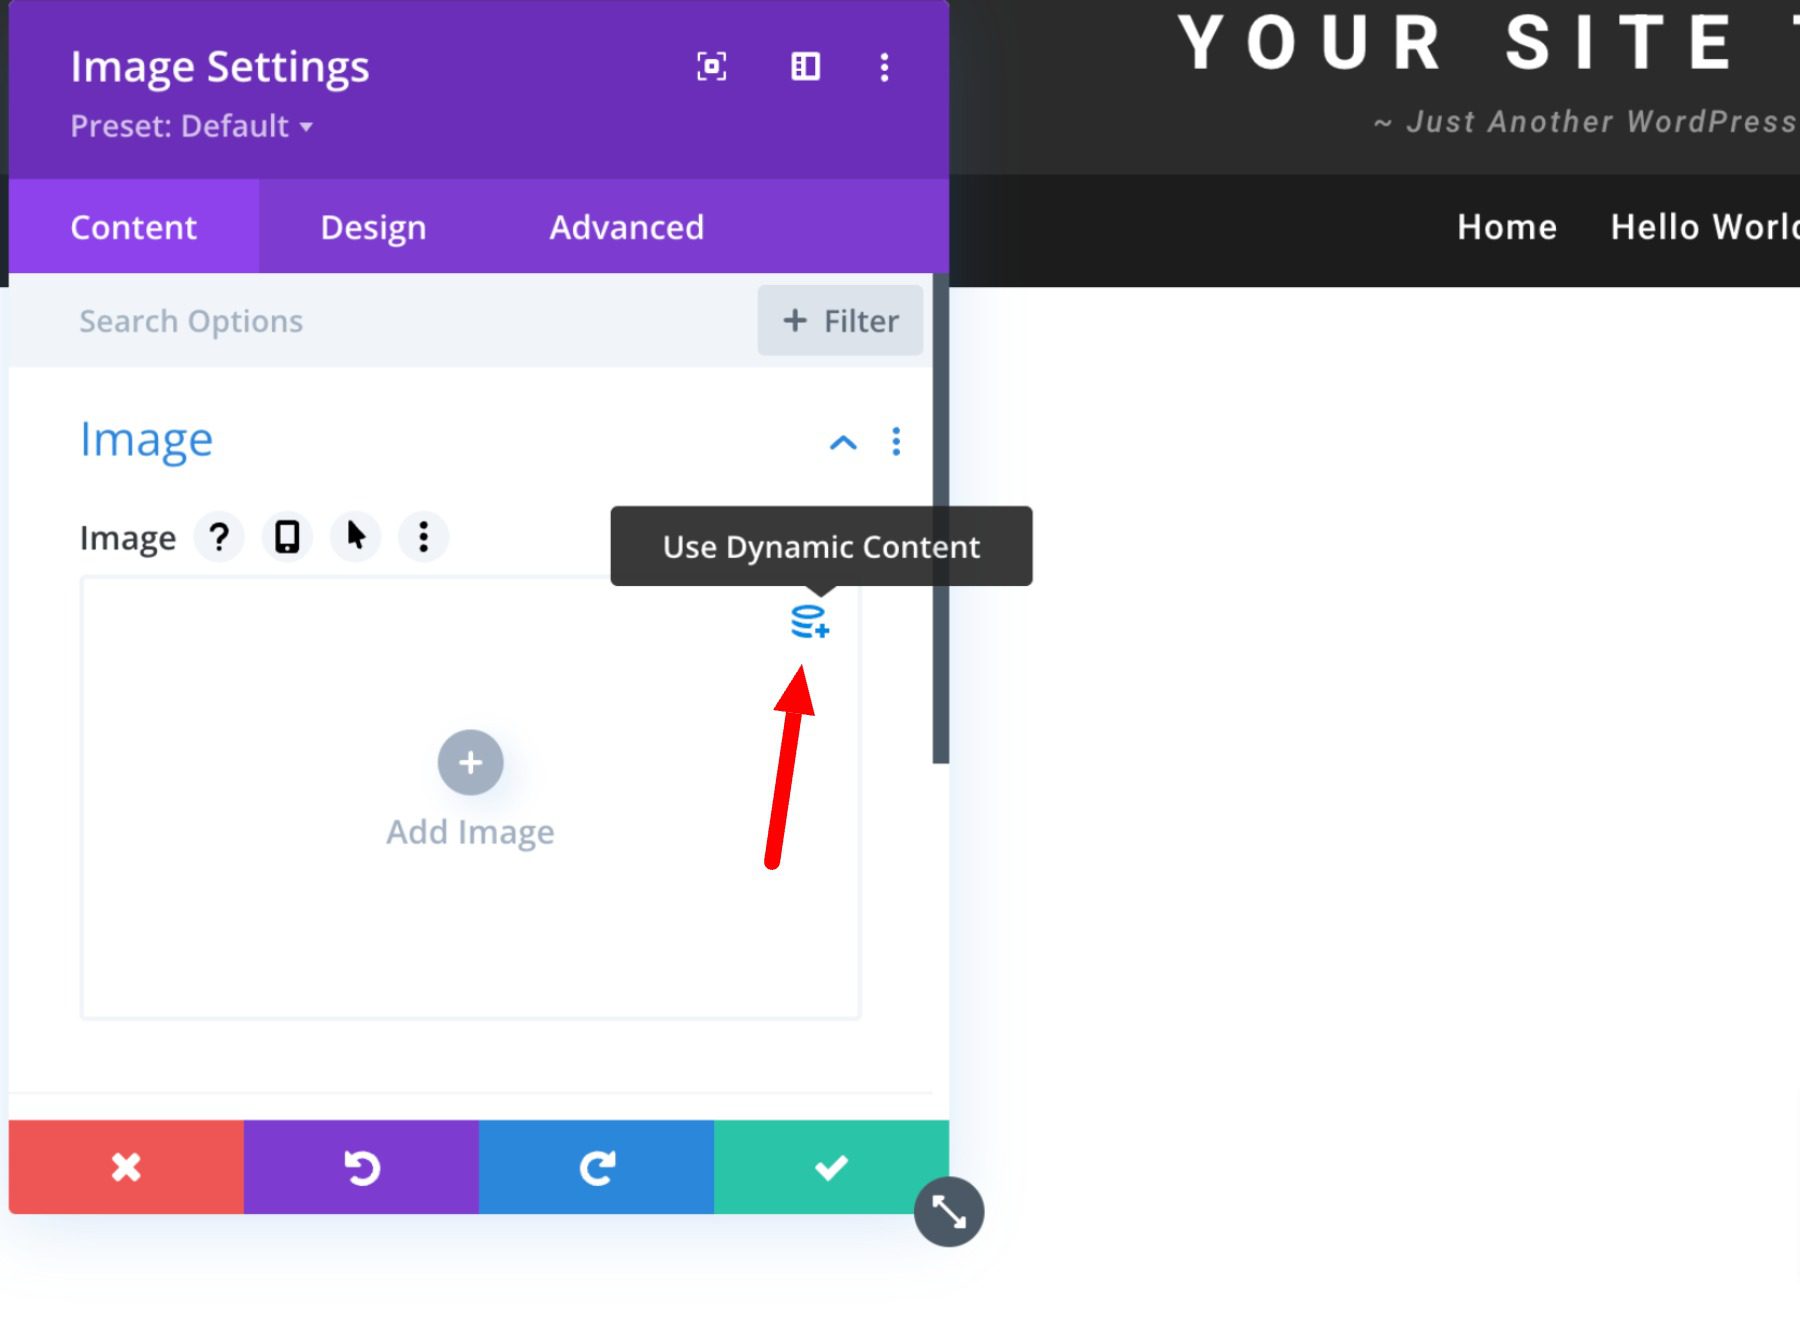
    When using Divi, you can use the Divi theme builder to add a site logo to your global header in just a few easy steps. You can start by clicking the edit button next to Global Header in your default website template.

    Now, you simply add an image module to the header and select the Use Dynamic Content option in the top right corner.

    You will then be prompted to select from a list of all dynamic content that is accessible. Select Site Logo to add the dynamic logo to your header.

    Learn more about using dynamic content with Divi here.

    Conclusion

    It is impossible to overstate the significance of your brand’s logo. However, you need a systematic approach to branding your site effectively. This is especially true if you want it to leave a lasting impression on audiences. Hopefully, some of the tips mentioned above can help you create your ideal logo and use the logo block correctly and effectively.

    If you have any other tips on making memorable logos, leave them in the comment section below!

    Featured Image via VectorMine / shutterstock.com

    The post How to Use the WordPress Site Logo Block appeared first on Elegant Themes Blog.

    Go to source

  • How to Fix Syntax Errors in WordPress

    There are a few ways to fix syntax errors in WordPress:

    1. Access your site via FTP and navigate to the file that is causing the error. Once you have located the file, open it in a text editor and fix any syntax errors.

    2. Use the “WordPress Debugging” feature to identify and fix syntax errors. To enable debugging, you will need to add the following line of code to the wp-config.php file:

    define( 'WP_DEBUG', true );

    This will display any errors on the front-end of your site, making it easier to identify and fix the problem.

    3. If the errors are in the database, you can access and fix them using a plugin such as “WordPress Database Error Fix”. This plugin can fix syntax errors in the database, as well as repair and optimize it.

    4. If none of the above methods work, you may need to restore a previous backup of your site. This will revert your site to a state before the error occurred and will ensure that your site is up and running again.

    Note: Always remember to take a backup before making any major changes to your site to prevent data loss.

  • How to Customize Your WordPress Header (in 2023)

    Customizing your WordPress website’s header has gotten much easier with the introduction of full site editing. Now, it’s possible to create and customize headers natively in WordPress using the block editor without having to resort to custom code or plugins.

    In this post, we’re going to walk through how to create a custom header in WordPress so that you can easily make the changes needed to your own website header. Let’s get started.

    What is a WordPress Header

    WordPress header

    In WordPress, the header is quite possibly the most important element. It houses a navigation menu, a logo, and other important elements such as social media icons, call-to-action buttons, or even business information. Since the WordPress header is the first thing your site visitors see, it’s important to make a good first impression. It should contain everything a visitor needs to see – pages, contact information, branding elements, or other important information.

    Thankfully, you are no longer married to the WordPress customizer. With the development of full site editing, it is now possible to design and implement your site’s header, or any other element, in any way you wish.

    How to Customize WordPress Header Using Full Site Editing in 2023

    Full site editing in WordPress is a bit different than the WordPress themes of old. While you can still use the WordPress Theme Customizer, it’s no longer necessary like it once was. The creativity-limiting customizer has been replaced with a new experience – the site editor. While still in beta, it is the future of WordPress customization. For instance, when creating a new header in the Twenty Twenty-Three Theme, the site editor is quite useful for a number of customization options including your header’s fonts, colors, button styling, and more.

    Accessing the WordPress Header in the Site Editor

    In order to access the WordPress header, you’ll need to first navigate to Appearance > Site Editor.

    WordPress site editor

    When the editor loads, you’ll be automatically taken to your home settings. To get to the header settings, you can either click the WordPress logo in the upper left corner of the editor, or select the dropdown arrow, then choose Browse all templates.

    browse all templates

    Next, click on template parts in the WordPress menu. Finally, click Header to edit the site’s header.

    edit WordPress header

    Styling the Header

    simple WordPress header

    In the Twenty Twenty-Three theme, the header is very basic. That being said, you have the option to add or delete any WordPress blocks you’d like. For the sake of this tutorial, we’re going to show you how to edit the header template part of the Twenty Twenty-Three theme to create a simple, yet effective custom header for your website.

    To get started, let’s take a look at the header’s structure by clicking the list view icon in the template editor. You’ll see that there is a group block that contains a row with two blocks – the page title and navigation block. The row is already structured the way we want with a centered vertical alignment, and the content is set to full width. So basically all we need to do here is make a couple of changes to this row.

    WordPress list view

    First, we’re going to delete the site title block, then replace it with the social icons block. To do this, simply click on the site title block in the list view, then expand the ellipsis menu.

    expand ellipsis menu

    Finally, click Remove Site Title to delete the block from the header.

    Remove site title block

    Adding The Social Icons Block

    The first block we’re going to add is the social icons block. Click the plus icon next to the Page List block, then start typing social icons. Simply click to add it.

    add social icons

    To add an icon, click the plus icon to reveal the modal box. Type Facebook to bring up the Facebook icon. Simply click to add it. Next add the Instagram, YouTube., and TikTok icons repeating the previously mentioned steps.

    choose social platforms

    Styling the Social Icons Block

    Next, we’ll style our icons. There are a number of options with the social media block including which layout style you’d like – either default, which is a logo enclosed in a circle, logos only, or pill shape. Next is layout justification and orientation, which controls whether your blocks will be displayed horizontally or vertically, and how you’d like them to be justified. Then there are link settings. Here you can choose to open the links in a new tab, and choose whether to show the labels.

    social media styles

    Depending on which layout style you choose, you’ll have different color choices. For example, when selecting logo only, you’ll only be able to add color to the logo itself. If you choose default or pill shape, you can choose both icon color and background color. The available colors are pre-selected in the Twenty Twenty-Three theme. Should you choose to add more, you’ll need to add them to your theme’s theme.json file.

    theme colors

    The final settings group is Dimension, which enables you to control how much spacing to set between each social icon.

    social icon padding

    In this tutorial, we’re going to choose the logo-only style, set the justification to space between items, and choose the horizontal orientation. This will evenly space our icons, display them horizontally, and show only the icon itself without a background. Under link settings, set it to open links in a new tab. For color, choose white. Finally, add 15px block spacing under the dimension settings.

    social icon settings

    Setting A Background Color to the Row

    Next, we’re going to add a background color to the row. In the list view, select the row block. In additional settings, locate background under color. Click inside the base box and add #8D4CE6 as the color.

    background color row

    Adding an Additional Row to the Header

    Our header requires a new row to be added. We’re going to be adding a site logo block, as well as a call to action button, so we need a place for these to live. It’s good to remember that when creating custom headers, adding rows is a good way to keep your blocks organized.

    To add a new row, click on the block inserter icon.

    WordPress block inserter

    Next, type row into the search bar or /row directly into the page editor to insert a new row.

    insert row block

    Moving Blocks Between Rows

    For the next step, we are going to move our navigation block to our newly created row. Ultimately, we’ll have social icons and a call to action button in the top row, then a site logo block and navigation block on our second row. To move the navigation block, click on it in the page editor. Click the drag icon in the toolbar settings for the navigation block and drag it to our newly created row.

    drag blocks

    Add the Button Block

    The next step in creating our header is to add the button block to the first row. Click the block inserter, then search for the button block in the search bar. Drag the button block to the first row. We’re going to style our button as follows. Type in BOOK NOW! for the text, then add #8D4CE6 for the text color, assign #ffffff for the button background color, and give the button a border radius of 100px. Leave the button text size set to small. Your button should now look like the screenshot below.

    button settings

    Add the Site Logo Block

    The last block we’re going to add is the site logo block. Using the block inserter, search for and select the site logo block. Drag it to the second row of the header.

    add site logo block

    To add a new logo, click the upload button within the site logo block. You can either choose an image already in your media library or upload a new one.

    add logo to WordPress header

    For the logo settings, ensure that link image to home is enabled, and choose the width for your logo. Optional settings include whether to open the link in a new tab or use the logo as the site icon. Additionally, you can set the margin and padding for the logo under the dimensions settings.

    site logo settings

    You may also want to consider using the best logo size for your site.

    Final Header Settings

    Before our header can be completed, there are a few settings we need to check. First, ensure that the 2nd row is set to full width to match our first row. Secondly, make sure that the justification is set to space between items. Lastly, set the row alignment to align middle.

    row alignment settings

    That’s it! As you can see, accessing and customizing your website’s header can be accomplished in a few short steps using the WordPress site editor. Adding, editing, moving, and resizing blocks is simple, and allows you to be creative to create a custom header for your site.

    Creating Multiple WordPress Header Template Areas

    Another great feature of the WordPress site editor is the ability to create different headers for different templates. Additionally, WordPress offers some pretty unique pre-made headers in the form of block patterns, that make it quick and easy to change the look of your website’s header. Let’s look at how easy it is to create a different header for your site. We’ll use the single template to illustrate how to create a different header that will be applied to posts on the website.

    First, navigate to Templates in the site editor. Next, select the Single template.

    edit the single template

    When you open the single template, you’ll see that the header we created in the last section is currently applied. It’s important to note that you should not edit the header on this template or any other template because changes you make to the header will be applied across the site. Instead, we’ll delete the header we created from this template, then create a new one that will only apply to the template we’re working with.

    To delete the header, click the list view icon. Next, select the header, then click the ellipsis menu to open the settings. Finally, click remove header.

    remove header template part

    Adding A New Header To A Template

    Next, we’re going to add a new header to the single post template. Click the block inserter to add a new block. Next, search for and select the header block to add it to the template.

    add header

    When creating a new header, there are a couple of options. You can choose from a pre-made pattern, choose a header that you have already created, or create a new one.

    header options

    Using a Premade Pattern Header

    To choose a WordPress block pattern, simply navigate to the patterns tab, then search for headers. All of the available header patterns for the Twenty Twenty-Three theme will be listed there. Alternatively, you can click the explore button to search for and add a header from the WordPress pattern library.

    NOTE: Not all header patterns will include navigation/menu elements. You may need to search for navigation patterns to find what you are looking for.

    explore WordPress header patterns

    Creating a New Header From Scratch

    If you want to create another header from scratch, rather than use a pattern, you can choose to start with a blank header. By choosing start blank, you’ll be prompted to name your template part. Name it “single post header”, then click create.

    name your header

    Once your header is in place, simply click on it in the page editor to start adding blocks. Alternatively, you can click the edit button to be taken to the template editor, where you can add any rows or blocks you’d like to create a completely new header.

    edit new header

    Using Divi to Add and Customize WordPress Headers

    Divi by Elegant Themes

    Divi offers a similar way to add custom headers to your WordPress website, but it kicks things up a notch. Divi is the most advanced full site editing theme in the WordPress universe. With over 200 design elements, a fully responsive framework, and the ability to customize literally every aspect of your site without a single line of code, it is the ultimate web designing experience available.

    Divi uses the Theme Builder to give you the ability to create custom headers, then apply them to different templates on your website. Headers can be created and applied to your pages, posts, archive pages, 404 pages, search results pages, projects, category pages, author pages, and much more.

    Divi template builder

    For more info, check out these 11 header types you can create with Divi.

    FAQs About WordPress Headers

    We’ve done our best to be as thorough as possible to give you the knowledge you need to build a custom WordPress header from scratch. That being said, we have put together some common questions regarding WordPress headers to give you a better understanding of how they work.

    Will Customizing One Header Affect All Headers Throughout My Site?

    Well, it depends. If you create a custom header, then try to change any aspect of it in a different template, then yes, it will be affected wherever that header is in place across your site. That being said, you can create multiple headers on your website and edit them without worry. For example, if you create a header under template parts, that is considered your global header. However, you can create a different header and apply it to certain templates.

    As previously mentioned, you can edit the single post template (or any other template), delete the header currently installed, and create a completely new one that is only applied to that template.

    How do Header Template Parts Work?

    Template parts are sections of your website that are repeated throughout the site. Both headers and footers are considered template parts. Template parts can be global, meaning they apply to a certain section on every page and post on your site, or only apply to sections on certain pages. For example, you can have a header template part that is set globally to apply everywhere, yet another template part that you have assigned only to certain pages, such as the 404 page.

    What Kind of Blocks can I use in a WordPress Header?

    You can use any block in the WordPress library within a WordPress header. Although some blocks make more sense than others. You should definitely incorporate a navigation block, and site logo block, and consider using others such as social media icons, business contact information, and buttons. For more, see our tutorials on WordPress Blocks.

    How do Global Site Styles affect my header style?

    Global site styles will automatically be applied to every block within your header. That being said, you have the ability to override global block styles in your header by assigning different colors, text sizes, dimensions, and more to the blocks in your header.

    Customizing Your Website’s Header Is Easier Than Ever

    Thanks to full site editing, it’s possible to make your website’s header look and function any way you’d like. You’re no longer stuck with a boring header where it’s impossible to make even the smallest of changes without a ton of coding. Using a full site editing theme such as Twenty Twenty-Three, or a more robust theme like Divi, gives you more options to style your header to match your branding, add important elements, and make a good first impression.

    What tools do you use to customize your website’s header? Let us know by sounding off in the comments below.

    The post How to Customize Your WordPress Header (in 2023) appeared first on Elegant Themes Blog.

    Go to source

  • 6 Ways to Establish and Protect Your Brand Reputation

    A great brand reputation is something that every business strives for, but it can mean different things to different businesses. There are many factors that contribute to a positive brand reputation, and what makes one company’s reputation stand out may not be the same for another.

    The post “6 Ways to Establish and Protect Your Brand Reputation” first appeared on WP Mayor.

    Go to source

  • How to Fix Connection Timed Out Error in WordPress

    There are several things you can try to fix the “connection timed out” error in WordPress:

    1. Increase the PHP execution time limit

    You can increase the PHP execution time limit by adding the following line of code to your wp-config.php file:

    set_time_limit(300);

    This will increase the time limit to 300 seconds (5 minutes).

    2. Increase the memory limit

    You can increase the memory limit by adding the following line of code to your wp-config.php file:

    define('WP_MEMORY_LIMIT', '256M');

    This will increase the memory limit to 256MB.

    3. Check your plugins

    The “connection timed out” error can sometimes be caused by a plugin that is consuming too many resources. Try deactivating all of your plugins and then reactivating them one at a time to see if the problem is fixed.

    4. Check your theme

    If deactivating your plugins does not fix the problem, try switching to a default WordPress theme (e.g., Twenty Twenty) to see if the problem is caused by your theme.

    5. Check with your hosting provider

    If none of the above steps fix the problem, it’s possible that the issue is with your hosting provider. You may want to contact your hosting provider to see if they can help you resolve the issue.

    I hope these suggestions help!

  • How to Fix the “Error Establishing a Database Connection” in WordPress

    There are a few possible reasons for the “Error establishing a database connection” message in WordPress. Here are a few steps you can take to try to fix this problem:

    1. Check your database login credentials (username and password) in the wp-config.php file to make sure they are correct.

    2. Make sure your database server is running. If you are hosting your own website, you will need to ensure that the MySQL server is running.

    3. If you recently imported your database or installed WordPress, it’s possible that the MySQL server has gone down. Try restarting the MySQL server and see if that fixes the problem.

    4. If you are using a hosting provider, they may be experiencing server issues. Contact your hosting provider and ask them if they are aware of any issues with their servers.

    5. If none of these steps help, you may need to troubleshoot further by checking your server logs for more information about the error.

    I hope this helps!

  • How to Create a WordPress Theme Preview Image

    To add an image to the theme preview in WordPress, you can use the screenshot file:

    1. Create an image that you want to use as the theme preview. The image should be 880 pixels wide and 660 pixels tall.

    2. Save the image as a PNG file and name it screenshot.png.

    3. Place the screenshot.png file in the root directory of your theme.

    4. If you are uploading your theme to the WordPress theme repository, the theme preview image will be automatically generated from your screenshot.png file.

    If you are distributing your theme through other means, you may need to specify the theme preview image in the style.css file. To do this, add a Screenshot header to the top of the style.css file and specify the path to the screenshot.png file as the value:

    /*
    Screenshot: https://example.com/wp-content/themes/your-theme/screenshot.png
    */
    

    I hope this helps!

  • How to Add Internal Links in WordPress the Easy Way (Using Link Whisper)

    When it comes to SEO, internal links are critically important to the success of your website. That being said, adding internal links to WordPress can be a daunting task, especially if you have tons of content that needs to be optimized. Thankfully, there is an easy way to set internal links in WordPress automatically with the Link Whisper plugin. In this post, we’ll demonstrate how to use Link Whisper as an essential part of your SEO link strategy. Let’s get started.

    What are Internal Links?

    Internal links are links that guide a user to another post or page on your website. They can be inserted into posts, pages, images, menu items, or projects in WordPress. Without them, your missing opportunities to send your site’s visitors to other areas of your website you wish them to visit.

    Why are Internal Links Important to SEO?

    Internal links help SEO

    Using internal links in WordPress is a huge piece of the SEO puzzle. Internal links help SEO by alerting your site’s visitors to other areas of your site that may be of interest to them. You can use them to highlight products, services, or a post or page that is relevant. You see, when search engines crawl your site, they aren’t only looking for keywords. They also look for both internal and external links. Internal links help Google to understand which posts and pages are most important on your website. Plus, pages with internal links are much more likely to be indexed, increasing the chances of your content ranking higher in SERPs. In short, Google likes them.

    Using internal links is typically a good way to increase traffic to your site, but there are caveats if not done properly. You should ensure that you don’t put too many links in one page. Doing so can frustrate and confuse your site’s visitors. Also, make sure your links are relavant. If not, you could actually hurt your SEO. Knowing the importance of internal linking, you’re probably thinking to yourself, this could take forever with all the content I have on my site. No worries. We’re going to show you how to add internal links to your site automatically, using the Link Whisper plugin.

    What is Link Whisper?

    Link Whisper plugin

    Link Whisper is a WordPress plugin that helps you add internal links to your content. Link Whisper will offer suggestions on where to add links, as well as what anchor text to use. Additionally, it helps to identify orphaned pages in your site, which can limit your chances of ranking high in SERPs. Link Whisper can also suggest links as your write new content, which is a huge time saver. Also, you can run a site scan to help identify which pages actually need them.

    Link Whisper free

    Link Whisper is offered in two variations. First, you can download the free version in the WordPress repository. It comes with some very basic features that provide you with automatic links suggestions as you write, a well as internal link reporting. In the reports, you’ll get insight on pages with orphaned content, as well as outbound internal and external links.

    With the premium version of the plugin, you’ll get a few added bonuses. In addition to the features on the free version, you’ll get more in-depth reporting on links, as well as a robust auto-linking feature that enables you to add links in one click. You just input the keyword of your choice, specific the URL, and Link Whisper does the rest for you.

    For this post, we’re going to show you how to add internal links using both the free and premium versions of the plugin.

    How to Add Internal Links in WordPress Using Link Whisper Free

    In order to use Link Whisper correctly, there are a few steps to take. Let’s walk through them one by one so you can get comfortable using it on your website.

    1. Install the Plugin

    Log in to your WordPress website and navigate to Plugins > Add New. Enter for Link Whisper in the search bar. When the plugin appears, click Install Now to install the plugin.

    Install Link Whisper

    2. Configure Link Whisper Settings

    Next, navigate to Link Whisper > Settings in the WordPress dashboard. There are a number of settings here, some of which you may want to adjust depending on your setup. First, you can choose whether to ignore numbers. By default, this setting is enabled. Next select your language. Then, you can choose from a list of common words you can ignore. Under Post Types to Create Links For, choose any that you wish to omit from Link Whisper. This will vary depending on what taxonomies you have on your site. The next setting lets you choose the term types to create links for.

    The next setting is a pretty important one. Link Whisper allows you to choose how many sentences to skip when it adds links. By default, there is selected. The reason this is important is to not add too many internal links to any one post or page. As previously mentioned, having too many links can confuse your site’s visitors and Google. Too many links can’t keep your site from ranking well. The last option, Delete all Link Whisper data, should only be enabled if you plan to start over on your links, or when planning to delete the plugin.

    When finished with your settings, click the SAVE button.

    Link Whisper internal links WordPress settings

    3.Internal Link Reporting

    Next, navigate to Link Whisper > Report. When the plugin was installed, it automatically ran a report of all posts and pages on your site. On the reporting page, you can see a list of any inbound internal, outbound internal, and outbound external links on your site.

    4.Review Link Suggestions

    In the free version of Link Whisper, you can navigate to any post or page on your site and scroll down to the Link Whisper settings underneath your content. You will find suggestions for internal links to other posts or pages depending on keywords. Link Whisper will highlight the text in your content where it thinks an internal link should be.

    Link Whisper internal link suggestions

    5.Adding an Internal Link

    With the free version of Link Whisper, you take the link suggestions given in the previous step and add the suggested links to your page or post. Although it won’t add it for you, you can easily copy the link in the suggested links area then place the link in the corresponding suggested text on your page.

    Copy link suggestion

    Adding Internal Links with Link Whisper Premium

    The premium version of the plugin makes it simple to add internal links in WordPress, both inbound and outbound. Repeat the steps to run the initial link scan after plugin installation, then navigate to the links report in Link Whisper > Reports.

    internal links

    Next, choose whether you’d like to add inbound internal links or outbound internal links. Then, click Add on the post or page you’d like to add links to. For this example, we will add outbound internal links to a post.

    Add outbound internal links

    Link Whisper will open the post using the page editor. Scroll down to the Link Whisper settings. By default, it will suggest target keywords for your post, and provide link suggestions for it. There are a number of other settings you can configure as well. You can scan your page content for keywords, or add custom ones. Additionally, you can choose to show link suggestions for the same category, or select certain post types. Link Whisper will provide its suggestions for links, and enable you to add them with the click of a button.

    To add all links, simply click Check All. Alternatively, you can select one or more by selecting the checkbox next to the suggested link. Finally, to add the link, click the Insert Links Into Post button.

    Insert links into post

    Adding Internal Links to WordPress Is Easy With Link Whisper

    Internal links are an important component to your site’s success in SERPs. Thankfully, using Link Whisper makes that a much less tedious task. The free version of the plugin has some nice features that will allow you to identify keywords in your posts and pages, then offer link suggestions. The premium version takes those suggestions to a different level with its auto-linking capability. Either way, Link Whisper provides an easy way to add internal links to your website.

    For more, you may like these tips for SEO link building.

    Do you have a tool or method you use to add internal links to your site? Let us know in the comments below.

    The post How to Add Internal Links in WordPress the Easy Way (Using Link Whisper) appeared first on Elegant Themes Blog.

    Go to source

  • How to Fix the WordPress White Screen of Death

    The WordPress White Screen of Death (WSOD) is a common error that can be caused by a variety of factors. Here are a few things you can try to troubleshoot and fix the WSOD:

    1. Check for plugin conflicts: Deactivate all of your plugins, and then activate them one by one to see if any of them are causing the WSOD.

    2. Check for theme issues: Switch to the default WordPress theme (e.g. Twenty Twenty), and see if the WSOD goes away. If it does, then the problem may be with your theme.

    3. Check your .htaccess file: Your .htaccess file controls how your website functions, and a corrupt .htaccess file can cause the WSOD. You can try renaming your .htaccess file to something like .htaccess_old, and then see if the WSOD goes away.

    4. Check for a PHP error: The WSOD can sometimes be caused by a PHP error. You can check your website’s error logs for any PHP errors that may be causing the WSOD.

    5. Increase the PHP memory limit: If none of the above solutions work, you may need to increase your PHP memory limit. You can do this by adding the following line of code to your wp-config.php file:

    define('WP_MEMORY_LIMIT', '256M');
    

    If none of these solutions work, you may need to seek further assistance from a WordPress developer or the WordPress support team.