Tag: wordpress

  • How to Password Protect a Page in WordPress

    Creating a WordPress website for your business or portfolio is an excellent way to start growing an audience for yourself. However, you may run into scenarios where you want to limit access to specific posts or pages. For example, you may be a filmmaker that wants to limit the viewership of a film on his website to prevent piracy or a photographer trying to safeguard assets. Regardless of your reason, configuring a password on a page allows you to restrict visitor access and permit only particular clients, colleagues, or partners. In this article, we’ll show you how easy it is to password-protect a page in WordPress and why you might need to.

    Why Password Protect a Page in WordPress?

    As previously stated, password-protecting a page is a useful feature when you want to limit access to something on your WordPress site. In this way, only users that have been given access to the password can access the pages you lock.

    There are a number of reasons why you would want to do this, which can span a page being under construction, gatekeeping users to get their email for marketing purposes or limiting access to photos, art, or other intellectual property for internal usage.

    There are a number of security plugins that may have password protection built-in. And there are plugins designed specifically for enhancing password protection in WordPress. But if you’re looking for basic functionality, WordPress has a default feature for password protection. In the following section, we’ll delve into how to password-protect pages natively.

    How To Password Protect a Page or Post Using The WordPress Editor

    If you aren’t already aware, you can easily password protect a page or post using the built-in feature of the WordPress editor. To do this, start from your admin dashboard and create a new page or post by navigating to Page or Post -> Add New.

    Start by clicking add post

    Once you are done editing your page, select the publish button and select Visibility.

    Select visibiltiy.

    From the Visibility panel, select Password protected, and create your password in the textbox below.

    Select password protected

    If you’re wondering if this still works within the Divi builder, good news! It does; the native password-protect functionality works the same in the WordPress editor and the Divi Builder.

    If a user visits your password-protected page, they will be met with something that looks like the page below.

    password protected page example

    Here’s what it looks like using Divi:

    Divi password protected

    It’s just that simple! But while this is the easiest method for password protection, it’s lacking when it comes to more advanced options. Features such as partial content restriction, password-protecting an entire website or unlocking different areas of a site with a single password aren’t possible natively, so this is where a password protect plugin can be helpful.

    How to Password Protect a Page in WordPress Using a Plugin

    If you are looking for more password protection features, there are some plugins that should give you what you need. For this example, we’ll be using Password Protect WordPress (PPWP). It’s almost as easy to set up as native WordPress password protection but comes with more features as well.

    To get started, let’s navigate to Plugins > Add New from your WordPress dashboard.

    Plugin page

    In the search box, type “PPWP” and install and activate the free plugin.

    PPWP install and activate

    Now, when you navigate to your post or page editor, there will be a new section in your sidebar where you can set user roles and corresponding passwords via PPWP.

    PPWP in the sidebar of WordPress editor

    Other Features of WordPress Password Protect Plugins

    You can also use shortcodes to lock parts of your content on a page. To do this, navigate to Partial Protection under the Password Protect WordPress section.

    Partial Protection section.

    From here, you can customize your shortcode and then simply embed your section into any page on your website.

    PPWP shortcode

    With PPWP, you can even password-protect your entire website from public view. To do this, navigate to the Sitewide Protection option under the Password Protect WordPress section from your dashboard.

    Sitewide Protection section

    From here, simply toggle the Password Protect Entire site option, set your password, and save the changes.

    Password Protect Entire site option

    And don’t worry, PPWP works with Divi, so you can password-protect your content regardless of what editor you’re using. If you’re interested in even more password protection features, you can get the pro version of PPWP.

    Password Protecting a Page in WordPress: FAQs

    What’s the difference between the default WordPress “Password Protected” feature and the plugin?

    The main difference between the two options is that the plugin has been designed specifically for password protection. Thus, it comes with more features available. Whether you want to password-protect a section of a page, your whole website, or a category of posts, the easiest way to do it is with a plugin.

    Will password-protecting a page effect SEO?

    Search engines aren’t able to index pages that are protected via passwords; this is where a partial section can be useful for SEO, as search engine bots can still crawl to your page, but the content that you want to protect remains hidden.

    Can I use multiple passwords to protect a page or post?

    Natively, this isn’t possible without some coding know-how, but different users can access pages with multiple passwords using features like the PPWP plugin’s password-protection feature that utilizes user roles.

    Final Thoughts On Password Protection With WordPress

    A good starting point with password protection is getting familiar with the default settings WordPress has to offer, but you can get as sophisticated as you want. If you want a simple on-off solution, you can use the built-in password protection functionality in the WordPress editor. But if you are looking for a simple solution with more features, a plugin like PPWP is the way to go. You can learn more about how to partially restrict content with a password. Or, if you are a Divi user, check out DiviPasswords to take your password protection to the next level.

    If you are looking for better password security for WordPress in general, consider using a Password Policy plugin.

    What do you password-protect on your website? Let us know in the comments!

    Article thumbnail image by Natty_Blissful / shutterstock.com

    The post How to Password Protect a Page in WordPress appeared first on Elegant Themes Blog.

    Go to source

  • If you have received a complaint regarding a spam campaign running on your Droplet from DigitalOcean, here are the next steps

    If you have received an email from DigitalOcean stating that they have received a complaint regarding a spam campaign running on your Droplet, it is important to take immediate action to address the issue. Here are some steps you can take to solve this issue:

    • Investigate the source of the spam: It is important to determine the source of the spam in order to take appropriate action. You can start by checking the logs of your server and any applications or services running on it, as well as the logs of your email server.

    • Take action to stop the spam: Depending on the source of the spam, you may need to take different actions to stop it. For example, if the spam is being sent from a compromised account, you should reset the password for that account and take other measures to secure it. If the spam is being sent from a compromised server, you should take steps to secure the server and prevent further spamming.

    • Notify DigitalOcean: Once you have taken steps to stop the spam, you should notify DigitalOcean and provide them with information about the steps you have taken. This will help them determine that the issue has been resolved and prevent any further action from being taken against your account.

    • Take preventative measures: To prevent future spamming incidents, it is important to take preventative measures such as keeping your server and applications up to date, using strong passwords, and regularly monitoring your logs and server security.

    By following these steps, you should be able to resolve the issue and prevent future spamming incidents.

  • 7 Best Google Analytics Plugins for WordPress (in 2023)

    One of the best advantages for your business to leverage is Google Analytics because it can help improve your marketing strategy and address key issues with your audience. But finding the best Google Analytics Plugin for WordPress can be a real hassle, there are just so many options to choose from, and you’re going to want the best solution for your company’s needs.

    In this article, we’ll look at the pros and cons of the best plugins available to help you choose the right plugin for your needs.

    What is a Google Analytics Plugin for WordPress?

    Google Analytics is a platform that collects data from your websites and apps to create reports that provide insights into your business. These include:

    • The number of visitors to your website
    • Information about the visitors’ interests and demographics
    • Find your blog posts and landing pages with the most traffic.
    • Determine the source that generates the most traffic (social, organic, etc.)
    • How visitors use your website and which links they choose to click

    It’s a fantastic resource that lets you take a deep dive into your website, but it isn’t exactly user-friendly. It’s easy to get lost in a sea of data trying to sift out useful information from the superfluous tidbits. That’s where a good Google analytics plugin comes into play.

    A good plugin will easily let you segment data so you can analyze and improve your content and user flow without any of the usual headaches.

    7 Best Google Analytics Plugins

    We’re eager to share these plugins with you so you can get a leg-up on Google Analytics needs, so let’s get started with our choices!

    1. MonsterInsights

    Monster insight logo

    MonsterInsightsdoes a wonderful job of combining the tools of both WordPress and Google Analytics. It operates in the background and won’t have an impact on any front-end WordPress themes you use.

    You don’t even need to leave WordPress to gain important visitor data using the built-in Google Analytics dashboard, which provides statistics on your best traffic sources, top-ranking articles, site visits, outbound links, and much more. With these helpful stats, MonsterInsights is also a great tool for SEO.

    It’s clear that MonsterInsights is the quintessential Google Analytics plugin for WordPress; garnering over 3 million active installations and a 4.5-star rating. In the WordPress community, it’s the most well-known and well-liked analytics tool. It’s free to use but comes with some pretty cool add-ons with the premium version, including eCommerce and outbound link tracking.


    Key Features of Google Analytics for WordPress by MonsterInsights:

    • Simple to comprehend reports from a Google Analytics dashboard
    • Conversion tracking for forms
    • Improved tracking for eCommerce
    • Track affiliate links
    • Detailed demographic reports of your audience (gender, age, device, location, etc.)
    • Ability to see which sites are referring the most viewers to you and what visitors are searching for within your site
    • Enables you to track 404 errors
    • Updated embedded tracking code
    • Monitor performance for specific pages


    Search console report from MonsterInsights

    Viewing real-time statistics from your dashboard to improve your strategies and generate clicks is just one of the many features of MonsterInsights. Affiliate links, ad tracking, and enhanced e-commerce tracking are all incredibly useful tools that come with MonsterInsight.

    The MonsterInsights Google Analytics plugin dashboard.

    You can monitor the top traffic sources for your website as well as your best-performing articles, pages, etc. Making business decisions based on data is made simple thanks to this insight into the behavior of your customers.


    Google Analytics for WordPress by MonsterInsights is for you if…

    • You are looking for a simple-to-use plugin with a ton of advanced features.
    • You want a solution that’s super easy to configure and integrates easily with WordPress.
    • You want to understand your audience in a deeper way.

    Google Analytics for WordPress by MonsterInsights Pricing: Free with premium plans starting at $99.50 per year | More Information

    2. Analytify

    Analytify logo

    Another major player in the WordPress analytics space is Analytify. This plugin can install your Google Analytics tracking code for you without requiring any coding on your part. The user interface makes it possible for you to retrieve your data directly from your WordPress dashboard and presents it in an understandable manner.

    Since it provides improved eCommerce tracking features, Analytify is especially beneficial for organizations that engage in online sales. Although the commercial versions of the plugin are far less expensive than MonsterInsights while providing identical capabilities, they also have the advantage of allowing you to look deeper into specific posts and pages.

    However, the free version of the plugin is very constrained, allowing you to have limited access to some more general features with premium features being necessary for your complete Google Analytics needs.

    Key Features of Analytify:

    • Automated email reports
    • Real-time visitor tracking capability
    • Shortcodes for data integration into custom templates
    • Clear, intuitive UI

    Analytify dashboard

    This plugin provides you with some great data, made even more useful through digestible graphs and charts. You can view stats like views, users, bounce rates, time spent on your pages and more from the admin panel on WordPress.

    Analytify is for you if…

    • You use a web store and want enhanced eCommerce tracking.
    • You want automatic reports emailed to you.
    • You want to track individual campaign progress.

    Analytify Pricing: Free with premium plans starting at $39 | More Information

    3. ExactMetrics

    ExactMetrics comes in third on our list of the top Google Analytics plugins for WordPress. With over 1 million downloads this plugin obviously was one of the most trusted in the industry. It has a ton of features and makes it easy to set up Google Analytics without requiring you to work with any code or pay a specialist.

    Its user-friendly statistics for beginners put stats into your WordPress dashboard so you can quickly assess how your website is doing and which tactics you’re implementing are effective.

    Additionally, it is quite simple to collect data in Google Analytics without manually setting up event monitoring thanks to tracking features like file download tracking, scroll tracking,  eCommerce tracking, and custom dimensions.

    However, it’s important to note that this plugin has a drawback in that it prevents you from integrating with other tools and services like WooCommerce or Google Ads. Also, the complaints about incessant advertisements have dropped their score to 2.5/5 stars.

    Key Features of ExactMetrics:

    • No coding is necessary to configure Google Analytics
    • Comprehensive dashboard reports
    • Track form conversions

    eCommerce report for ExactMetrics

    This simple-to-install solution allows you to track advanced data and view metrics to better understand your website user experience. While the recent addition of advertisements for the free version seems to have tanked their reputation, the paid version is still a viable solution.


    ExactMetrics is for you if…

    • You want a more basic analytics plugin.
    • You don’t mind being bombarded with advertisements.
    • You are willing to pay for the premium version.

    ExactMetrics:  Free with premium plans starting at $99.50 | More Information

    4. GA Google Analytics

    Google Analytics logo

    GA Google Analytics is a lightweight plugin that simply connects every page of your WordPress site to Google Analytics. Unlike other WordPress analytics tools, it won’t show any data or insights, but it still does its job well.

    The Google Analytics interface might be more appealing to many WordPress users that don’t want a dashboard application and would prefer to use the native Google Analytics dashboard. This plugin is for you if you’re content to leave Google Analytics separate from the WordPress dashboard but still want to keep things light and make sure the tracking code is on every page.

    Because it eliminates the need for you to manually add tracking code to each page, Google Analytics is perfect for large, complicated websites with a lot of pages.

    Key Features of GA Google Analytics:

    • General Data Protection Regulation (GDPR) compliant
    • Does one thing and does it well
    • Support for Global Site Tag (gtag.js), Google Analytics 4, and Universal Analytics (analytics.js)

    GA Google Analytics setup screen

    This relatively light solution is a great way to get your feet wet in terms of tracking analytics. It’s designed to be simple and straightforward, to easily get you started in the world of analytics.

    GA Google Analytics is for you if…

    • You want a lightweight solution.
    • You don’t want an extra dashboard UI specifically for tracking Google Analytics.
    • You are new to analytics tracking and want to learn the basics before taking a deep dive.

    GA Google Analytics Pricing: Free with premium versions starting at $15 | More Information

    5. WP Statistics

    WP Statistics logo

    WP Statistics is a robust yet simple WordPress analytics plugin that enables you to monitor all user activity from your WordPress dashboard. The content and geographical based reports that this plugin produces are solid and, it displays real-time website analytics all for free.

    This might not be the greatest option if you’re looking for a simple and uncomplicated plugin. However, it is a good choice if you want to dig deep into the statistics of your WordPress site and want to get data from several platforms and search engines in addition to Google.

    You won’t need to set up the plugin with Google Analytics, which is another benefit. The tool only collects information that takes place on your website; no outside data is provided. The only drawback to this is that it can eat up storage space and grow the size of your backup.

    Key Features of WP Statistics:

    • Data export in XFL or CSV files.
    • Filter data by location, keywords, IP address, etc.
    • Track from multiple search engines (Google, Bing, Yahoo.)

    WP Statistics graph example

    In your WordPress dashboards, WP Statistics can find important incites like the number of visitors, referrals, browser usage, country origins, and more. This plugin shines in particular at providing information in a way that is palatable, such as graphs and maps.

    WP Statistics is for you if…

    • You want to keep track of analytics from search engines other than just Google.
    • You want to focus on geographical data and content reports.
    • You want a free solution

    WP Statistics Pricing: Free| More Information

    6. Jetpack

    Jetpack logo

    One of the many features of Jetpack, a multi-purpose WordPress plugin, is its integration with Google Analytics. Jetpack provides a quick overview of your site’s performance by displaying your site stats through a straightforward interface. You shouldn’t count on being able to delve deep into the data on certain posts and pages, though.

    The free edition only offers you its own analytics capabilities and reports, which is something to keep in mind. Therefore, you must upgrade to a Pro license if you expressly want Google Analytics integration.

    Key Features of Jetpack:

    • Simple site traffic reports
    • Funnel reports help you track user flow through your site
    • Track visitor’s goal conversion

    Jetpack settings

    Google Analytics integration with Jetpack’s growth tools enables you to examine traffic statistics for your website in the WordPress dashboard.


    Jetpack is for you if…

    • You want to keep using Jetpack as a multifunctional tool.
    • You have experience with using Jetpack for other purposes.
    • You are looking for an all-in-one toolkit for WordPress

    There is also has a JetPack CRM plugin that may be a great addition for your business.

    Jetpack Pricing: Free with premium plans starting at $4.99  | More Information

    7. Matomo (A Google Analytics Alternative)

    Matomo logo

    A highly regarded substitute for Google Analytics is Matomo, garnering over 60,000 downloads and a 5-star review. Matomo and Google Analytics differ significantly in that Matomo does not disclose data if you choose not to. This plugin can be a suitable choice if you run a website that promotes privacy.

    They pride themselves on security above all else and put you in full control of your data, which is a nice feature in the current climate.

    Key Features of Matomo:

    • No one else can see your data
    • Easy to install. No coding or technical knowledge is needed.
    • Free to use, premium features are relatively cheap.

    Matomo analytics example

    You can view a bevy of advanced analytics from the Matomo dashboard and be ensured of the safety of your data. All of the fundamental features of an analytical plugin are present in Matomo. You can monitor the number of people who visit your website and it displays thorough information on traffic sources, keywords, geo-locations, and other analytics, just like Google Analytics.

    Matomo is for you if…

    • You value privacy and want to be in control of your data.
    • You want a cheap solution that provides everything you need for advanced analytics.
    • You want an easy to the user interface that doesn’t need too much configuration.

    Matomo Pricing: Free with premium plans starting at $29.00 | More Information

    Final Thought on Amazon Affiliate WordPress Plugins

    As many analytics plugins are tailored for specific purposes, you might want to select more than one. Choose a plugin like MonsterInsights or Analytify if you want to integrate the power of Google Analytics into your WordPress dashboard. Both of these have fantastic free versions as well as feature-rich premium editions.

    If you want to focus on security and speed, lightweight tools like Matomo or GA Google Analytics might suit your needs better. Regardless, we’re sure one of these plugins has the features you’re looking for.

    Did we miss any great Google Analytics plug-ins? Leave a comment telling us below!

    Article featured image by Blan-k / shutterstock.com

    The post 7 Best Google Analytics Plugins for WordPress (in 2023) appeared first on Elegant Themes Blog.

    Go to source

  • How to Fix SSL Error on Your WordPress Site

    There are a few different ways you can try to fix an SSL error on your WordPress site. Here are some steps you can take:

    1. Check the SSL certificate: Make sure the SSL certificate for your domain is properly installed and not expired. You can check the status of your SSL certificate by using a tool like SSL Shopper’s SSL Checker.

    2. Force SSL in WordPress: If your SSL certificate is properly installed, you can try forcing SSL on your site by adding the following code to your WordPress .htaccess file:

    RewriteEngine On
    RewriteCond %{HTTPS} off
    RewriteRule ^(.*)$ https://%{HTTP_HOST}%{REQUEST_URI} [L,R=301]
    

    This will redirect all traffic to the HTTPS version of your site.

    3. Update your WordPress site URL: If forcing SSL doesn’t work, you may need to update the WordPress site URL to use HTTPS. To do this, go to the WordPress dashboard and navigate to Settings > General. Then update the “WordPress Address (URL)” and “Site Address (URL)” fields to use HTTPS instead of HTTP.

    4. Check for mixed content: Another common cause of SSL errors is mixed content, which is when a page is loaded over HTTPS but includes resources (such as images or scripts) that are served over HTTP. To fix mixed content issues, you can use a plugin like SSL Insecure Content Fixer to automatically update your site’s URLs to use HTTPS.

    If these steps don’t help, you may need to consult your hosting provider or a WordPress developer for further assistance.

  • How to Fix Error 404 on Your WordPress Site

    There are a few different ways you can try to fix a 404 error on a WordPress site. Here are a few things you can try:

    1. Check the permalink settings:

    Sometimes the 404 error can occur if the permalink settings in your WordPress site are not configured correctly. To fix this, go to Settings > Permalinks in your WordPress dashboard and make sure the permalink structure is set to the correct option.

    2. Check for broken links:

    Another common cause of 404 errors is broken links. You can use a plugin like Broken Link Checker to scan your site for broken links and fix any that are found.

    3. Check the .htaccess file:

    The .htaccess file controls how Apache serves your site’s pages, and a mistake in this file can cause a 404 error. You can check the .htaccess file by accessing it through your hosting control panel or FTP client.

    4. Clear your cache:

    If you have a caching plugin installed on your WordPress site, it’s possible that the 404 error is being caused by a cached version of the page. Try clearing your cache to see if this fixes the problem.

    5. Deactivate plugins:

    If none of the above solutions work, it’s possible that a plugin is causing the 404 error. Try deactivating all of your plugins and then reactivating them one by one to see if any of them are causing the issue.

    6. Re-upload WordPress core files:

    If all else fails, you can try re-uploading the WordPress core files. This can be done by downloading a fresh copy of WordPress and replacing the core files on your site via FTP.

    I hope these suggestions help! If you’re still having trouble fixing the 404 error, you may want to consult with your hosting provider or a WordPress developer for further assistance.

  • How to Highlight a Menu Item in WordPress

    Do you want to highlight a menu item on your WordPress site?

    Highlighting a menu item can really help you point user’s attention to a specific area on your menu. This can be great if you want to highlight the Pricing or Contact Us page on your website.

    In this article, we will show you how to easily highlight a menu item in WordPress using CSS code.

    How to Highlight a Menu Item in WordPress

    Why Should You Highlight a Menu Item?

    A navigation menu is a list of links pointing to important areas of your website. They are usually presented as a horizontal bar at the top of every page on a WordPress website.

    This navigation menu is created by adding different menu items. For more details, you can see our article on how to add a navigation menu in WordPress.

    A highlighted menu item can be a great way to capture the user’s attention to your most prominent call to action. The eyes of the visitors will be automatically drawn to the menu item when they visit your website.

    WPForms highlighted menu icon

    By adding this feature, you can create a user-friendly website and highlight important menu items that you want your users to check out.

    That being said, let’s see how you can highlight a menu item in WordPress using CSS.

    Method 1. Highlighting a Menu Item Using Full Site Editor

    If you’re using a block-enabled theme then you’ll have the Full Site Editor instead of the older Theme Customizer. You can easily highlight a menu item in it as well.

    First, head over to Appearance » Editor from the WordPress admin dashboard. This will direct you to the full site editor.

    Here simply double-click the menu item you want to highlight, and then click the gear icon at the top. This will immediately open up that specific menu item’s ‘Settings’ block.

    Select the menu item you want to highlight and then click the gear icon at the top

    Simply scroll down in the ‘Settings’ block to the ‘Advanced’ tab and click the arrow icon beside it to expand the tab.

    This will open up an ‘Additional CSS Class’ field where you simply have to write highlighted-menu in the field.

    Write highlighted menu in Additional CSS Class field

    Next, click the ‘Save’ button at the top of the page to store your changes.

    After that, you will need to add a small bit of CSS to your theme for the highlight effect. You can either fix the missing Theme Customizer, or you can use a code snippet plugin to add CSS code.

    How to Add CSS Snippets Using WPCode

    For adding CSS in WordPress, we recommend using WPCode because it’s the easiest way to add any custom code to WordPress.

    First you need to install and activate the free WPCode plugin. For more instructions, check out our guide on how to install a WordPress plugin.

    Upon activation, navigate to Code Snippets » Add Snippet from your WordPress admin panel. Now click on the ‘Add New’ button.

    Go to Code Snippets and click Add New

    This will take you to the ‘Add Snippet’ page.

    Here, hover your mouse over the ‘Add Your Custom Code (New Snippet)’ option and simply click on the ‘Use Snippet’ button below it.

    Click Use Snippet button

    Now that you’re on the ‘Create Custom Snippet’ page, start by choosing a name and a ‘Code Type’ for your CSS snippet.

    You can choose any name you like.

    Select Universal Snippet as Code Type

    Next, simply click the dropdown menu beside the ‘Code Type’ option on the right and then choose the ‘Universal Snippet’ option.

    After that, copy/paste the following CSS code into the ‘Code Preview’.

    <style type="text/css">
    /* Highlighted menu */
    .highlighted-menu
    {
    background: #d3d3d3;
    border-radius: 35px;
    padding: 0px 20px;
    line-height: 50px;
    }
    </style>
    

    Be sure to include the style tags, as you see on Lines 1 and 10 below.

    Paste code

    After pasting the code, go to the ‘Insertion’ section by scrolling down.

    Here simply choose the ‘Auto Insert’ mode so that the code can be automatically executed on your entire website.

    Choose Auto Insert as insert method

    Now, go to the top of the page and toggle the switch from ‘Inactive’ to ‘Active’.

    Then simply click the ‘Save Snippet’ button.

    Save your highlight menu item snippet

    You have now successfully highlighted a menu item in WordPress using a full site editor.

    This is how your menu item will look after you add the CSS code.

    Highlighted menu item

    How to Access the Theme Customizer Using a Block Theme

    If you want to use the Theme Customizer and use an FSE theme, then simply copy and paste the URL below into your browser. Make sure to replace ‘example.com’ with your own site’s domain name.

    https://example.com/wp-admin/customize.php
    

    Here you simply have to click the ‘Additional CSS’ tab.

    Click Additional CSS tab

    Now, expand the ‘Additional CSS’ field, and then just copy/paste the following code snippet.

    /* Highlighted menu */
    .highlighted-menu
    {
    background: #FFB6C1;
    border-radius: 35px;
    padding: 0px 20px;
    line-height: 50px;
    }
    

    After that, simply click the ‘Publish’ button at the top.

    Paste your CSS code

    That’s all it takes to highlight a menu item.

    It should look something like this on your website when finished:

    Highlighted menu item

    Method 2. Highlighting a Menu Item Using Theme Customizer

    If you’re using a non-block-enabled theme, then you’ll probably have a theme customizer enabled by default. Highlighting a menu item in a theme customizer is a fairly simple process.

    First, simply go to Appearance » Customize in your WordPress dashboard to launch the theme customizer. Once the theme customizer opens up, simply click on the ‘ Menus’ tab.

    Go to Menu in Theme Customizer

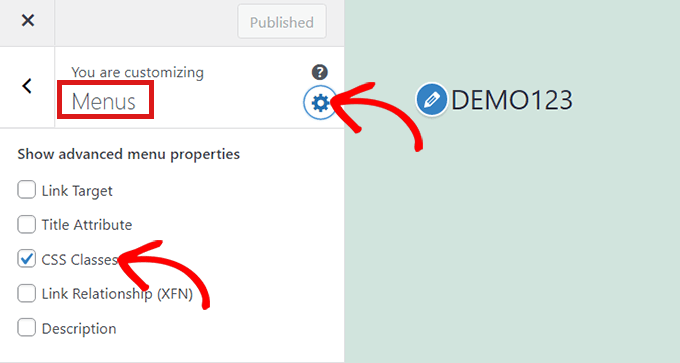
    Once you’re in the ‘Menus’ section, simply click on the gear icon at the top right to display advanced properties.

    Now, simply check the ‘CSS Classes’ box.

    Check CSS Classes box

    After that, scroll down to the ‘Menus’ section.

    If you have multiple menus on your website, simply click on the menu whose menu items you want to highlight.

    Select a menu

    This will open up a new tab where you can select the menu item that you want to highlight. It could be ‘Get Started’ like in our example, or it might be your contact form page or the link to your online store.

    Simply click on the menu item of your choice which will expand it to display some options. Click into the ‘CSS Classes’ field.

    All you have to do is write 'highlighted-menu' in the field. You can add this CSS Class to multiple menu items, and they will all be highlighted.

    Write highlighted menu as CSS Class

    Next, simply go to the ‘Additional CSS’ tab in the theme customizer.

    Now, simply copy and paste the following CSS code.

    /* Highlighted menu */
    .highlighted-menu
    {
    background: #FFB6C1;
    border-radius: 35px;
    padding: 0px 20px;
    line-height: 50px;
    }
    

    Congratulations! You’ve successfully highlighted a menu item.

    Note: Your theme might not have an ‘Additional CSS’ field in the theme customizer. If not, check theme settings to find out how to add custom CSS. If you can’t find it, you might want to contact the developer or add it using WPCode.

    Paste CSS code in Additional CSS tab

    Customizing Your Menu Item Highlight

    Now that you have highlighted the menu item, you can adjust the CSS code to customize your menu item the way you like it.

    For example, you can change the background color of your menu item.

    Pink highlighted menu item

    Simply look for the following code in the CSS snippet, you just pasted.

    background: #FFB6C1
    

    After locating it, you can simply replace the pink color code number with the hex code of any color of your choice:

    background: #7FFFD4;
    

    Above is the hex code for aquamarine.

    Blue highlighted menu item

    You can check out our guide to easily add custom CSS for other ideas on how to customize the highlighted menu item.

    After you’re satisfied with your choices, simply click on the ‘Publish’ button in the theme customizer or ‘Save Snippet’ in WPCode to save your changes.

    We hope this article helped you learn how to highlight a menu icon in WordPress. You may also want to check out our beginner’s guide on how to style WordPress navigation menus or our expert picks of the must-have WordPress plugins to grow your site.

    If you liked this article, then please subscribe to our YouTube Channel for WordPress video tutorials. You can also find us on Twitter and Facebook.

    The post How to Highlight a Menu Item in WordPress first appeared on WPBeginner.

    Go to source

  • How to add a “favorite” feature to your WordPress site

    To add a “favorite” feature to your WordPress site, you can either use a plugin or write custom code. Here are the steps to do this using a plugin:

    1. Install and activate the WP Favorite Posts plugin. This plugin allows users to bookmark their favorite posts, pages, and custom post types.

    2. After activating the plugin, a new “Favorites” menu will appear in your WordPress dashboard. Go to “Favorites > Settings” to configure the plugin’s settings.

    3. In the plugin settings, you can choose which post types to enable the favorite feature for and customize the text and appearance of the favorite button.

    4. To display the favorite button on your site, you can use the wpfp_link function in your theme’s template files. For example, you could add the following code to your single.php file to display the favorite button on single post pages:

    if ( function_exists( 'wpfp_link' ) ) {
        wpfp_link();
    }
    

    5. Users can then click the favorite button to bookmark a post, and view their favorite posts by visiting the “Favorites” page on your site.

    Alternatively, you can write custom code to add a favorite feature to your WordPress site. This would involve creating a custom database table to store the favorite data, and writing functions to add and remove posts from the favorites list. You would then need to add a button or link to your site’s templates to allow users to favorite posts, and a page or widget to display their favorite posts.

  • State of the Word 2022: What WordPress Has Achieved and What’s in Store for the Future

    WordPress held the annual State of the Word keynote address on December 15th, 2022. During the event, WordPress co-founder Matt Mullenweg addressed the progress of various WordPress project aspects and provided previews of what’s coming in the future years.

    A group of contributors and developers attended State of the Word 2022, and it was also live-streamed with over 30 watch parties and 500 RSVPs across 11 countries.

    This article will recap the event and let you know what WordPress has achieved in 2022 and the plans for the project.

    State of the Word 2022 Video

    In case you missed the live stream event, WordPress uploaded the State of the Word 2022 to its YouTube channel, and you can watch it here:

    Four Freedoms of Open Source

    Josepha Haden Chomphosy, the executive director of the WordPress project, began the event with the question, “Why WordPress?” She followed it up with a reminder of the four freedoms of open source:

    1. To run the program for any purpose.
    2. To study how the program works and change it to make it do what you wish.
    3. To redistribute copies.
    4. To distribute copies of your modified versions to others.

    These freedoms, stated in the WordPress Bill of Rights, remove barriers and help secure a free, open, and interconnected web in the future. Josepha then mentioned that Matt Mullenweg taught her that open source is an idea that can change our generation.

    2022 WordPress Recap

    Matt Mullenweg then took the stage and started the keynote address. Here are the highlights for the 2022 recap.

    Gutenberg Editor

    As an editor tool for website and mobile application building using the block paradigm, Gutenberg has seen wide adaptation worldwide. Matt believes that Gutenberg will be bigger than WordPress itself.

    In 2022, bbPress Forums, which powers WordPress.org forums, has embedded Gutenberg, so now you can add links and images in forums without using HTML-like language. This is done with the Blocks Everywhere plugin that will also be embedded in BuddyPress.

    WordPress support forum text editor that uses Gutenberg block editor

    Other applications also have embedded Gutenberg. Here are a few examples:

    • EngineAwesome, a Laravel-Based SaaS application.
    • Pew Research Center’s Political Typology Quiz. One out of eight quizzes has been converted to blocks in 2022, with more than 1 million people completing it in 2022.
    • The web version of Day One, an award-winning journaling app, uses Gutenberg.

    The Gutenberg project also concluded the licensing of Gutenberg Mobile. Matt explained that Gutenberg has always been GPL-licensed, but people couldn’t just include Gutenberg in a mobile app due to how mobile apps are distributed.

    Mobile Gutenberg now has dual licenses, so you can use it under GPL or MPL (Mozilla Public License) and easily embed it in mobile applications.

    WordPress Community Events

    Since the beginning of the Covid pandemic in 2020, many community events, such as meetups, have switched to online. In 2022, we saw many online gatherings return to the in-person meetup style.

    Matt explained that 500 meetup groups doubled their events in 2022. WordCamps are also increasing in number – from only one WordCamp in 2021 to 22 WordCamps in 2022. So far, 34 WordCamps are already planned for 2023, and the number will most likely increase.

    The list of past WordCamps in 2022

    Learn WordPress

    WordPress hosts the Learn WordPress website. It contains courses and community workshops for people who want to learn WordPress. In 2022, there were 12,000 people who took one of these courses.

    Matt said the course activities were happening almost every week and were moderated or facilitated by volunteers.

    Website Redesign

    The WordPress.org website was redesigned in 2022, including its homepage and blog areas. The new design follows the jazz design paradigm, and Matt hopes that this “neo-jazz meets software” aesthetic will become a new design language on its own.

    The WordPress.org homepage

    Another new addition to the WordPress.org website is the Showcase section, which features famous websites that are powered by WordPress.

    The WordPress showcase page

    Openverse

    WordPress acquired Openverse from the Creative Commons organization in 2021 and has since launched it on the WordPress.org website. It’s a search engine that scours the web for Creative Commons-licensed media, such as images and videos.

    The WordPress Openverse page

    In 2022, audio media will be introduced into the Openverse, allowing podcasters and music creators to share their works with the world.

    Matt continued with the following Openverse stats:

    • 22 million images.
    • 1.1 million audio files.
    • Millions of users per month.
    • Over 59 million requests made in the past 30 days.

    Photos uploaded to the WordPress photo directory will also be available in the Openverse.

    Three Major Updates

    WordPress launched three major updates in 2022 with new design tools to customize a website’s entire front-end. What’s more, users no longer need to know as much PHP and CSS as before.

    Matt highlighted the top three aspects that shipped with the updates in 2022:

    • Block themes. WordPress themes are moving from a bundle of PHP and CSS to blocks, allowing users to create themes or customize websites in the Gutenberg Editor without dealing with code.
    • Styles and style variations. Themes are usually a collection of colors, fonts, and spacing that people can customize with the Gutenberg Editor. The styles and the variations thereof provide alternatives to these components with the same underlying structure.
    • Twenty Twenty-Three theme. Unlike its predecessors, the Twenty-Twenty-Three default theme comes as a black canvas, with ten style variations designed by WordPress community contributors.
    WordPress Twenty Twenty-Three theme in the Site Editor, with the global styles panel showing available styles

    Gutenberg Phase Two Wrap-Up

    WordPress introduced Gutenberg four years ago, and the project is divided into four phases:

    1. Easier Editing. Replacing the post and page editor with the Gutenberg block tools. Already available in WordPress, with ongoing improvements.
    2. Customization. Using the Gutenberg design tools to customize headers and footers and create an entire website with blocks. This phase includes full site editing, block patterns, block directory, and block-based themes.
    3. Collaboration. A more intuitive way to collaborate during WordPress core content creation.
    4. Multilingual. Core implementation for multilingual sites

    We are in phase two of Gutenberg with the latest WordPress 6.1 release. At this point, creating a theme from a blank canvas is possible just by using the Gutenberg editor on the front-end. The upcoming WordPress 6.2, expected to arrive on March 2023, will mark its end.

    This is possible using the Create Block Theme plugin that allows importing Google Fonts into the theme and serving them locally from the site. Matt said that with this system, we could have “one theme, one pattern, infinite permutations,” implying the endless customization possibilities with block-based editing.

    A Record Number of Release Contributors

    A record number of 1,399 contributors made all the updates and new features possible. Check out the following contribution stats:

    • 652 first-time contributors.
    • 204 contributors participated in all 2022 releases.
    • 424 contributors from 2021 returned in 2022.
    • 322 contributors who took a break in 2021 returned in 2022.

    Matt also introduced and recognized four new core committers in 2022 – Bernie Reiter, Marius Jensen, Adam Zielinski, and George Mamadashvili.

    Plugin and Theme Taxonomy

    Starting in December 2022, WordPress is launching a new taxonomy for the plugin and theme directory. With over 50,000 plugins and 10,000 themes, the new taxonomy should help users understand what kind of plugin or theme they’re getting. The new taxonomy also allows the creators to self-identify what kind of project their extensions are.

    WordPress Twenty Twenty-Three theme in the WordPress directory, with the new taxonomy highlighted

    The feature is still a work in progress, but Matt mentioned four taxonomies:

    • Solo or single-player. Solo developers develop extensions under this category for themselves but also release them for others.
    • Community. These extensions belong to a community of developers with a lead dev stewarding the development. These extensions are then shared in the directory and passed to others. Community extensions also invite contributors to get involved in the WordPress community.
    • Canonical plugins. The WordPress project considers a portion of community plugins important to the ecosystem. These plugins receive support from the core WordPress developers.
    • Commercial. These extensions often have commercial support and are developed by companies. They also offer upsells, such as pro versions of the plugins.

    What’s Coming In 2023

    In addition to addressing the 2022 WordPress project progress, Matt also presented some plans for 2023.

    WordPress 20th Anniversary

    WordPress will turn 20 in May 2023. Matt mentioned that few software projects make it to such an age and that WordPress shares the same birthyear as Creative Commons.

    There will be celebrations for the anniversary – you can follow the updates on the WordPress 20th anniversary website.

    The WordPress 20th anniversary homepage

    WordPress Community Summit

    WordPress Community Summit is an event where top contributors gather. After a six-year hiatus, the WordPress Community Summit will come back in 2023 and coincide with WordCamp US 2023.

    The WordPress Community Summit 2023 homepage

    Gutenberg Phase Three

    Gutenberg phase three will start after the WordPress 6.2 release. The next generation of Gutenberg and WordPress will have a real-time collaboration feature that allows multiple people to work together on a post, page, or website. Matt explained that it would feel similar to working with Google Docs, where everyone can see what others are doing on the interface.

    This feature will also allow people to invite others to collaborate in WordPress to edit posts, pages, or themes together. This way, users won’t need to use external tools like Google Docs, plus they’ll be able to benefit from using blocks in their collaborative workflow.

    Post revisions will also receive a revamped interface during phase three, allowing people to edit revisions or check the post or page history.

    Lastly, WordPress will improve the media library with the Openverse integration. This will allow people to download media from the Openverse directly via the WordPress media library, improving the editorial workflow.

    WordPress Playground

    Adam Zielinski developed a new sandbox called Playground. Normally, you need a web host or a local web server to use WordPress. The WordPress Playground, however, will work on web browsers using WebAssembly.

    A browser tab showing the WordPress Playground sandbox

    The sandbox is handy for testing themes or plugins or just trying a new design with the editor. The Playground already shows potential for the future. For example, you can use it as a staging environment to download and clone your WordPress site into your browser, make some edits, and then deploy the changes on your live website.

    WordPress playground is still experimental and in active development, but you can visit the Playground page to test it or even participate in the project.

    Conclusion

    WordPress has progressed a lot in 2022, including core updates like broader Gutenberg integration and community changes like the reactivation of many worldwide events. The introduction of Full Site Editing, now known as Site Editor, is one of the biggest WordPress changes in 2022, and it has changed how people build websites with this content management system.

    As we’re approaching the end of phase two of the Gutenberg project, we can expect another major milestone in 2023 – the introduction of real-time collaboration in WordPress. The new feature will improve our editorial workflow, making WordPress a better platform for creating content.

    The post State of the Word 2022: What WordPress Has Achieved and What’s in Store for the Future appeared first on Hostinger Blog.

    Go to source

  • Top 7 WordPress Accessibility Plugins Every Website Should Be Using in 2022

    Web accessibility refers to ensuring websites can be accessed even by disabled users. If you are looking for an easy way to improve your WordPress accessibility, installing a plugin may be the answer. There are several website accessibility guidelines and regulations to follow. These include the Web Content Accessibility Guidelines (WCAG) 2.1, the Americans with […]

    Read More…

    The post Top 7 WordPress Accessibility Plugins Every Website Should Be Using in 2022 appeared first on Hostinger Tutorials.

    Go to source

  • Understanding WordPress Block Patterns: What They Are and How to Use Them

    First introduced in WordPress 5.5, block patterns have opened the way for the Gutenberg editor to be a full-scale page builder. They help users build complex WordPress websites with minimal time, effort, and technical expertise. In this article, we’ll show you how WordPress block patterns work and how they differ from reusable blocks. You’ll also […]

    Read More…

    The post Understanding WordPress Block Patterns: What They Are and How to Use Them appeared first on Hostinger Tutorials.

    Go to source